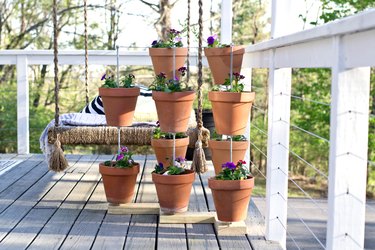
Springtime is here, which means it's the perfect time to spruce up your outdoor area. Whether you're short on space or just love the look, creating a vertical planter is a great option for showing off your favorite flowers. Using simple materials from the hardware store, you can create a striking vertical planter in just a few hours.
Video of the Day
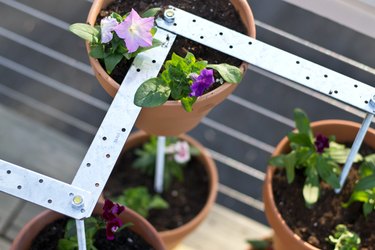
The W-shaped configuration of this planter gives it great stability, and the pots are large enough to accommodate a wide variety of plants. At the end of the growing season, the planter can be easily disassembled for safe storage.
Video of the Day
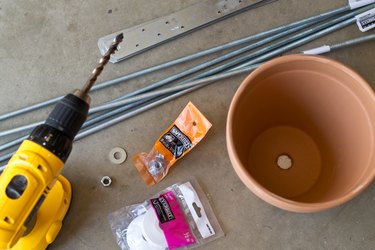
Things You'll Need
Tape measure and pencil
2 x 6 pressure treated lumber, 8 feet
Power miter saw
Kreg pocket-hole jig and pocket screws
Framing square
Drill
3/8-inch twist bit
3/8-inch four-prong T-nuts (5)
3/8-inch diameter threaded rod, 3 feet long (5)
3/8-inch washers
3/8-inch nuts
Hammer
Pliers
3/8-inch tile-cutting drill bit
8-inch diameter terracotta pots (10)
1/2-inch cover flange (found in plumbing section) (20)
12-inch long galvanized steel connector straps (Strong Tie Part No. ER 102) (4)
Gardening gloves
Garden trowel
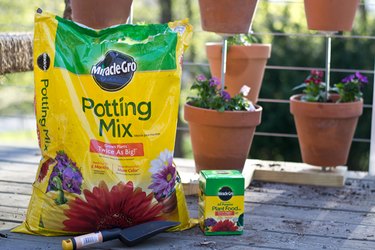
Miracle-Gro® All Purpose Potting Mix (32-ounce bag) (3)
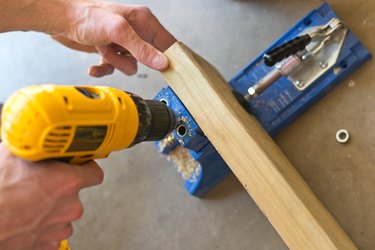
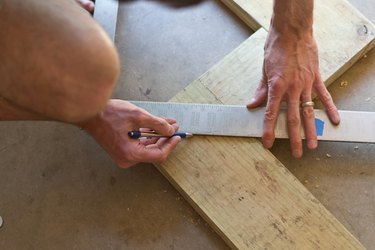
Step 1: Cut Wood Base to Size
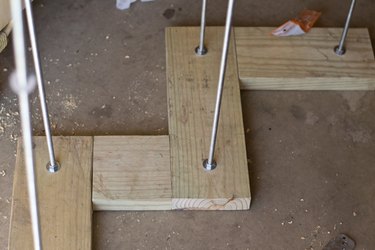
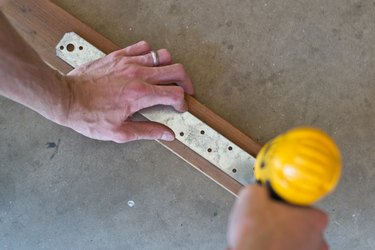
The base of your planter will consist of pieces of pressure-treated 2 x 6s, arranged in a zig-zag "W" pattern. Begin by using your miter saw to cut two 16 1/2-inch long pieces, one 11-inch long piece, and one 5 1/2-inch long piece.
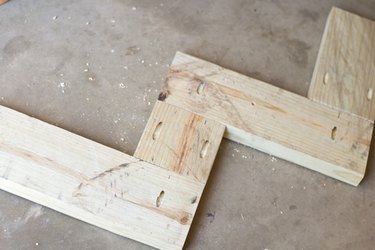
Prepare to connect the wood by drilling pocket holes. Drill one pocket hole in each end of the long sections, and drill two pocket holes in each end of the short sections—as shown in the third image below.

Lay out the pieces in the "W" shape—first a 16 1/2-inch piece, then the 5 1/2-inch piece, then another 16 1/2-inch piece, then the 11-inch piece. Join the pieces together with pocket screws.
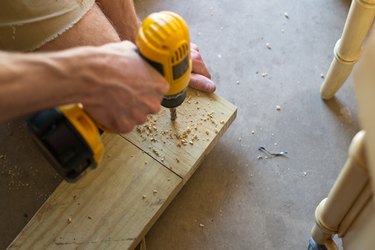
Step 2: Measure and Drill Holes for the Threaded Rods
Find and mark the center points on the three corners and two ends of the wood "W" shape. The centers will be set 2 3/4 inches in from both edges.
Drill 3/8-inch holes through the base at the five marked locations.
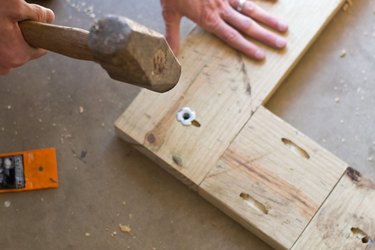
Step 3: Insert the Threaded Rods
On the bottom side of the "W" base, insert a 3/8-inch four-prong T-nut into each of the drilled holes. Pound it flush with a hammer.
Thread a washer and then a nut onto the end of each threaded rod. Screw the nut up a few inches on the rod.
Flip the base over and screw a threaded rod down through the drilled holes and into each of the T-nuts. Tighten each nut down onto the base to securely anchor each rod to the "W" base.
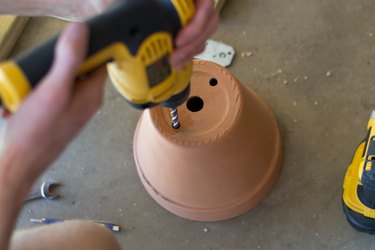
Step 4: Drill Holes Into the Bottom of the Pots
Using an all-purpose bit designed for tile, drill two 3/8-inch drainage holes in the bottom of the pots, near the outside edges. (The existing center drainage holes of each pot will be blocked once the pots are threaded onto the rods in a following step.)
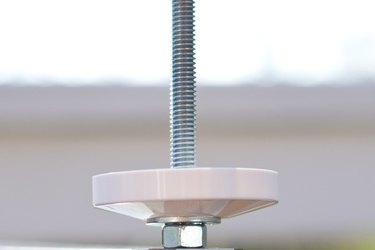
Step 5: Add the First Support Flange onto the Threaded Rods
Measure the desired height for the first level of pots on the threaded rods. Install a nut, a washer and a cover flange on each rod, and screw it down to the desired height.
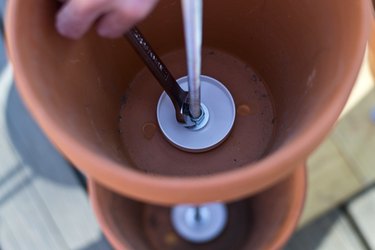
Step 6: Mount the Pots
Slide the first pots down the threaded rods, using the existing center drainage holes. Apply another cover flange, washer and nut. Tighten to secure the pots in place. Measure and repeat for remaining pots, setting them at the desired heights. For the best effect, stagger the height of the pots rather than setting each row at the same height.
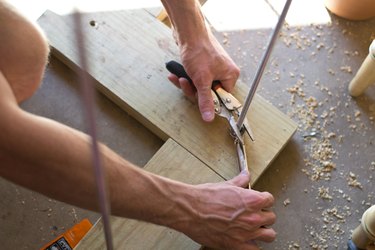
Step 7: Connect the Threaded Rods With Connector Straps
Because the columns of soil-filled pots will be heavy and susceptible to swaying, you will need to stabilize the tops of the pots with a W-shaped reinforcement band, made from ordinary metal connector straps. Begin by drilling a 3/8-inch hole in each end of the connector straps, 1/2-inch in from the ends. The holes will be 11 inches apart, matching the spacing of the threaded rods.
Step 8: Connect the Reinforcement Straps to the Threaded Rods
Thread nuts down onto each rod, about a 1/2 inch, then slide the reinforcement straps onto the rods. Holding the straps at 45-degree angles (the same angles as on the wooden "W" base), secure the reinforcement straps with additional nuts screwed down onto the rods. This will help keep each rod upright, and prevent them from swaying in the wind.
Step 9: Fill Pots With Potting Mix
Put on your gardening gloves and use a garden trowel to fill the pots loosely with Miracle-Gro® All Purpose Potting Mix. Add your plants and additional soil, and then lightly tamp the soil. Water each plant thoroughly, until water begins to seep down through the drainage holes. Newly planted flowers need a good watering to quickly establish themselves in their new environment.
Tip
Adding a trailing flower, like petunias or ivy geraniums, is a good option for a vertical planter because it cascades over the edge of the pot. Pots of this size can accommodate two or even three plants each. An upright plant near the center of the pot and a cascading plant or two near the outside of each pot will soon create a veritable wall of flowering color, completely hiding the hardware.
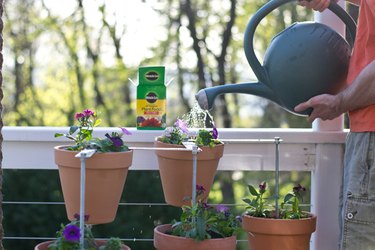
Step 10: Water and Feed Your Flowers
Once your pots are planted, water regularly and after about a month, start feeding with Miracle-Gro® Water Soluble All Purpose Plant Food, following the instructions on the container for quantity and frequency of feeding. Remember to feed routinely for bigger, more beautiful plants!
This post is sponsored by Miracle-Gro ®