
How to Expose Photo Emulsion for Silk Screen Printing
How to Expose Photo Emulsion for Silk Screen Printing. When you have a coated screen ready to go, use the best source of light to expose your screen - the sun!
Things You Will Need
- Coated Silk Screens
- Contact Exposure Units For Silk Screen
- Garden Hoses And Attachments And Water
- Little Red Wagons Or Dolly
- Art-prepared As Transparencies
- Sunlight
-
Place the silkscreen frame - coated with emulsion that's dried - in the contact exposure unit. The well of the screen should have the foam inserted into it and be locked down in position, flat face up.
-
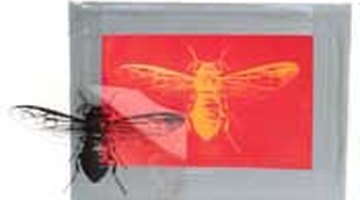
Place the artwork to be exposed (the transparency) on the emulsion surface "wrong reading" (i.e. backwards) in the center of the screen.
-
Place the plate glass over the art, sandwiching the art between the glass and the silkscreen mesh. Make sure there is contact over the entire surface of the art. (The emulsion is slow, so you can do this quickly under normal light.)
-
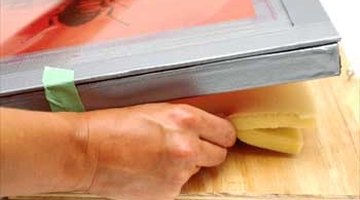
Use a dolly, a little red wagon, or two people to take the entire unit out into direct sunlight, being careful not to disturb the glass or move the art around in any way.
-
Let the contact unit sit in the direct sun for at least 20 minutes. (See exposure times below.)
-
Wheel the contact unit into a shady area (or indoors if there is an area set up for washing inside) after exposure.
-
Disassemble the unit, removing the art and glass from harm's way.
-
Place the screen in an upright position, braced in such a way so as not to move when sprayed with water.
-
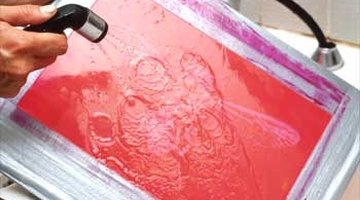
Use a garden hose or power washer to spray the entire surface of the screen with water. At first, do this with low pressure from a distance. Within 2 minutes the screen will start to open up and the positive areas will start washing away.
-
Move closer if necessary, increasing the pressure of the hose and focusing it on any areas that do not seem to be washing away.
-
Continue until all the positive, unexposed places in the screen are washed clear.


Tip
Exposure times will vary depending on the time of year, haze, cloud cover and time of day. On a clear day at noon in the summer, 20 minutes is enough time to harden the exposed emulsion. On a clear day at noon in winter, 40 minutes will be the likely exposure time. Under hazy, cloudy conditions or with exposure during the late afternoon, it might take up to 2 hours, so plan accordingly. The emulsion should change color from a light pink or light blue-green to a dark blue-green when fully exposed. A photo-flood, sunlamp bulb, or even flourescent light can be used, but you will have to test exposure times specific to the particular light source you use. Always keep the distance from the bulb to the screen constant when testing. The exposure process works like this: The emulsion responds to the UV rays of the sun. The light hardens the unprotected (the clear, or negative) areas of the screen's coated surface, preventing ink from being pushed through. Protected (positive) areas of the screen do not receive the UV rays and, therefore, remain soluble in water. Clean the glass before using. Make sure weather conditions are conducive to the amount of exposure time you have.
Warning
The contact unit with the screen and plate glass is heavy, so don't lift it by yourself. Be careful not to use too much water pressure when developing the screen. Initially, the entire surface is somewhat delicate and could be penetrated by the water under high pressure. If the emulsion surface begins to run in a smeary mass down the surface of the screen, you used too much photo emulsion in the coating process. Wash out completely and let dry before coating again.
Tips
- Exposure times will vary depending on the time of year, haze, cloud cover and time of day. On a clear day at noon in the summer, 20 minutes is enough time to harden the exposed emulsion. On a clear day at noon in winter, 40 minutes will be the likely exposure time. Under hazy, cloudy conditions or with exposure during the late afternoon, it might take up to 2 hours, so plan accordingly.
- The emulsion should change color from a light pink or light blue-green to a dark blue-green when fully exposed. A photo-flood, sunlamp bulb, or even flourescent light can be used, but you will have to test exposure times specific to the particular light source you use. Always keep the distance from the bulb to the screen constant when testing.
- The exposure process works like this: The emulsion responds to the UV rays of the sun. The light hardens the unprotected (the clear, or negative) areas of the screen's coated surface, preventing ink from being pushed through. Protected (positive) areas of the screen do not receive the UV rays and, therefore, remain soluble in water.
- Clean the glass before using.
- Make sure weather conditions are conducive to the amount of exposure time you have.
Warnings
- The contact unit with the screen and plate glass is heavy, so don't lift it by yourself.
- Be careful not to use too much water pressure when developing the screen. Initially, the entire surface is somewhat delicate and could be penetrated by the water under high pressure.
- If the emulsion surface begins to run in a smeary mass down the surface of the screen, you used too much photo emulsion in the coating process. Wash out completely and let dry before coating again.
Writer Bio
This article was written by the CareerTrend team, copy edited and fact checked through a multi-point auditing system, in efforts to ensure our readers only receive the best information. To submit your questions or ideas, or to simply learn more about CareerTrend, contact us [here](http://careertrend.com/about-us).
More Articles