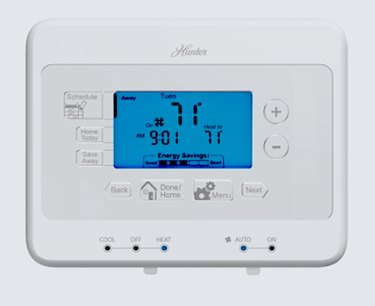
Indiglo thermostats are digital programmable thermostats from the Hunter company. The term "Indiglo" refers to the proprietary backlighting feature that allows the display screen to be easily readable at night.
Hunter currently makes a relatively small line of programmable thermostats, including models 44157 (offering a 5-day, 2-day programming capability for setting separate programs for work-week days and weekends) and the 44378 (a 7-day programmable model that allows a separate set of programs for each day of the week). There are also older models featuring the Indiglo screen, but these will be programmed in much the same way as the current models. Models such as 44660 and 44668, for example, will be programmed in exactly the same way, although the control buttons that operate the features may look a little different.
Video of the Day
Video of the Day
The programming method for Hunter Indiglo thermostats will be quite familiar to anyone who has programmed a thermostat from Honeywell or another major manufacturer. Like any programmable thermostat, the goal is to automate the temperature settings, allowing you to save energy costs through preprogrammed setbacks for nighttime or when you are away from the home.
The following instructions are based on the Hunter model 44377 thermostat, but the process is easily adapted to any of the Hunter Indiglo models.
Step 1: Set the Day and Time
- If the thermostat is displaying the wrong day, press the MENU button repeatedly until the setting you wish to change begins to flash. If the day of the week is incorrect, for example, press MENU until this display begins to flash.
- Use the "+" and "—" keys to move the day forward or backward to the correct day.
- Press NEXT to move to the next function. When the time display begins to flash, again use the + and - keys to adjust the time to the correct setting.
- When the correct time and date display, press the HOME/DONE button to lock in the time and date.
Step 2: Set the Day Programs
- Press the SCHEDULE button to enter scheduling mode.
- Press the + or - key until the display reads ON, indicating the scheduling mode is activated.
- MONDAY will be flashing on the screen. Press NEXT to begin scheduling the program for that day.
- The first time period will be the AWAY setting, which will flash on the screen. Press the NEXT button to activate the process for programming that time period.
- Use the + and - buttons to set the start time for the AWAY program. When the correct time is set, press NEXT.
- Now use the + and - buttons to set the end time for the first time period.
- Press the NEXT button again, which will activate the flashing HEAT TO display. Use the + and - keys to set the high temperature allowed for this time period. When the correct HEAT TO temperature is displayed, again press the NEXT button.
- Now, the COOL TO setting will be flashing on the display. Again use the + and -buttons to set the minimum temperature you want.
- The next press of the NEXT button will send the thermostat into the next time period, SLEEP. Repeat the above steps, alternating between the NEXT button and the + and - buttons to set the start and end times, and the maximum and minimum temperatures.
- Continue for all time periods available on the thermostat. Our example has four settings: AWAY, SLEEP, WAKE, and AT HOME.
- Once all programs for the day have been set, the screen will flash SCHEDULE UPDATED, and will then return you to the SELECT DAY screen. Use the + and - keys to move to the next day, which will flash on the screen.
- Initially, the screen will ask you if you want to "COPY DAY?" You can either select YES or NO using the + and - buttons. Once you have programmed the next day—either through copying or entering additional time and temperature settings—the display will again read SCHEDULE UPDATED and send you to the SELECT DAY screen to continue to the next day.
- Once programs for all days have been set, press the HOME/DONE button to exit the programming mode. You have now programmed your Hunter Indiglo thermostat.
Additional Features
To Turn Off the Programming
- Press the SCHEDULE button.
- Use the + and - keys to toggle to OFF.
- Touch the SCHEDULE button again. The screen will now display the word UPDATED.
- Now the thermostat will remain set at whatever temperature you set using the + and - buttons.
Home Today
The Home Today feature allows you to override the different schedule periods for a single day and will hold the temperature at whatever setting is normally programmed for the AT HOME period for the entire day. It is a helpful feature on those days when you vary from your normal routine and remain at home.
Simply press the HOME TODAY button. At the end of the day, the thermostat will automatically revert to its normal function.
Save Away
This function can be useful on those occasions where you plan to away from home for an extended period, such as for long weekends or when you are on vacation.
- Touch the SAVE AWAY button.
- The hours and days display will be flashing on the screen. Use the + and - buttons to set the length of period you would like the thermostat to hold your home at the AWAY temperature settings.
- Press the HOME/DONE button to lock in this setting. The thermostat will now maintain this temperature range until the time expires, then will return to its standard programming.
Temporary Temperature Override
- Press the + and - buttons to set the temperature to a new level.
- Press DONE/HOME. This will lock in the new temperature, but only until the next program period is due to begin.