
Homemade Rubber Molding

By creating homemade rubber molds, you can inexpensively reproduce small household objects. Rubber molds are particularly useful for casting copies of small sculptures and ornaments. They can be reused many times, allowing you to produce many copies your artwork or favorite decorations.
You can then use your rubber molds to cast objects in plaster, Portland cement, gypsum, polymer resins, wax or silicone.
Materials for Homemade Rubber Molding
There are commercially available rubber molding compounds that you can use to make your homemade rubber mold. These compounds typically consist of liquid rubber and a separate catalyst. Silicone rubber is preferable since it makes more durable, longer-lasting molds than latex rubber compounds. You must mix the catalyst with the liquid rubber before pouring the mold around the object to be cast. Since it typically takes hours for the rubber to set, you have plenty of time to pour the rubber after mixing the compound. You must also use an oil-based or polymer modeling clay to create a container to cast your homemade rubber mold.
Making Homemade Rubber Molds
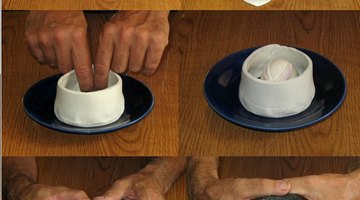
Roll the clay out in a thin strip over a board with a rolling pin. Then cut the sides with a craft knife so that the edges are straight. Cut the ends of the clay on a diagonal. Roll the strip of clay into a cylinder shape and place it on a plate or other flat, non-porous surface. Press the clay cylinder downward onto the surface to create a seal so that the rubber mold compound won't leak out.
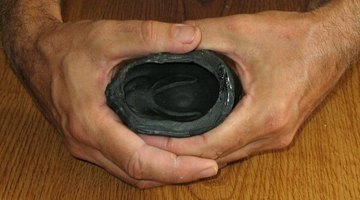
Coat the object you would like to cast in a release agent such as petroleum jelly or spray lacquer. This will allow you to easily remove the object after the rubber mold has set. Place the object inside the clay cylinder. Mix the rubber compound together pour it into the clay cylinder over the object. Tap the plate to vibrate the air bubbles out of the rubber molding compound. Allow the rubber mold to rest for several hours or for the amount of time recommended by the manufacturer. Remove the cast object from the rubber mold.
Making Casts from Rubber Molds

Before you begin casting, apply a coat of release agent such as liquid soap or glycerin to the inside of the rubber mold. Always pour the casting material into the mold slowly and in a thin stream. Tap the mold gently to allow the air bubbles to rise to the surface of the casting material. When the cast has set, gently flex and stretch the rubber mold, then slowly pull the object out. In some cases, you may need to make a small cut in the rubber mold to release the cast object. Use rubber cement to reseal the cut portion of the rubber mold.
Resources
Writer Bio
Jennifer Claerr is a web writer who has written for online sites such as Demand Studios, NBC5i.com, Texas.com and PC.com. She has a degree in art from the University of Texas at Arlington. She writes on a variety of topics, including holidays, health and fitness, travel, computers and art.
More Articles