Things You'll Need
Deer headskin or cape
Deer form
Drill with various bits and sander
Hide paste
Modeling clay
Glue
Glass or plastic eyes
Needle and brown thread
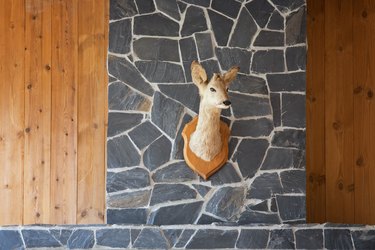
If you recently shot an exceptional buck, it would be a shame to let the head and antlers go to waste. While most trophy hunters send their kills to professional taxidermists to get them mounted, it is possible and relatively simple to mount your own deer head. You will need some artistic skills, though. Deer forms come with no detail and you have to carve them yourself if you want to make them lifelike. Try studying photographs of deer before you start carving in order to get an idea of what you should be aiming for.
Step 1: Measure the Deerskin and Order the Form
Measure your deerskin and order an appropriately sized deer form from a taxidermist.
Video of the Day
Step 2: Sand the Form
Sand your deer head form to a smooth finish. The forms come with no detail, so you will have to use your drill and add realistic looking grooves around the eyes, nose, and mouth. Make sure to work slowly so that you do not make a mistake and damage your form. Drill out holes for the nostrils and use a sharp knife to create a septum in the middle of the nose.
Step 3: Remove the Cartilage
Gently tug out the cartilage from the ears of the deerskin and insert the ear liners that came with your form to see if they fit. The ear liners come separate from the rest of the form, but should be included. If the liners are too big, you can trim them to the correct fit by sanding them down. Rub glue all over the ear liners and insert them into the ears of your deerskin, carefully adjusting the liners within the ears to make sure that you have them in straight.
Step 4: Apply the Deerskin to the Form
Insert the form into the deerskin and verify that it fits and that the antler skull plate is flush with the top of the head. Glue the antlers into place, making sure that they are tilted in an anatomically correct fashion. If the antlers are especially large, drill small holes into the skull plate and screw them in for added security.
Step 5: Adhere the Modeling Clay
Gently tug the deerskin back from the face of the form and apply a layer of modeling clay around the eyes and nose into the detailed grooves you drilled out. Glue your deer eyes into the eye sockets with the pupils parallel to the ground.
Step 6: Smooth on the Hide Paste
Spread the hide paste all over the form and pull the face of the deer skin back over the form. Make sure that the skin fits correctly over the form and you do not have any crooked places. If the skin is too big for the form at any point, build up some mass with the modeling clay beneath the skin, so that it fits perfectly.
Step 7: Close the Incision
Sew up the Y incision at the back of the deer's head, so that the form is tightly enclosed by the skin. Staple the deerskin into place at the base of the form.
Step 8: Dry the Deer Head Completely
Mount the deer form to the plaque that it came with. Hang the plaque on the wall upside down for two weeks to allow the deer to dry completely. The deer head mount is then ready to be displayed.
Video of the Day