Zedcor Wholly Owned/PhotoObjects.net/Getty Images
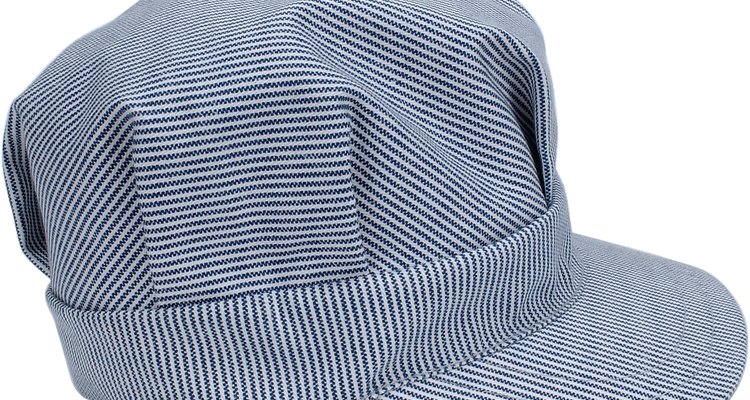
A railroad conductor cap is a fun accessory. Whether you want to wear a railroad conductor cap for a theme party or as a part of a Halloween costume, it’s the hat that makes the outfit complete. If you follow the directions below, you will have a sturdy, durable conductor cap that you can wear over and over for many years to come.
Preparation
Make the cap band pattern pieces. Draw a long rectangle on the newspaper that measures 24 “ long by 2” wide. This is the inside band. Cut out the newspaper and mark the pattern piece “inside band.” Draw another rectangle on the newspaper 2 ½ inches wide by 24” long. This is the outside band. Cut out the newspaper and mark the pattern piece “outside band.”
Make the cap bill pattern piece. Draw a rectangle on the newspaper that measures 4 ¼ inches long by 5” wide. Draw a curve around two of the corners along one of the 4 ¼ inch side. Cut out the newspaper and mark the pattern piece “bill.” Also write on the pattern piece that the curved edge should be placed on the fold when cutting out the fabric.
Make the head pattern piece. Draw a 12 by 12 inch square on the newspaper and cut it out. Cut the corners off the 12 by12 square so that you have an octagon with 5” sides. Label this piece “head piece.”
Cut the fabric. Lay each of the pieces out on the fabric and pin to secure them in place. Be sure you lay the bill pattern piece on the fold.
Cut the interfacing. You will need one piece of interfacing cut from the outside band pattern piece and one from the bill pattern piece. Note that the interfacing for the bill does not need to be placed on the fold.
Apply interfacing to the two pieces: outside band and one side of the bill. Be sure you apply the interfacing to the wrong side of the fabric.
Assembly
Make the bill. Fold the bill in half, right sides together. Machine stitch around the curved edges. Do not stitch the long straight edge.
Trim the seams on the bill and clip the curves.
Turn the bill right sides out and push the fabric out so that the outside of the seam is pulled tight. Press.
Top stitch from one side around the curved edges to the other side. Top stitch another row close to the first one.
Cut the corners of the raw edges of the bill almost as round at the outer edge of the bill.
Make the bands. With right sides together, sew the two ends of the bands together so that you have a large circle. Note that because the two ends are different sizes, you will have part of the outside band left out. Make sure that the left over part of the outside band is along the same long edge at both ends.
Attach the bill to the inside band, right sides together, with a machine basting stitch.
Pin the outside band, right sides together, over the bill to the inside band so that the bill is sandwiched in between. Machine stitch. Clip the curves around the bill.
Turn right sides out and push the seam so that it is pulled tight. Press.
Fold under the outside band to form a hem and press.
Shape the head piece. Lay the octagon out on a flat surface. Pinch the corners of one flat side of the octagon and bring them to the center. Pin the two folds in place. Repeat this step all around the cap. This will form a curved shape all around the head piece. Machine baste close to the edges.
Attach the head piece to the outside band, right sides together. Align the front of one of the pleats with the center of the bill. Pin in place. Ease the rest of the cap into the circle of the band and pin into place. Machine stitch.
Remove all basting and trim all loose threads.
Related Articles

How to Make a Men's Baseball Cap
How to Make a Poncho From a Blanket
How to Curve a New Era Cap
How to Make a Dew Rag
How to Make a Cowboy Hat Smaller

How to Lengthen Dress Coat Sleeves
How to Make Fleece Gloves

How to Attach Stampede Ties to a Cowboy ...

How to Replace a Sweatband on a Cowboy ...
How to Make an Easy Child's Colonial ...
How to Hold a Band on a Cowboy Hat

How to Make a Mary Poppins Bag
How to Sew a Medieval Cowl

How to Put Rank on an ACU Cap
How to Fold a Krispy Kreme Hat
How to Stop Sweat from Staining Golf ...
How to Bustle a Mermaid Dress

How to Shape a Ball Cap to Your Head

How to Make a Clerical Shirt

How to Remove the Lining on a Peg ...
References
Writer Bio
River Lin is an independent writer and consultant. With a Master's degree in teaching English as a second language from Ball State University. She lived in Japan for 15 years teaching and editing. Now based in the US, she works for a variety of clients. Published work can be found in print and online at various websites and goarticles.com.
Photo Credits
Zedcor Wholly Owned/PhotoObjects.net/Getty Images