When your Makita weed trimmer runs out of string, it's a simple procedure to remove the spool so you can either rewind more string or install a new spool that has been pre-strung at the factory. The latter option is definitely easier, but winding string is no big deal either, and it saves you from having to keep a supply of pre-strung spools in your workshop.
The procedure for removing the spool is basically the same for gas-powered and cordless trimmers, although the size of the string you need varies by model, so be sure to check that in your owners' manual. If the string you use is too thin, it may not do the job, but if it's too heavy, the trimmer motor will overwork and may fail. That's one advantage of buying a pre-strung spool: You can't make a mistake on string size.
Video of the Day
Video of the Day
How to Change a Makita Weed Trimmer Spool
Step 1: Disable the Trimmer
Remove the battery if you're changing the spool on a cordless trimmer or pull the spark plug wire off the plug if it's a gas-powered model. This may seem like an unnecessary step, and if you're in the middle of a trimming job, you may be tempted to neglect it, but don't, especially if it's a cordless model. If the trimmer starts up while you're working, you could be seriously injured.
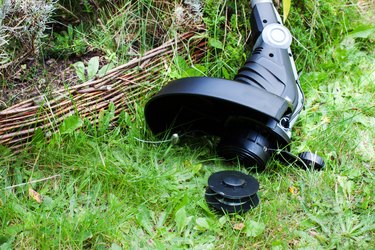
Step 2: Position the Trimmer So You Can Work
Set the trimmer on a flat surface with the trimmer head guard resting on the surface and the trimmer head facing you.
Step 3: Remove the Spool Cover and Spool
Note the two tabs on the side of the spool cover positioned directly opposite each other. Fit your hand over the spool with a finger touching each tab and squeeze them together. This loosens the spool cover, and it should slip right off into your hand, exposing the spool. Slip the spool off the rotary shaft carefully because it's spring-loaded, and you don't want the spring to pop off.
Step 4: Replace the Spool and Spool Cover
Slip on a new spool or the same spool after you've restrung it. Push it onto the shaft to depress the spring and hold it in place. Align the two tabs of the spool cover with the notches on the trimmer head, slip the cover onto the spool and push until you hear it snap in place.
Step 5: Prepare the String for Cutting
Give the strings a little tug to be sure they are disengaged from the locking notches on the spool. Stretch them out as far as the cutter on the side of the head guard and cut them to that length. You're now ready to get back to trimming.
Restringing the Spool
If you decide to restring your old spool, cut a length of trimmer string about three arms in length and bend the string back on itself to make two lengths, one about four fingers shorter than the other. Hook the bend onto the notch on the inside of the spool and wind the string in the direction shown on the head guard, keeping tension of the string to prevent it from unraveling.
When you're finished winding the string, hook each end into one of the two locking notches on the rim of the spool. You're now ready to install the spool into the trimmer. Don't forget to tug on the strings after you've replaced the spool cover to free them from the locking notches.