
How to Build Wooden Arches

One of the most beautiful things to see in a home is wooden arches. Many homeowners would love to have some in their homes were it not for the expense of hiring a craftsman to do it. However, with the right tools and tenacity, the beauty of wooden arches can be a part of every home.
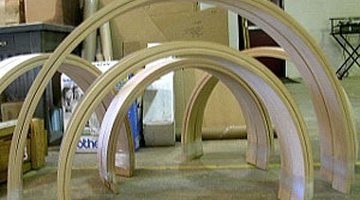
Here, we want to create an arched jamb to fit on an arched opening in a room.
Things You Will Need
- 6 Strips of desired lumber 1/8 inch thick by 6 inches wide by 96 inches long
- 1 strip of lumber ¼ inch thick by 1 inch wide by 96 inches long
- Wood glue
- Measuring tape
- Pencil
- 15 “T” forms
- 15 Screw clamps
- 1 Strip of 1/4 inch Masonite 6 inches wide by 96 inches long
- Air compressor
- Pneumatic stapler
- 3/4 inch staples
- Table saw
- Jointer
Tip
Always wear safety glasses. Be certain to use enough glue to cover the whole laminated area.
Warning
Never the set the height of the table saw blade and more than needed to make the cut. Exercise extreme caution when operating a jointer.
-
Measure the width of the arch and record the number. Next, measure the height of the arch from the center point of the opening and record the number.
-
Draw the arch on a table by drawing a horizontal line the width of the arch; be sure to mark the center point. Next, draw the height of the arch on the 1 inch strip of lumber. Drill a hole at one of the marks and secure the other one to the center point marked on the table. This will enable you to draw the arch.
-
Measure and mark a line 7/8 inch on the inside of the arch line drawn on table. This will allow for the “T”s set up and the 1/8 inch Masonite strip.
-
Mark the “T”s 1/8 of an inch from the inside of the vertical form. Secure the “T”s on that mark with two 2 ¼ inch screws.
-
Secure the 1/8 inch Masonite strip to the front of the vertical form of the “T”. Secure this strip with pneumatic stapler. Place a strip of masking tape on the front of the “T” form to cover the vertical and horizontal areas of the “T”.
-
Place a liberal amount of glue to one side of five of the six 1/8 inch strips of lumber. Turn the glued side to the unglued side of the next piece until all six pieces are together.
-
Place the center of the glued material against the 4 inch Masonite and secure it to the “T” form with a screw clamps.
-
Place the remaining screw clamps to the “T” forms until the lumber is secure against all of the “T” forms.
-
After glue has set, usually over night, remove the clamps and the arched trim from the “T” forms.
-
Joint one edge until smooth. Next, carefully rip the width of the piece needed on a table saw.
The Drip Cap
- One of the most beautiful things to see in a home is wooden arches.
- However, with the right tools and tenacity, the beauty of wooden arches can be a part of every home.
- Next, draw the height of the arch on the 1 inch strip of lumber.
- Secure the 1/8 inch Masonite strip to the front of the vertical form of the “T”.
- Secure this strip with pneumatic stapler.
- Turn the glued side to the unglued side of the next piece until all six pieces are together.
Resources
Writer Bio
Michael Straessle has written professionally about the construction industry since 1988. He authored “What a Strange Little Man,” among other books, and his work has appeared in various online publications. Straessle earned a Bachelor of Arts from the University of Arkansas at Little Rock in professional/technical writing.
Photo Credits
- www.circletrim.com
- www.circletrim.com
More Articles