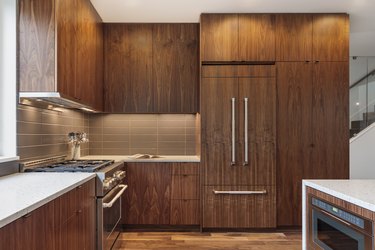
Restaining kitchen cabinets is a great way to update the look and feel of your kitchen, for a fraction of the cost of replacement. Typically, restaining cabinets is a long and involved process, but it doesn't have to be. There are less time-consuming ways to accomplish updating the look of your kitchen cabinets, using some quick and easy restaining methods and the right set of tools.
Restaining Cabinets With Tinted Varnish
Video of the Day
A tinted varnish changes the appearance of kitchen cabinets without being overly drastic. Tinted varnishes provide a new sheen to cabinetry, enhancing the original woodwork by deepening the color richness with subtle hues. The application takes only a few hours and requires no special tools other than a paintbrush. While applying tinted varnish is faster than refinishing cabinets, you will still have to prepare the surfaces by removing knobs, pulls, cabinet doors and drawer facings, and cleaning and sanding your cabinets before application.
Video of the Day
Restaining Cabinets With Gel Stain
Gel stains come in a wide variety of color choices. Staining wood cabinets gives you a complete color change solution, but only if your goal is a darker stain. It doesn't take long to apply a gel stain with a paintbrush — the process is very fast, with minimal drying times; however, the basic area preparation required is similar to the prep needed for application of tinted varnishes.
Prepping to Restain
Selecting the right products to prepare kitchen cabinets before restaining them plays a big role in how quickly you can complete your project. Cleaning the drawers, cabinet doors and other surface areas with trisodium phosphate (TSP) helps remove buildup and stains much more quickly than using just soap and water. Using sanding sponges or 120-grit sandpaper and hand-sanding the finish before applying the stain means the stain will go on more quickly and evenly than if you opted to skip this step.
Cabinet Staining Tips
Applying the stain or varnish with the existing grain of the cabinets results in a more professional look. Once the stain or varnish is applied, wait 24 hours for it to dry, or follow the the drying times listed on the packaging if you purchased a quick-drying varnish or stain. Reapply stain and varnishes in thin coats to achieve darker colors, allowing adequate drying time between each coat.
Going Gray Isn't Easy
It's worth pointing out that a quick restain inevitably means going to at least a slightly darker color. This is usually fine because many dark tones are on-trend, and they make a good complement for stainless-steel appliances and white or pale countertops and backsplashes. If your starting point is the the relatively golden hue commonly given to oak cabinetry in the 80s and 90s, you may need to apply several coats to make the finish as dark as you'd like.
If you want to take your cabinets to a lighter tone, for example staining oak cabinets gray or giving them a stylish bleached look, there is unfortunately no quick and easy option. To achieve those effects, you'll need to commit to a full-scale campaign of stripping, sanding and refinishing from scratch.