Highlights
- You don't need to rely on a set schedule to regrout your tiles.
- Inspect the grout joints periodically to ensure they're still in good shape.
- Cracking, peeling, and noticeable wear can all indicate that it's time for new grout.
- Make sure the substrate behind or beneath your tiles is in good condition before you regrout your tile.
- Protect your grout by resealing it annually, if it is a type that requires sealing.
- Always use a new grout that is compatible with the old grout.
You may find that you need to regrout bathroom tile from time to time, but this home improvement job doesn't need to happen on a set schedule. New grout is required only if something goes wrong with your existing grout. It's important that your grout remains in good condition so that it can do its job, which is to protect the substrate beneath or behind the tile. But this is definitely a situation where if it isn't broken, it's best not to fix it.
Why You Need Grout
Video of the Day
Grout serves some important functions for bathroom tile installation. This cement-based, epoxy, or acrylic product fills the gaps (called grout joints or grout lines) between the tiles to create a watertight surface that is durable and easy to clean. Grout also helps even out a tile installation by bridging slight variations in tile thickness. In the bathroom, kitchen, and other wet areas, grout is crucial for preventing water from seeping between the tiles and reaching the materials behind the tile surface.
Unfortunately, water, normal use, and foot traffic can eventually wear down or crack the grout, breaching the watertight barrier. Normal house settling can also damage the grout in your home.
Choose the Right Grout Type
Grout comes in several different types and formulations. When regrouting, be sure to use the right type of grout for the application, and make sure it is compatible with the old grout — if you're not removing the old grout completely. Here are the basic types of grout you'll find at the home center:
- Sanded grout is typically used for floor tile and any grout joints wider than 1/8 inch.
- Unsanded grout is used for joints 1/8 inch wide or smaller and for glass and other types of tile that can be scratched by sand.
- Standard cementitious grout comes in powder form and hardens when mixed with water, much like mortar or concrete. It should be sealed.
- Premixed grout is made with acrylic polymers and does not contain cement. It hardens by drying. There's no mixing required, but it's trickier to install than standard grout. It does not need to be sealed.
- Epoxy grout is a high-strength grout that hardens like epoxy glue. It's the most durable grout but is the least DIY-friendly. It does not need to be sealed.
When to Regrout Bathroom Tile
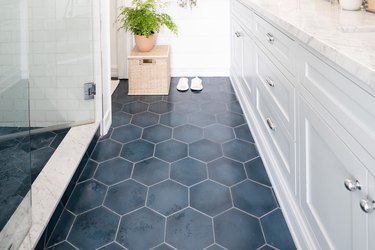
Grout can last for a very long time when it's not subjected to a lot of movement, wear, or water. Instead of relying on a set schedule to regrout bathroom tiles, inspect the grout joints periodically to ensure they're still in good shape. Grout that's cracked, missing, or peeling should be replaced as soon as possible. The longer that compromised grout is ignored, the more likely it is that water will damage the wall or subfloor behind your tile, potentially causing even bigger problems.
Is There Mold Behind the Tile?
Grout is porous, and when mold begins to grow on its surface, there's a possibility that the mold is coming from behind the tile. One sign of this condition is that the mold returns after you clean it from the tiled surface. Another sign is that the tiles are loose or the wall or floor behind the tile sounds hollow or feels spongy when you tap or press on the tile. If you discover any of these symptoms, you'll have to remove one or more tiles to investigate further. Do not simply replace the grout if you suspect there is mold behind the tile.
Do You Need to Regrout?
Before you dig into this project, take a few minutes to assess the job. Grout that is merely discolored with dirt, grime, or lime scale from water does not need to be replaced unless you want to improve the look. Often, cleaning and resealing grout can remove surface discoloration. Even if the grout lines remain discolored, they're still protecting the tiles and materials behind them, so replacement isn't necessary except for cosmetic reasons.
You should also try to determine the condition of the surface behind your tile. Listen for a hollow sound as you tap on your tiles to ensure water hasn't eaten away at the wall behind them. Check for loose or cracked tiles, which could indicate a larger structural issue than just cracked grout. If you have larger issues than just faulty grout, you'll want to address them before you regrout tile.
How to Regrout Bathroom Tile
Before you begin working, lay a drop cloth over your bathtub or shower, if necessary. The old grout that comes out from between your tiles will be rough and could scratch the surface of your tub or shower base.
It's important that you remove the grout from all of the tile edges, but be careful not to damage the tile in the process. You may not need to remove the grout all the way to the substrate; the amount you should remove should be specified by the manufacturer of the new grout. This may vary from about 2 mm to at least one-half the thickness (depth) of the grout joint.
The method for applying new grout described here is for conventional cementitious grout; premixed and epoxy grout involve different steps and waiting times. Follow the manufacturer's instructions no matter what grout you use.
- Use a damp sponge or cloth to clean the surface of the tile and the grout thoroughly to remove all soap scum and grime. Rinse well, and wipe the tile dry with a clean towel.
- Remove any handles, accessories, or other hardware that will be in your way as you work.
- Dig out the old grout from between the tiles with a grout saw, oscillating tool, or other grout removal tool. You can also use a utility knife (replacing each blade as soon as it dulls) or an old-fashioned church key can opener. Clean the joints as you work with a shop vac.
- Remove the drop cloth and vacuum the work area thoroughly.
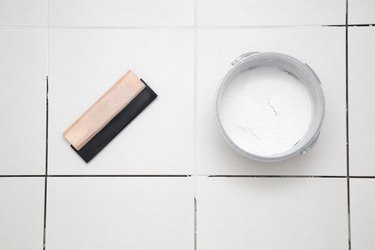
- Mix a batch of the new grout as directed by the manufacturer.
- Spread the grout over the tiles and grout joints with a rubber grout float or trowel, holding the tool at a 45-degree angle to the tile surface and moving it diagonally to the grout joints. Make sure you are pushing the grout into the joints and not just spreading it across the surface. Work in a 3 x 3-foot area at a time.
- Remove excess grout as you work by holding your float or trowel at a 90-degree angle and scraping away the excess.
- Let the grout set up as directed. It must be partially hardened before moving to the next step.
- Wipe the tiles and grout with a grout sponge dampened (not dripping wet) with clean water. Wipe diagonally across the joints so the sponge doesn't pull grout out of the joints. Rinse the sponge frequently in a bucket of clean water.
- Allow the grout to harden as directed, then wipe again with the grout sponge to remove the majority of grout haze from the tile surfaces.
- Let the grout cure as directed, then remove the grout haze from the tiles by rubbing with a damp microfiber cloth followed by a dry cloth.
- Let the grout cure completely, as directed.
- Caulk all joints where the tile meets plumbing fixtures or adjoining walls, ceiling, or floor. These joints do not get grouted because mating surfaces or materials can move and crack the grout.
- Allow the caulk to dry as directed, then apply a grout sealer to all of the new grout.
Tip
If a grout haze has dried on your tiles and you can't remove it, apply a grout haze remover product from your local hardware store. Haze removers can do the job quickly and easily. Do this before you seal your grout.
How to Protect Your Bathroom Tile Grout
The best way to protect your grout is to seal it. Unlike installing new grout, however, resealing is a job that you should do on a schedule. Many professionals recommend resealing your grout once a year. A heavily used family bathroom may need to be sealed every six months, however, while a seldom-used guest bath may be able to go two years between grout sealings. Whenever you reseal your grout, make sure it is clean and dry before you begin so you don't trap dirt or mildew under the sealant.