A fun day in the pool is not complete without a comfortable floating lounge chair to soak up the sunshine, especially one with an attached cup holder. Rather than buying an inflatable pool chair, make your own with a yoga mat and pool noodles, and then kick back with your favorite drink and enjoy a relaxing day on the water.
Video of the Day
Things You'll Need
Yoga mat, 74-inches long
Tape measure
Styrofoam pool noodles, 7
Box-cutter
11-inch cable ties, 20
Plastic rope
Scissors
Pen
Tip
If you do not have plastic rope available, regular rope will also work, but the chemicals in pool water may weaken it over time.

Step 1: Cut Two Noodles for a Head Rest
Roll out the yoga mat and measure the width of the mat. Using a box-cutter, cut a pool noodle into two pieces equal to the width of the mat. These two noodle pieces will be used to build a head rest.
Video of the Day

Warning
Use caution while using the box-cutter.
Step 2: Roll the Noodles into the Mat
Place one of the noodles you just cut along the end of the mat and roll the mat around the noodle. Place the second noodle in front of the wrapped one and roll the mat around the second noodle so that both noodles are rolled into the mat.

Step 3: Secure the Head Rest with Cable Ties
Place the box cutter inside the hollow center of the first pool noodle, about 2 inches in from the edge of the mat. Press the box cutter down, creating a hole through the pool noodle and the yoga mat. Thread a cable tie through the holes in the pool noodle and the mat and tighten the cable tie, securing the pool noodle and mat in place. Repeat this process on each end of the pool noodles, securing all four ends of the noodles to the mat. Trim the excess cable ties with scissors when you are finished.

Step 4: Add Noodles for Floatation
Turn the yoga mat over and lay two pool noodles along each long side of the yoga mat, just below the head rest. Use the box cutter to poke five holes on each side of the mat, along the inside edge of the pool noodle. These holes will be used to secure the noodles to the mat. There will be excess pool noodles hanging off the end of the mat, but do not cut this off -- you will use this to create a foot rest.

Step 5: Secure the Noodles to the Mat
Thread a cable tie around the pool noodle and through the hole in the mat and tighten the cable tie, securing the noodle to the mat. Attach the rest of the pool noodle to the mat with a cable tie at each of the holes you created. Repeat with the pool noodle on the other side of the mat. When you are finished, both pool noodles should be snugly tied to the sides of the yoga mat. Trim the excess cable ties after the noodles are attached.

Step 6: Cut Noodles to Make a Foot Rest
Measure the distance in between the two excess pool noodles sticking out at the end of the mat and make note of the measurement. Use the box-cutter to cut two pieces of noodles equal to the distance you just measured.

Step 7: Tie the Foot Rest Together
Thread one end of the plastic rope through both of the pool noodles that you just cut. Tie them together by tying the ends of the rope in a tight knot. Cut off the excess rope with scissors. These two pieces of pool noodles will become the foot rest.

Step 8: Attach the Foot Rest
Secure the foot rest to the excess pool noodles hanging off the end of the mat by sliding a cable tie between the two pieces of the foot rest and tightening it around the excess noodles at the end of the mat. Attach both sides of the foot rest with cable ties and trim the excess cable ties to prevent them from poking someone during use.

Step 9: Build Arm Rests
Cut two pool noodles in half with the box-cutter, giving you a total of four pieces. Thread plastic rope through two of the noodle pieces and tie them tightly together. Tie the other two noodle pieces together with plastic rope as well, creating two arm rests for the chair. Trim the excess plastic rope after you have tied a tight knot.

Step 10: Build a Cup Holder
Cut a 4-inch piece of pool noodle with the box cutter. Stand the pool noodle upright and place your favorite summer beverage on top of the noodle. Use a pen to trace the outline of the beverage bottle on the pool noodle.

Step 11: Hollow Out the Cup Holder
Use the box-cutter to cut out the center of the pool noodle, using the line you drew as a guide. Only cut the center about three-quarters of the way down the length of the cup holder, leaving the bottom intact.

Step 12: Attach the Cup Holder to the Arm Rest
Place the cup holder on the center of the arm rest about three-quarters of the way down from the head rest, and trace the outline of the cup holder with a pen. Using the box-cutter, cut out the circle you just drew on the arm rest and place the cup holder inside. The hole for the cup holder only needs to be about 3 inches deep. The cup holder should fit snugly in the center of the arm rest.

Step 13: Attach the Arm Rests to the Chair
Flip the lounge chair over so the bottom is facing up. Place an arm rest alongside one of the pool noodles used to create the frame of the chair. Slide a cable tie between the two noodles of the arm rest and around the noodle attached to the side of the yoga mat. Tighten the cable tie around the noodle near the head rest. Place a second cable tie around the noodle toward the opposite end of the arm rest. Repeat with the second arm rest on the opposite side. Because the chair is flipped over, make sure to attach the arm rest with the cup holder upside down so it is facing up when you turn the chair over.

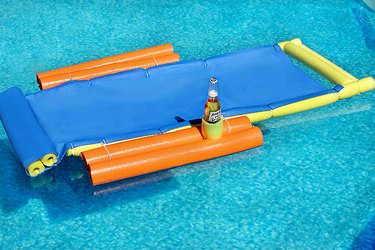
Place the lounge chair in the water with the noodles facing down and don't forget to set your favorite beverage in the cup holder. The lounge chair does not keep you completely dry but works wonderfully to keep you afloat while enjoying a lazy day on the water.
