Tip
If you find leaks you can use aquarium sealant to correct the problem. Make sure the area is dry and allow ample time for it to cure before reattaching the pump and pressurizing the system
If you have an aquarium odds are you have some sort of filter on it or you won't have live fish for long.
Typically the size of the tank combined with the amount of fish in inches determines how much filtration is needed to keep the tank water fresh. The better the filtration the less water changes are necessary to keep your tank healthy.
Video of the Day
Video of the Day
You usually want your filtration to be at least double the size of your tank plus the number of inches of fish. So lets say you have a 60 gallon tank and you have 30 inches of fish, you want your filtration to be at least 90 x 2 or better yet 90 x 3 so you need a pump that pushes at least 180 gph of water. This gives you 3 choices; Under gravel filtration using a power head hang on filter canister filter
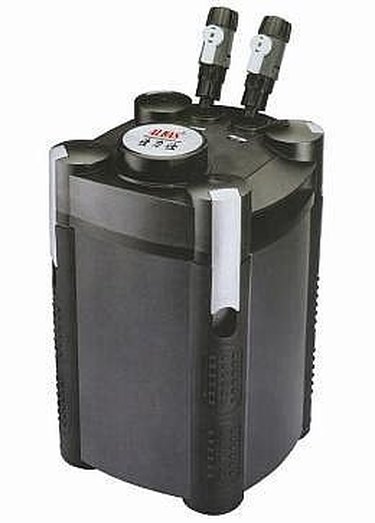
Of those choices the canister filter is preferred but the most expensive. I have a link to a canister filter being sold on Amazon.com for $132.50
As you can see canister filters are expensive but I am here to tell you that with a little ingenuity you can build your own or if you don't want to make your own you could buy the one listed below for $132.50.
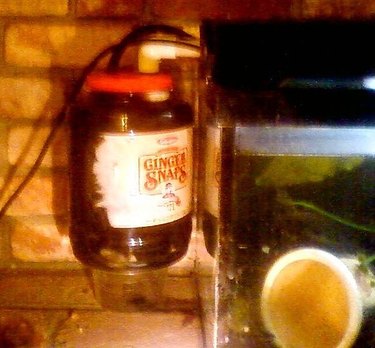
Mine cost me less than $35 to make and keeps my tilapia tank looking pretty pristine. I had most everything here already so honestly it cost me about $5.
My filter sits right next to my tank so this is how I will explain it, if your filter will be hidden under the tank you will need to use a threaded coupler instead of an elbow and lengthen the return pipe. Keep in mind that the higher the pump has to lift the water the lower the output so adjust accordingly.
Step 1
First thing is finding the container you will use for your canister filter. Our family loves cookies and pretzels and since we shop at a warehouse store once a month we buy some sort of goodie in gallon size or larger plastic jars. So for my filter I used a Ginger Snap container to make mine with.
Leak test the jar to make sure that it can withstand some pressure. I filled the jar with water and screwed the lid down tight. Then I held it close to my body and gave it a good squeeze. I figure that since the pressure is uneven it would be more likely to leak this way. This jar passed this test so it is what I used. I tried to take the label off but was unsuccessful so eventually I will have to do something about that, but if you hide the filter in the cabinet stand your aquarium sits on, who cares if the label is still there?
Step 2
Use your cordless drill to place 2 holes in the lid of your container. These holes need to be mid way between the center of the lid and the outer edge.
First hole Make sure that the first hole is slightly smaller in diameter than the tubing that will be going to your water pump.
Second hole This second hole needs to be slightly smaller than the diameter of your connector that will be attached to your threaded elbows.
Step 3
Cut one end of your rubber tubing at an angle and insert it through the smaller of the 2 holes you made in your lid. It will be a snug fit so you may need to use a little Pam cooking spray to lubricate it and some pliers to help pull it through the hole. Pull the tubing so that it extends about 4-6 inches beyond the lid as you want the water to be pumped to the bottom of your canister filter.
Step 4
thread the threaded connector onto one of your threaded elbows and then thread this downwards into the hole you made in the lid. This should also be a very tight fit. Once you have the elbow threaded through the lid as far as it will go you will want to face the open end of the elbow towards the outer edge of the lid. You can apply a small amount of aquarium sealant between this connector and the lid if you like but if you made the hole tight enough this should not be necessary.
Now thread the second threaded elbow over the connector that is now protruding through the bottom of your lid. You can also at this time apply a little aquarium sealant around the connector at the lid if you like but if you made this hole tight enough you should not need to do this. Tighten the elbow down as tight as you can with the open end pointing towards the center of the lid. Attach your piece of PVC pipe and place the other elbow on the open end of the pipe with the open end of the elbow facing downwards. This will be the return drain back into your tank.
Step 5
Place your baggies of carbon (charcoal) and Ammo-lock into the bottom of your jar.
If you are using Bio-balls you can now fill your jar 3/4 of the way full with them. Otherwise, cut up your red and blue scrubby pads into 2 or 3 inch squares and fill the jar with them to between 3/4 full to about an inch or so from the top of the jar. If you are using bio balls you will still cut up the scrubby pads but place them on top of the bio balls and fill to about 2 or 3 inches below the top of the jar.
Next carefully lower the lid over the jar and work the rubber tubing down through the filter media and screw the lid on tight.
Place your filter where it will be kept. In my case the filter is right next to the tank. Once I placed it there I realized that I did not have enough lift space available so I had to place my filter on an object to get the outlet height just right.
Step 6
Attach your pump to the canister filters inlet tubing and make sure that the PVC outlet tubing is over the tank so that it can drain correctly.
Plug in your pump and watch for any leaks. Correct leaks accordingly, in my case I had to tighten the lid slightly.
Make sure that you are happy with the water flow exiting the canister, you may need to make changes in the pump if you calculated incorrectly. My pump has a variable output so I just turned it to maximum.