Decorative stone around your house is perfect to cover an area without plants, create a path, or use it as a garden mulch. But it requires the correct initial planning and installation steps to work well. Choosing the right decorative stones and preparing a suitable foundation for them helps make your landscaping project a success.
Decorative Stone Considerations
Video of the Day
Decorative stone doesn't harbor termites, blow away, or require replacement like wood chips and similar options, and they're non-flammable and help suppress weed growth. However, they raise the temperature in the surrounding area and must be treated as a permanent landscape feature after installation. Stone is best suited for plant-free areas, although you can use it with heat-loving perennial plants, such as in a rock or desert garden bed.
Video of the Day
Choose Decorative Stone
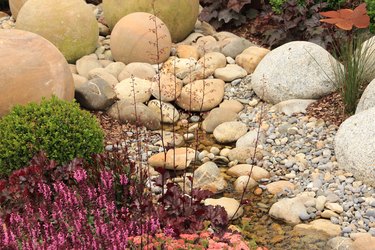
The type of decorative stone that works best in the space and has the preferred look is the first decision that you need to make. If the main purpose of the stone is purely ornamental, then almost any type will work well. In areas where you expect some foot traffic, such as along a garden path, select larger, smoother stones like river rock. You can also use pea gravel, which is a smaller rock that's similar to river rock with smooth surfaces.
River rock is also a good choice if drainage is an issue in the space because the larger rocks don't compact and moisture can more easily drain through and into the ground. If you prefer smaller stones that pack down better than river rock yet still provide drainage, volcanic rock, or lava rock, provides a good choice. Keep in mind the sharp edges of volcanic stones make them unsuitable for pathway use.
Measure the Installation Depth
After deciding on a type of stone, determine the amount needed. Begin by deciding on the best depth for the decorative stone bed. Generally, a 3-inch layer is ideal for small stones up to 1 inch in diameter. Larger stones should be about 4 inches deep.
After determining the best depth, measure the square footage of the area where you're installing the stones. A cubic yard of decorative stone will cover 162 square feet at the 2-inch depth, 108 square feet at the 3-inch depth, and 81 square feet at the 4-inch depth.
Prepare the Bed
After you have your stone, the first step for installation begins with clearing the area. Dig up and remove any sod from the site. Pull up weeds completely by their roots and remove any remaining root pieces in the soil so they don't regrow. If the area was exceptionally weedy, water the location and wait seven days for seeds to germinate. After germination, apply a broad spectrum herbicide, such as one containing glyphosate.
Wear safety glasses, a face mask, gloves, and long sleeves when applying the herbicide. Spray it evenly over the installation area, but avoid overspray onto neighboring plants or lawn areas. The herbicide usually kills the remaining weeds within a few hours and it's no longer active in the soil within seven to 10 days.
Decorative Stone Installation Tips
Proper installation of landscaping rocks minimizes later maintenance issues and prevents most problems in the decorative stone bed. Installing edging around the perimeter of the bed, whether you use vinyl edging strips, large stones, or wood edging, keeps the smaller stones in place so they don't migrate to other areas of the yard.
Lay down a layer of landscape fabric over the entire site, overlapping the edges of each fabric sheet by at least 3 inches. This helps keep any remaining weeds from growing and keeps the stones from sinking into the soil. Unlike plastic sheeting, landscape fabric allows water and air to pass through and into the ground. It also lasts longer than plastic.