
If you're going to do a DIY tile job, you'll have to grout it, and that means you have to know how to grout tile and — depending on the type of grout you use — how to mix grout. Not all types of grout need mixing. Acrylic- and urethane-based grouts come premixed and are ready to use right out of the container. Epoxy grout, a super-strong, waterproof grout, is mixed with a catalyst instead of water.
When it comes to most tile projects, however, the best grout for the job is standard, cement-based grout, which comes as a powder and has to be mixed with water before you can use it. The process is simple and is similar to mixing thinset tile mortar but is a bit more rigorous. To get a mixture that will fill the grout lines without voids or slumping (leaving the grout joints under-filled), you need just the right consistency.
Video of the Day
Video of the Day
In addition to plain water, grout can be mixed with a latex additive or a combination of water and additive. You can also adjust the color by adding pigments while you're mixing grout. Whatever you do, you're aiming for a final mixture that has a uniform color and consistency, and that takes a bit of patience.
What Is Grout Additive?
When mixed with plain water, cement-based grout is porous and may chip out of wide grout joints. A good way to make grout more waterproof and less likely to chip is to substitute a water-based latex additive for water or to combine the additive with water.
Additives give the grout a smoother texture, and they close the pores to the extent that the grout may not need a sealant to keep out moisture, prevent mildew discoloration, and make the grout easier to clean. Additives are also recommended when colorizing grout because they help the pigments disperse evenly to produce a uniform hue.
The main disadvantages of grout additives is that they make the grout set faster, which means you need to mix smaller batches and/or work faster. Additives improve grout adhesion, which is a good thing as far as the tile installation is concerned but a bad thing when it comes to cleanup. If you use additives, it's more important to clean as you go than if you use plain water.
Things You'll Need
Grout additive (optional)
Pigments (optional)
Drill-powered mixing paddle (optional)
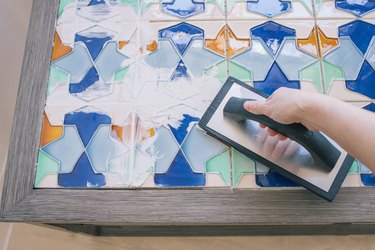
How to Mix Grout
Before you start mixing grout, make sure you have the right kind. Sanded grout contains sand aggregate, and it's best for ceramic tile grout joints that are wider than 1/8 inch because the sand adds body, strength, and texture. Unsanded grout, for its part, is better for joints 1/8 inch or narrower, and because it has better adhesion, it's often preferable to sanded grout for wall tiles or a backsplash. If you're installing tiles made of glass or polished stone, unsanded grout is also the better choice because sand can scratch these delicate tiles.
Additives and pigments are optional, but if you're going to use them, make sure you have some on hand before you start; you can't add them afterward. Here's a step-by-step rundown of the mixing procedure.
1. Pour Out the Powder
Pour enough of the grout powder into a 5-gallon bucket to make a batch. It's best to make small batches to ensure the grout doesn't harden before you have a chance to spread it. About 3 to 4 inches in the bottom of a 5-gallon bucket is usually enough.
2. Add Water or Additive
Check the manufacturer's instructions on the bag to determine how much water to add, and pour this amount into a 2-gallon bucket. Pour about 3/4 of the water into the bucket with the powder. If you're using a grout additive instead of water, check the instructions on the additive container for the right amount to use, and add about 3/4 of this amount to the grout powder.
3. Start Mixing
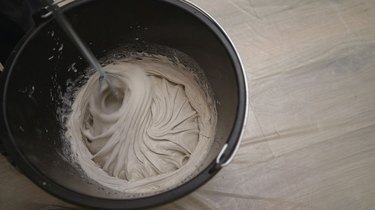
Use a margin trowel to mix the grout with water. Turn over the mixture slowly and repeatedly to make sure all the grout powder gets wet. It helps to tilt the bucket toward you and rotate it as you go, like a cement mixer. If you're colorizing with pigments, now is the time to add them to the mixture.
If you want to do the job faster and expend less effort, you can use a drill-powered mixing paddle instead of a trowel. Not every home improvement expert is in favor of this idea, though, because the paddle introduces air bubbles that weaken the mixture and may cause discoloration. You can avoid this, however, by running the drill at a low speed (less than 350 rpm) and working methodically.
4. Add More Water
Soak a grout sponge with water and squeeze it over the grout bucket to add more water to the grout, mixing as you go. This method is preferable to simply pouring in the water because it's more precise. If you add too much water, you can make the mixture too thin, and that makes the grout weaker and more likely to slump. When using an additive, it's usually fine to pour it straight from the bottle because the narrow opening makes it easier to control the amount you add.
The final consistency you're aiming for is about the same as bread dough or peanut butter. When you remove some of the grout mixture with your trowel, it should remain on the trowel even when you invert it.
5. Slake the Grout
Let the grout sit undisturbed for about 10 minutes. This is called slaking, and it allows time for the chemical reaction to occur that improves the durability of the final product. After this slaking period, the grout will feel stiffer, but don't add more water.
6. Mix the Grout Again
Stir the grout with a trowel until it is consistently smooth. It may feel stiff at first, but it will become softer and smoother after a few strokes. Do not add water to loosen it; if it's too stiff at this point, you have to start over with a new batch. As soon as it's well mixed and smooth, you're ready to grout!
Why Slake Grout?
Slaking grout may seem like a waste of time, and beginners often skip this step, but it's an important part of the mixing procedure. Grout hardens because the Portland cement in the mixture hydrates as it absorbs water, and you have to give this process time to get started. If you start spreading the grout mixture without slaking, some of it will be weak and will probably crack or chip out later.
Mixing Grout FAQs
Properly mixing grout isn't difficult, even for DIYers, but it's essential for a long-lasting grout job. Here are some common questions that you might have if this is your first time using grout.
What Is the Standard Grout Mix Ratio?
The usual method to measure grout powder is by weight, and you measure water by volume, so that makes it difficult to establish a volumetric grout mix ratio. In general, however, the standard grout to water ratio is 2 quarts of water to 25 pounds of grout powder, and 1 pint to 7 pounds of powder.
The ideal grout mix ratio varies from product to product, so be sure to check the container for the proper grout to water ratio. Use that as a guideline, but in the end, the most reliable determinant is the consistency of the grout.
What Is the Best Grout Consistency?
When grouting walls, the grout consistency should be a little stiffer than that for floor tiles because the grout needs body to prevent it from falling out. Generally speaking, the ideal grout consistency for wall tile is similar to that of bread dough. When grouting floor tiles, the grout consistency should more closely resemble peanut butter.
In any case, the grout should be thick enough to stay on your grout float even when the float is inverted. It should be stiff enough to require a fair amount of effort to force it into the grout joints.
Can I Make My Own Grout Color?
Yes, you can add pigment to change the grout color. This is a good way to add extra color to a kitchen backsplash, a countertop, or any other DIY project. Pigment is available in powder form, and it comes in a variety of earth-tone and primary colors.
You add the pigment during the mixing procedure. There's no hard-and-fast rule governing how much to add, so it requires a bit of trial and error. To add to the uncertainty, you won't be able to determine the exact color until the grout dries because it tends to lighten. The best strategy is to mix a sample batch, keep track of how much pigment you add, let the grout dry, and compare it to the tile color. If you're satisfied, mix a larger batch using the same proportion of pigment.
What If the Grout Is Too Runny?
If you dip your grout float into a fresh batch of grout and extract some of it and excess grout drips off the float as you're holding it aloft, the grout is too runny. You may think this is an advantage because the grout will flow more easily into spaces between the tiles, but actually, runny grout is weak and will crack in no time. It also tends to slump inside the grout lines and may fail to fill them completely.
If you haven't slaked the grout, you can fix the problem by mixing in more grout powder to thicken the mixture. If the grout has already slaked and it's still runny, you're better off mixing another batch. Don't worry about the crevices, by the way. It's better to caulk those.
What If the Grout Is Too Thick?
At the opposite end of the scale, the grout you pull out with your float may be so thick that it breaks into pieces or crumbles. Thick grout sets more quickly, is harder to push into the grout lines, and may contain dry grout powder. The grout won't be as strong as it should be, and if you try to use it, you're likely to end up with voids that will cause the surface grout to collapse when it has hardened.
Again, you can remedy the problem before slaking by simply adding a bit more water to the mixture, remembering that the ideal consistency is somewhere between bread dough and peanut butter. If you wait until after slaking, you have a bum batch that you should discard.
How Long Does Grout Take to Dry?
Grout hardens in three stages. In the first stage, it sets, which means that it becomes too stiff to work with. Setting time varies by product, but it's usually from 15 to 30 minutes. In the second stage, the grout dries and becomes hard to the touch. Once it has dried, you can no longer easily wipe excess grout from the surface of the tiles. If you left a large amount of excess grout, you may have to chip it off with a putty knife or chisel.
The final stage of drying is called curing. This is when all the chemical reactions in the material have completed, and the grout reaches its maximum hardness. Again, curing time varies by product, although 24 to 48 hours is typical. You'll usually find the curing time specified on the product container. If your DIY project is laying floor tiles, you should wait for the grout to cure before walking on the tiles.
Even fully cured grout may still contain a small amount of moisture, and if so, some patches may be darker than others. Wait for all the grout to develop a uniform lighter shade before sealing it. This could take longer than 48 hours depending on the moisture conditions in the room.