The warmth of wood trim, including baseboards, is a selling point for fans of Craftsman, Victorian, and other vintage homes. Through the years, stained wood trim tends to lose its luster as kids, pets, housecleaning, and errant furniture scratch and mar the finish. Restaining wood baseboards requires several labor-intensive steps, but it's well worth the effort to return the wood to its original or a new stain color and sheen. Here's how to restain wood baseboards.
Determine the Original Finish
Video of the Day
Before you begin, put on gloves, safety goggles, knee pads, and a dust mask or respirator. Test the existing protective finish in an inconspicuous spot with denatured alcohol and a cotton swab to see if it dissolves the finish. If the finish softens, usually in about 30 seconds, it is shellac. Use denatured alcohol, rags, and a medium synthetic steel wool scuff pad to remove the finish.
Video of the Day
If the finish is unaffected, try lacquer thinner in another location. If the finish softens, it is lacquer, but if it doesn't, try a drop of xylene in a new spot to see if it is a water-based finish. However, if nothing works, it's either varnish or polyurethane. You'll need a solvent- or citrus-based paint and varnish remover to remove the finish.
Prepare the Baseboards
To protect the walls and floors, mask them with painter's tape or painter's pretaped plastic sheeting. Depending on the layout of your home, baby gates in the doorways can keep children and pets out of the room. Do one room at a time so the project isn't overwhelming. Open the windows and put fans in the windows to push the fumes out of the house. Turn on exhaust fans and open exterior doors to increase air circulation.
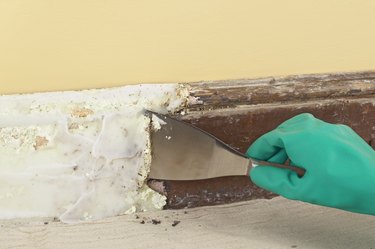
Remove any wax or wood polish by wiping the baseboards with a rag dipped in mineral spirits. Then strip the wood by following these steps:
- Apply the stripper with a natural-bristle brush.
- Wait the recommended time according to the directions.
- Keep the stripper moist by applying more as needed.
- Scrape off the old finish by pulling, not pushing, with a metal scraper or scrub pads.
- Repeat as needed.
- If necessary, neutralize the stripper according to the manufacturer's directions.
If only part of the old finish is damaged and/or spattered with paint, consider sanding with a 220-grit sandpaper. Clean the baseboard with a rag dipped in mineral spirits and then touch it up with a matching gel stain and finish.
Sand the Baseboards
Once the finish is removed and the wood has dried, it's time to sand. You can use sandpaper or a scrub pad. Follow these steps:
- Sand the baseboards with 80-grit sandpaper or a scrub pad.
- Move along the grain to avoid damaging the wood surface.
- Repeat with 120-grit and then 220-grit sandpaper to smooth the surface.
- Wipe with a tack cloth to remove the dust.
Baseboards that have been damaged by water may require bleaching. You can use a wood bleach, not laundry bleach, and follow the package directions. To use oxalic acid:
- Mix 2 tablespoons of oxalic acid and 1 cup of hot water.
- Brush the solution onto the dark water stains.
- Wait 20 minutes.
- Repeat as needed and then remove it with fresh water and a sponge.
- Neutralize with 1 1/2 tablespoons of borax mixed with 2 quarts of water and wipe it on with a sponge.
- Rinse with fresh water.
- Allow it to dry overnight.
- Sand to smooth the grain of the wood.
Repair any dings and dents with wood filler. There are a number of products that are stainable or pretinted to match the color of your baseboards. Fill it, let it dry, and sand it smooth.
Stain the Wood
Choose a stain color that complements your décor and any existing hardwood floors or trim. Generally, gel stains are better for vertical surfaces. Stir, don't shake, the can of stain and then apply it to the baseboards following these steps:
- Use a bristle or foam brush or a rag to wipe the stain over the wood.
- Brush against the grain to fill the large pores in oak or mahogany woods.
- Wait for the wood to absorb the stain but don't let it dry out; use a timer to ensure consistency from wall to wall and room to room.
- If desired, apply a second coat of stain to darken the color.
- Remove the excess stain with clean, dry rags.
- Allow it to dry completely before applying the final finish.
Finish the Job
Apply a protective finish to the baseboards to protect the wood. No matter which product you choose — shellac, varnish, or polyurethane — apply it according to the manufacturer's directions. In a vintage home, a satin-finish, low-VOC, water-based polyurethane may be the best choice for long wear and ease of application.
Depending on the stain, you may need to do a light sanding to smooth the wood grain. Touch up the stain as needed and then wipe it with a tack cloth to ensure a perfectly clean surface. Then follow these steps:
- Apply the finish with a brush, working with the grain of the wood.
- Allow the first coat to dry for the recommended period.
- Scuff lightly with 220 fine-grit sandpaper, a scrub pad, or #0000 steel wool if using an oil-based finish per the manufacturer's directions.
- Wipe with a clean rag or tack cloth.
- Apply a second coat of finish.
- Allow it to completely dry.