Things You'll Need
Bathtub drain and overflow kit
Hacksaw
Fine-tipped marker
Utility knife
PVC primer if using PVC pipe
ABS or PVC glue
Plumber’s putty
Pliers
Phillips-head screwdriver
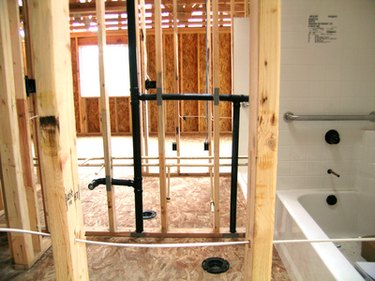
A bathtub drain and overflow are parts that work together to open and close drainage on a tub. The entire system includes the tub stopper, the lever and overflow cover plate, as well as the drain and overflow pipes. This assembly allows water to travel down the overflow pipe behind the tub in the event that the bathtub overfills. Install a bathtub drain and overflow assembly in a new tub when replacing the assembly for a bathroom upgrade.
Step 1
Dry-fit the pipes without glue. Place the T-fitting on the waste drainpipe so that one remaining opening is vertical and the other one is lateral toward the tub. Put the overflow pipe with the overflow elbow attached into one side of the T-fitting. Put the drainpipe with the drain elbow attached from the tub drain into the lateral opening of the T-fitting. Hold the assembled pipes in position so they're close to the openings for the overflow and drain.
Video of the Day
Step 2
Measure from the furthest side of the tub drain elbow to the furthest side of the tub drain opening and trim the pipe leading from the tub drain to the T-fitting with a hacksaw if the tub drainpipe is too long. The pipe from the overflow should be vertical and the pipe from the tub drain horizontal but sloping slightly downward to the T-fitting. Measure from the top of the opening on the overflow elbow to the top of the opening for the overflow drain and trim with a hacksaw if the overflow pipe is too long.
Step 3
Mark the location and alignment for all of the connections with a fine-tipped marker by making a mark across connecting pieces and around the pipes where they fit together. Mark which end of the pipes go into the elbows so the pipes don't get mixed up when they're disassembled.
Step 4
Trim all burrs with a utility knife from the ends of the pipes before gluing by scraping with the knife until the edges of the pipes are smooth.
Step 5
Apply PVC primer to the insides of the T-fitting and elbows and the outsides of the ends of each pipe if they're PVC. Apply either PVC or ABS glue to the same areas of each fitting and push the fittings together, aligning the marks made with the fine-tipped marker.
Step 6
Assemble gaskets and connection rings according to the package directions that came with your specific kit.
Step 7
Insert the lift assembly (the part with the lever if installing a lever-type drain stopper) into the overflow opening. Carefully push it into the opening; the shaft on the assembly will need to bend slightly to fit into the pipe. Use a screwdriver to turn the screws into the overflow cover plate to secure the assembly in position. Position the cover plate over the overflow opening and secure with a screw (if installing a manual pop-up or screw-in tub drain stopper).
Step 8
Place a ring of plumber's putty on the drain basket or tailpiece and screw into the drain opening until tight. Use the handles of a pair of pliers to tighten the connection by sticking the handles into the opening and turning clockwise until tight.
Step 9
Slide the drain mechanism into the drain until the drain is securely in position for a lever-activated pop-up-style drain stopper. Use a screwdriver to secure the assembly by turning the screw in the drain-cover screen for a grid-type bathtub drain stopper. Screw in the drain stopper for a screw-in stopper drain. Pop in the stopper for a manual pop-up-type drain stopper.
Tip
Take your time when dry-fitting pipes to ensure proper position.
Warning
Use the primer and glue in a well-ventilated area. Follow all safety precautions printed on the PVC primer and PVC or ABS glue containers.
Video of the Day