Weather fronts mark the boundaries of air masses of different properties, which don’t easily mix. A cold front marks the leading edge of a colder airmass bumping up against a warmer one. Compared with a warm front, which has a mostly horizontal lean resulting from the gradual glide of encroaching warm air over a cold airmass, a cold front boasts a steep leading edge that forces the warmer air ahead of it rapidly upwards. This situation typically produces more dramatic clouds – and often more violent weather, though of shorter duration.
Where the Clouds of a Cold Front Come From
Because warmer air is less dense and thus lighter, it always rises over heavier colder air in a front – whether it’s a warm front moving a warmer airmass into an area (and overriding colder air) or a cold front bringing in a colder airmass (bulldozing warmer air out of the way).
Cold fronts move faster than warm fronts – about twice as fast, in fact – and have a steeper vertical edge, which means the warmer air ahead of them is pushed significantly upwards quite rapidly. This swift rise causes the lifted air parcel to cool and condense into clouds, often producing precipitation as well.
Heaped Cold Front Clouds
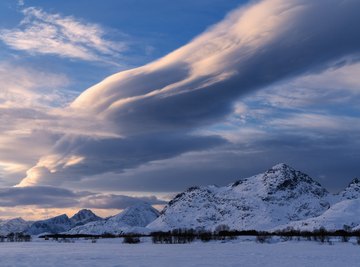
The classic cold front clouds produced along that steep, tall leading edge are cumulus, or “heaped,” clouds. These are the “cauliflower-looking" clouds that are often deeper or taller than they are wide, and they contrast with the more layered warm front cloud types, including various kinds of stratus, resulting from that frontal zone's gentler lean. Such cold-front cumuli often pile up right along the frontal boundary on comparatively short notice, whereas the cirrus, cirrostratus, altostratus, stratus and nimbostratus of a warm front often are clouds that cover a large area.
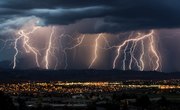
Given enough moisture, and especially if the forced-up warm air ahead of the front is compelled to keep rising because of atmospheric instability, the cumulus piling along a cold front often evolve into cumulonimbus, or thunderheads. By their definition, these storms are electrified due to the swirl of charged particles within their updrafts, so be aware: Lightning – plus potentially damaging winds and hail – is a possibility when a cold front barrels through.
While a cold front may certainly prompt isolated thunderstorms, it can also produce a belt of multiple storms along its advance, a so-called squall line, given enough moist, unstable air ahead of it. Squall lines can extend across hundreds of miles of a frontal boundary and may last for hours; the thunderstorms may outpace the cold front by dozens or hundreds of miles.
Severe squall lines sometimes produce damaging straight-line winds known as derechos, which may be triggered both by cold fronts and summertime stationary fronts. Derecho winds may howl between 60 and 150 miles per hour and cause extensive damage across broad areas; they’re a significant, if unpredictable, form of ecological disturbance in the central and eastern U.S., sometimes responsible for flattening large swaths of forest.
Cirrus Harbingers
Generally speaking cold fronts have less of a cloud “advance party” than warm fronts, the slower, more gradual approach of which tends to produce a succession of high, middle and low layered clouds.
However, if thunderstorms have erupted along a cold front’s nose, you may see cirrus – wispy, high-level clouds – moving in ahead of the boundary. That's because cirrus shreds are sometimes blown off the anvil of a thunderhead: the lofty, flat-topped crown of the storm that tends to point in the direction of the prevailing winds.
A Fast-Moving Sweep
All things considered, your average cold front tends to produce more intense weather than your average warm front: thunderstorms and gusty winds compared with gentle rains or simply overcast. The same speed, however, that helps boil up cumulus clouds and potentially cumulonimbus as a cold front charges through means this angry weather tends to pass quickly, whereas the drizzle and cloudiness of a warm front often make for more prolonged conditions.
References
- University of Illinois at Urbana-Champaign: Weather World 2010 Project -- Cold Front
- Mountain Weather; Jeff Renner
- Mountain Meteorology: Fundamentals & Applications; C. David Whiteman
- National Weather Service: Thunderstorm Ingredients
- National Weather Service: Air Masses
- Meteorology: Understanding the Atmosphere; Steven A. Ackerman, John A. Knox
Resources
About the Author
Ethan Shaw is an independent naturalist and freelance outdoors/nature writer based in Oregon. He holds a B.S. in Wildlife Ecology and a graduate certificate in G.I.S. from the University of Wisconsin-Madison. His primary interests from both a fieldwork and writing perspective include landscape ecology, geomorphology, the classification of ecosystems, biogeography, wildlife/habitat relationships, and historical ecology. He’s written for a variety of outlets, including Earth Touch News, RootsRated, Backpacker, Terrain.org, and Atlas Obscura, and is presently working on a field guide.