If you are considering throwing away your favorite pair of pants because the zipper is broken, then you may want to take a few moments to learn of some fast and cheap alternatives that will allow you to keep good pants in use. Broken zippers are often fairly simple to repair, and even the most time consuming repairs shouldn't take more than an hour of your time.
Repairing zippers with minor damage.
Assess the damage. After ensuring that the only missing or damaged teeth are in the lower 1/3 of the zipper, proceed with step 2 for a quick and easy repair. If there are missing or damaged teeth in the upper 2/3 of the zipper, refer to section 2 for zipper replacement steps. If the problem is a missing or broken pull tab, refer to section 3 for pull tab replacement steps.
Remove zipper stops to re-install the slider. If the slider has become misaligned or has been pulled completely off of the zipper, use needle nose pliers to gently pull the zipper stops off of the material to facilitate re-installation.
Move the slider above the damaged area to zip all remaining teeth together. If the slider encounters difficulty getting the first few teeth moving through, lubricate the zipper teeth by rubbing with a bar of soap and use a straight pin to push teeth through the slider opening.
Sew a new zipper stop above the damaged area with a needle and thread. To install a reliable zipper stop, oversew both sides of the track with a minimum of 8 stitches, keeping them as tightly together as possible. If the area missing teeth is large enough to create an opening below the new zipper stop, oversew the entire track below the new zipper stop to create a uniform and professional appearance.
Replacing a badly broken zipper.
Remove zippers with damaged or missing teeth in the upper 2/3 of the zipper track. Use a seam ripper to carefully remove the old zipper, taking note of the old stitching patterns and stitching order that was used.
Pin a replacement zipper of the same size and material in place of the old zipper. Use straight pins to hold the new zipper in place and closely inspect each area to ensure that it is properly positioned.
Stitch the replacement zipper onto the clothing. Using a needle and thread, copy the stitches that were removed in step 1 to ensure that the new zipper will be as strong and durable as the original stitching.
Replacing a zipper pull tab.
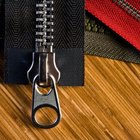
Remove the damaged pull tab or pieces. If your zipper has a bent, broken or missing pull tab, remove any remaining pull tab pieces using needle nose pliers.
Install a replacement clamp-on pull tab. Using needle nose pliers, clamp the replacement pull tab into place on the slider, squeezing the clamp-on ends until little or no gap remains between the clamping arms.
Test the pull tab to ensure that it cannot be easily removed from the slider. If the pull tab appears as though it may be pulled off over time, re-clamp the clamping arms more securely or replace with a more durable pull tab.
Related Articles
How to Put Sliders on Zippers
How to Repair a Plastic Zippper
How to Replace Pull Tabs on Zippers

How to Fix a Bent Bra Latch

How to Repair Heavy Duty Zippers
How to Identify a Zipper Size

How to Join 2 Zippers
How to Replace Parts for Hedstrom Swing ...

How to Glue a Leather Shoe Strap
How to Put in a Separating Zipper
How to Mend or Replace a Broken Zipper ...
How to Repair a Ripped Back Pocket on ...
How to Fix a Broken Pencil Skirt Zipper

How to Repair Fur Coats

How to Fix Cuts in Polyester Clothes
How to Put a Zipper on a Jacket

How to Fix Thong Sandals

How to Replace a Broken Underwire
How to Attach Adjustable Buckles
How to Repair a Brooch
References