Things You'll Need
Thrift Store Sewing Cabinet
Boards
Braces
Screws
Poster Board or Other Heavy Paper for Template
Masking Tape
Scissors
Pencil or pen
Jig Saw and Skill Saw or a Hand Saw, Coping Saw and Keyhole Saw
Clamps
Ruler or Straight Edge
Drill with Bits
Safety Goggles
Sandpaper
Contact Paper
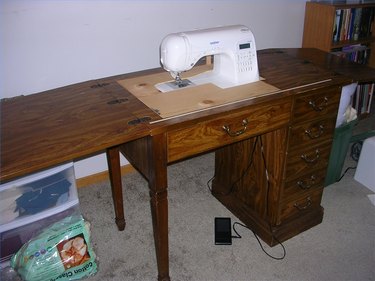
Need a sewing table for your new electronic sewing machine? Here is a cheap solution that works great. Purchase a sewing cabinet or table, old but sturdy, from a thrift store or garage sale and convert it to be used with your new sewing machine for under twenty bucks. This table works great for quilting!
Step 1
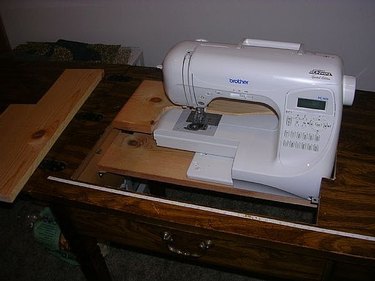
To convert a sewing cabinet the old hinged boards must be removed from the top of the cabinet. This should leave a rectangular opening in the top of the cabinet. A support board is installed inside the cabinet for the sewing machine to sit on and two top boards are cut to fit snug against the machine at the height of the needle plate. The sewing machine will then be recessed in the cabinet creating a smooth level sewing surface.
Video of the Day
Step 2
Take some measurements first. Measure the exact height of the sewing machine just in front of the needle. Most machines are 3 and half inches but there may be some variation.
Step 3
Also, measure the thickness of the cabinet top, the board with the rectangle opening. All of the boards used in this project should be this thickness. Mine is ¾ inches thick. Purchase screws to work with this thickness. Also, measure the thickness of the cabinet's side boards. They may be thinner and need different length screws. I used 8 by ¾ and 8 by 5/8 round head philips wood screws.
Step 4
The top of the cabinet may need to be cut so that the needle can be centered. Its a good idea to know that before beginning. Hold the sewing machine in the rectangular opening in the top of the sewing cabinet. Center the needle of the sewing machine inside the rectangle. If the machine needs to be taken out of the rectangle in order to be centered, the cabinet will have to be cut.
Step 5

Note where the power cords connect to the machine. Do they stick out? If so, a hole should be cut with the keyhole saw inside the cabinet to accommodate them.
Step 6
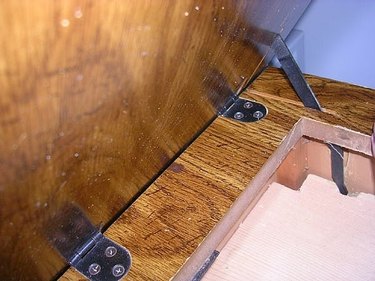
Measure the inside dimensions of the cabinet. Mine were 21 and ¾ inches wide by 17 and ½ inches deep. These dimensions will be used to cut the support board. The support board's width is the same as the cabinet but it's depth will be about two thirds of the cabinet's depth. This will create an opening for a knee lifter and power cords. It rests flush against the back and sides but not against the front. My support board was cut 21 and ¾ inches long by 11 ¼ inches wide which left about six inches for my knee lifter. Cut the support board to size with the skill saw, jig saw or hand saw. I used a 2 foot 1 by 12 board(actually measures ¾ inches by 11 ¼ inches) and just cut it to length.
Step 7
Test the support board inside the cabinet after its cut to size. Notches should be cut for the tables legs if they keep the support board from being flush against the back of the cabinet.
Step 8
If the table has leafs, cut a notch for the leaf's hinge to poke through the support board. Now the cabinet's leafs can close up if the sewing machine is removed. The top can then be used as a cutting table.
Step 9
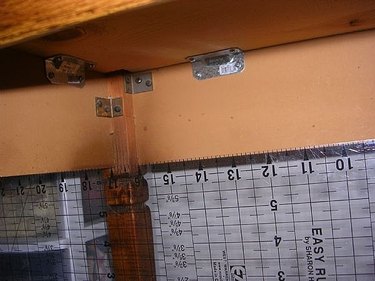
Measure and mark a line along the sides and back of the inside of the cabinet. Use the measurement of the height of the sewing machine in front of the needle plate. Mine was 3 and ½ inches. So rest a ruler against the top of the inside of the cabinet mark the sides and back with this height measurement and draw a line around.
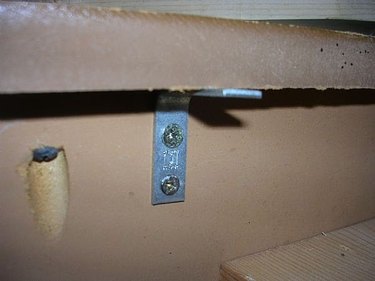
Step 10

Use this guide line to align the brackets. I used gusset angle brackets. These can be found at a hardware store where the decking supplies are kept. Line up a small straight board on the guideline and press the brackets flush against this board mark drill holes and drill. First put the support board in the cabinet. Install the brackets, first attaching them onto the cabinet. When all the brackets are in place on the cabinet, then drill holes into the support board and screw the board in place. Make sure screws are put in the cabinet and the board. The support board will not be coming out it is fixed in place.
Step 11
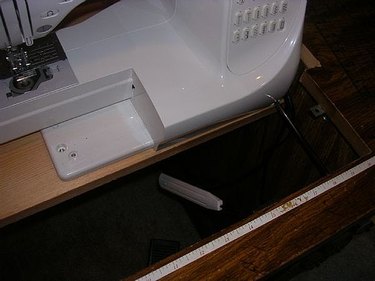
Now measure the rectangular opening in the top of the cabinet. Mine is 19 and ½ inches wide by 15 and ½ inches deep. I halved the depth and cut two boards that were 19 and ½ inches long and 7 and ¾ inches wide. I used a 1 by 10 by 4' board(actually measures ¾ inches by 9 ¼ inches) cut to size and width.
Step 12
Now install corner braces along the inside of the rectangular opening. The two top boards will rest on these braces. I installed 8, two in front two in back and two on each side. Install as many as needed to make the boards sturdy. Once the two top boards are cut and in place a brace can be placed on one board where the two boards come together.
Step 13
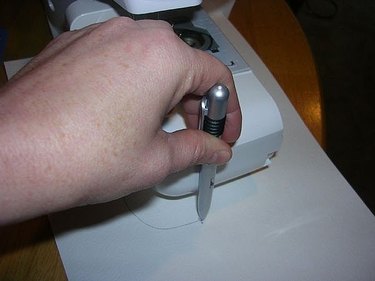
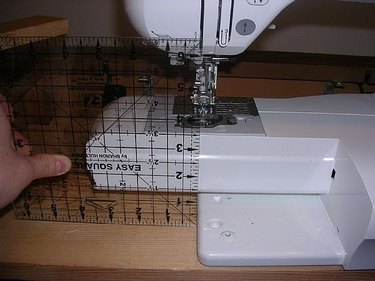
Next make a template out of poster board. The template must be of the machine at needle plate height. The easiest way to do this is with four small pieces of poster board. One for each quadrant of the machine. Place one of the pieces under the sewing machine press a pen against the machine at needle plate level and run the pen along the poster board. Cut along the line. Test this quadrant of the template to see if it matches the machine by resting it against the machine at needle plate level. A bit might need to be removed to make it rest against the machine. Do this for all four quadrants.
Step 14
Then match the four pieces together by resting them against the machine and tape together.
Step 15
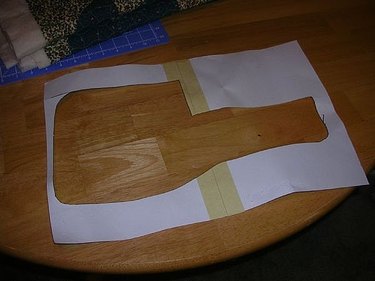
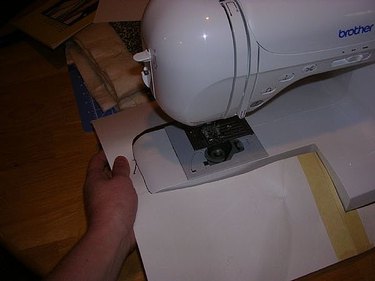
Place top two boards in the cabinet. Tape the template on the two top boards (and the cabinet if needed in order to center the needle on the machine) and trace along the inside of the template.
Step 16
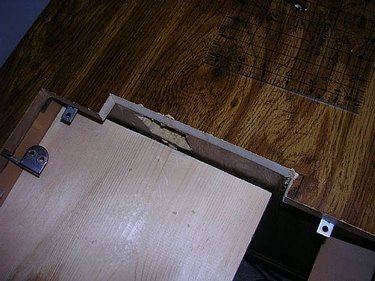
Remove the top boards from the cabinet. Using a jig saw or coping saw cut along the template lines on the two top boards. If necessary, remove part of the cabinet top using a jig saw or keyhole saw. Sand off any rough edges. Put the machine on the support board inside the cabinet and place the two top boards on either side of the machine. Make sure they are flush against the machine. Make any adjustments to the boards. If the boards are not tight in the opening and are moving around, a shim can be wedged at the back to make at tight fit.
Step 17
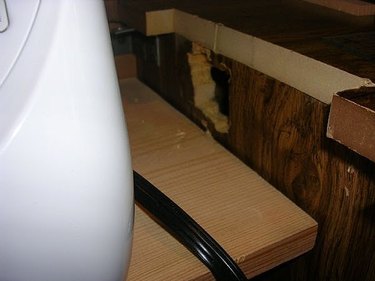
Cut out a hole on the inside of the cabinet for power cords if necessary. A drill may have to be used to punch a hole, then use a keyhole saw.
Step 18
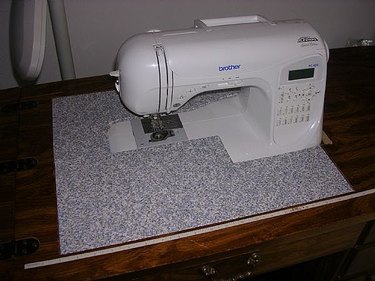
Cover the two top boards with contact paper for a smooth sewing surface.
Step 19
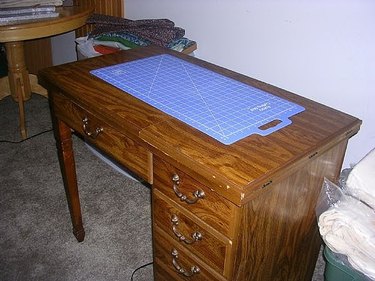
Close the cabinet and now its a cutting table. Pull it away from the wall and cut easily from all sides. Happy sewing!
Tip
For those unsure about power tools or lack tools, this project can still be accomplished with a hand saw, coping saw and key hole saw. They are not too expensive and can be found at any hardware store. The hand saw runs about $10 and the coping saw and keyhole saw run about $5. Drills are pretty common, so borrow one from a friend. Don't forget the bits, one bit sized for the width of the screws used and one to punch holes for the keyhole saw, and one philips or flat head screwdriver bit depending on the screws used.
Warning
Where safety goggles.
Video of the Day