Many carpentry and mechanical jobs require air compressors. But like any tool, knowing how to use and care for a compressor can make the difference between easy use and complete frustration. For maximum performance, compressors must be adjusted properly. Pneumatic nail guns, for example, won't drive nails to the correct depth unless the air compressor is correctly adjusted. If the pressure is too low, nails will not fully seat in the lumber. If the pressure is too high, nails will sink too deep and cause indentations in the lumber.
To adjust a compressor, you must determine the differential pressure, which refers to the difference between pressure readings when the compressor starts (cut-in) and stops (cut-out). The owner's manual gives the minimum recommended differential pressure for each device. If the differential is lower than the suggested minimum, the air compressor will turn on and off too quickly and the motor will not cool properly between cycles.
Video of the Day
Video of the Day
When following the procedure below, be sure to set the compressor adjustment screws in the order specified. Reversing the order results in the main calibration pressure moving with each adjustment to the differential. This process will change both the cut-in and cut-out pressures at once and make them hard to calibrate.
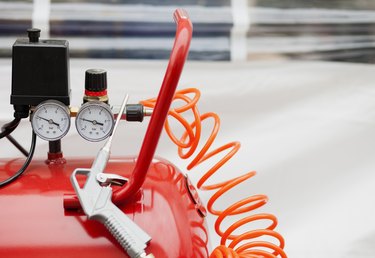
Step 1: Expose the Pressure Switch
Remove the air compressor's pressure switch cover. The pressure switch cover is a black plastic cover on top of the air compressor. It is removed by turning the screw on top of the cover counterclockwise with a Phillips screwdriver. Set the cover aside.
Step 2: Determine the Cut-Out Pressure Setting
Plug in the air compressor and turn the on/off switch to the on or automatic position. The air compressor will start immediately. Let the air compressor run until it shuts off. Observe the compressor's pressure gauge while it is running and take note of the pressure reading when it stops running. This is the cut-out pressure setting.
Step 3: Attach Hose to Compressor Nozzle
Bleed the air out of the air compressor. First, attach the hose by pulling back on the air fitting and sliding the fitting onto the air compressor nozzle, then releasing the hose nozzle. Attach a blowgun air tool to the opposite end of the air hose in the same manner.
Step 4: Release Air and Read Cut-in Pressure
Press the handle down on the blowgun to release air from the air compressor while watching the air pressure gauge. The air pressure gauge will show a decrease as air evacuates the tank. Take note of the pressure reading when the air compressor restarts. This is the cut-in pressure. Wait until the air compressor stops.
Step 5: Adjust Cut-In Pressure
Use an Allen wrench (or other tool, as needed) to turn the compressor's main calibration screw to the right to increase the cut-in pressure. The main calibration screw is either above the differential adjustment screw, to the left of it or is the only metallic screw. Refer to the air compressor owner's manual to identify each adjustment screw correctly.
Turn the screw to the left to decrease the cut-in pressure. Test the pressures by bleeding air out of the air compressor and repeating these procedures until reaching the correct cut-in pressure.
Step 6: Adjust Differential Pressure
Adjust the cut-out pressure of the air compressor by turning the differential pressure screw with a small flat screwdriver. Turn the screw clockwise to increase the differential or counterclockwise to decrease the differential pressure. Bleed air out of the air compressor as in the first adjustment and notice the pressure reading on the air pressure gauge. Continue bleeding and adjustments until reaching the correct cut-out pressure.
Step 7: Reattach Pressure Switch Cover
Use a Phillips screwdriver to securely screw the plastic cover back over the pressure switch.