Things You'll Need
Measuring tape
Bi-metal hole saw
Chimney pipe ceiling support assembly
Hammer
8 penny common nails
Sheet metal screws
Dripless smoke pipe adapter
Screwdriver
24 gauge pipe
Single wall extension
Cleanout tee
Cleanout tee cap
Sheet metal screws, No. 8, 1/2inch
Smoke pipe connector
Fire-stops
Joist shields
Attic insulation shield
Roof flashing
Storm collar
Chimney round top
Many wooden stoves use metal chimneys to vent smoke out of a home. Metalbestos chimney pipe is filled with mineral wool insulation. The insulated layers protect potentially combustible materials, such as wooden floor joists, from exposure to intense heat. Metalbestos chimneys can have either double or triple walls of stainless or galvanized steel. Double-walled chimneys have insulation between two steel walls. Triple-walled chimneys have an insulated layer and a layer of air to keep its outer surface cool.
Step 1
Make the opening for the finished ceiling support of the chimney on either a joist opening or finished ceiling. Measure a square that is 6 1/4 inches larger than the diameter of the chimney pipe and cut it out with a bi-metal hole saw. For example, a 6-inch chimney pipe needs to have a square opening that is 12 1/4 inches by 12 1/4 inches.
Video of the Day
Step 2
Continue going up through the house and cutting holes for the chimney. The size of the square holes you need to cut will be the same as the one you cut for the finish ceiling support assembly. Position the chimney through the house in a way that avoids penetrating a wall or floor with a single wall connector. Give the bare smoke pipe or connector the minimum of 18-inch clearance space on its path up to the attic.
Step 3
Insert the ceiling support into the square opening from underneath the ceiling. Drive four nails part-way into the prepunched holes of the assembly. Adjust the assembly so that it is sitting level and flush up against the ceiling and finish driving in the nails.
Step 4
Position the trim plate around the support assembly and nail to the joists to secure it.
Step 5
Insert the dripless smoke pipe adapter into the ceiling support assembly and attach it with two screws.
Step 6
Install the single wall extension by sliding it over the dripless adapter. Drive two screws into the top of the extension and through the dripless smoke pipe adapter to fasten them together.
Step 7
Slide the top of the tee outlet into the single wall extension and secure it with two screws. Insert the drip-free cap onto the bottom of the clean-out tee. Put the cleanout tee into the bottom of the dripless smoke pipe adapter.
Step 8
Insert the connector or smoke pipe and run it to your appliance. Insert it into the smoke outlet of your appliance. Secure all joints of the pipe with screws.
Step 9
Lead the top pipe up through the house and to the attic, where it will reach the vent. Put the joints together by twisting them to lock them together. Drive three stainless steel sheet metal screws evenly around the pipe at 1/2 inch above the joint.
Step 10
Install a fire-stop and joist shield at every hole that the chimney runs through. Nail the flanges of the joist shield to the frame of the fire-stop.
Step 11
Once you reach the attic, slide the attic insulation shield onto the pipe. Screw it into place 10 inches up above the framing of the joist shield.
Step 12
Cut another square opening through the roof. Insert the pipe into the chimney outdoor enclosure. Fit a fire-stop into the joist shield and attach it to the ceiling joist. Push the pipe through it to the outside of the house.
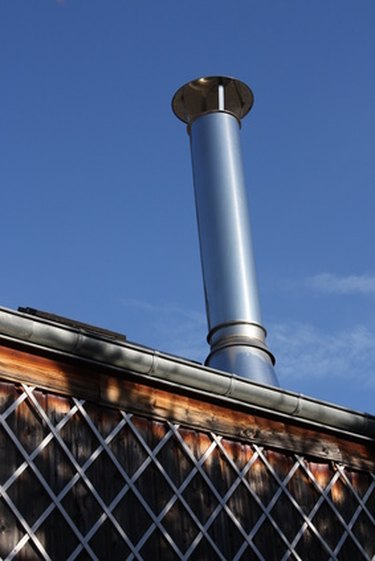
Step 13
Nail flashing onto the roof around the chimney pipe. Insert the storm collar termination onto the chimney pipe and secure with sheet metal screws. Finally, place the round top at the end of the chimney pipe and drive screws through it to keep it in place.
Tip
Read the instructions for your appliance and its fuel type. Different stoves and fireplaces have different clearance needs. It may need to have an 18-inch clearance from the walls or greater, depending on its make and model.
Metal chimneys are run through floors and ceilings of homes. Their insulation, combined with an adequate clearing space, prevents fire.
Warning
Read your municipality's building code before you start. Make sure that you are properly installing your chimney to avoid creating a potential fire hazard in your home.
To avoid starting a fire, make sure that your attic's insulation does not touch the chimney pipe.
Video of the Day