Whether you're illustrating a book, making banners for your website or creating your new logo, converting a pencil sketch to digital format can open up a world of processing options. While there are many ways of carrying this out, Paint, GIMP and Photoshop CC are all viable options and can achieve great results with a little practice and a little patience.
Scanning the Image
Video of the Day
Step 1
Place your pencil sketch in your scanner.
Video of the Day
Step 2
Locate your scanner management application and open the user interface.
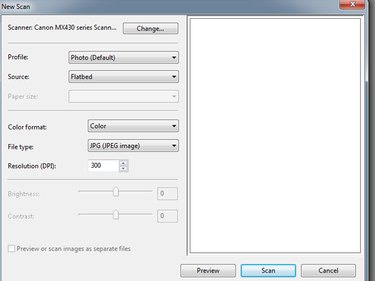
Step 3
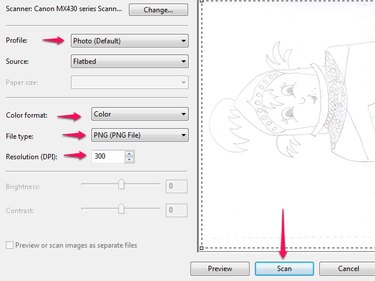
The setting options are similar on most scanners. For best results:
- Choose Photo for the Profile.
- Select PNG or JPEG for the file type. PNG is a lossless file type and works best for line art, logos or anything that might later be converted to vector so is generally the best option for this sort of project.
- If your scanner has the options available, you can choose Color format based on the type of sketch: Color for a color sketch, Black and White for line art and Grayscale for shaded sketches. You can also use Color for all types of sketches -- this sometimes provides optimal detail but then requires that you remove unwanted colors during processing. Play around with these options to get the best result for your scanner and type of sketch.
- The source should reflect the method in which you placed your sketch in the scanner -- so either Flatbed or Feeder.
- Choose a minimum resolution of 300 DPI. You can always downsize later.
- When you are happy with your settings, click Scan.
Step 4
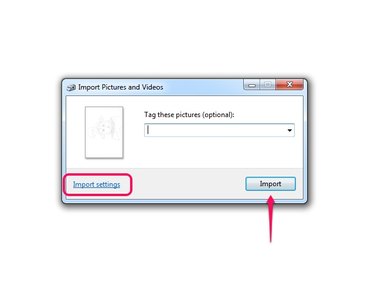
Import the image from the scanner to the computer, noting the import location. Your scanner likely has import settings to allow you to select the import location ahead of time. Open the image in your image-editing application of choice.
Processing Overview
After the image opens in your photo-editing application, there are a few things to consider:
- The image contrast usually needs to be increased.
- The image almost always needs some cleaning up to remove the extra marks and messy bits.
- The image often needs to have unintentional gaps closed so that you can paint using fill tools as well as brushes.
- If the image was scanned using the Color setting, there's a chance you'll need to remove unwanted colors.
Processing Your Image With Paint
Step 1
Paste your scan into Paint. Note that there is also an option to scan directly through Paint by selecting the Menu and then Direct From Scanner from the drop-down menu.
Step 2
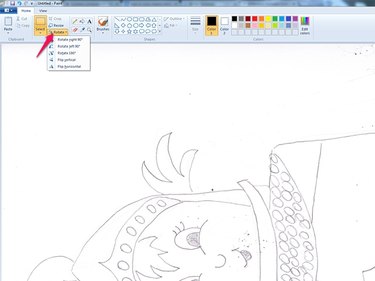
If your image is sitting sideways, click Rotate on the Ribbon and select the appropriate rotation angle.
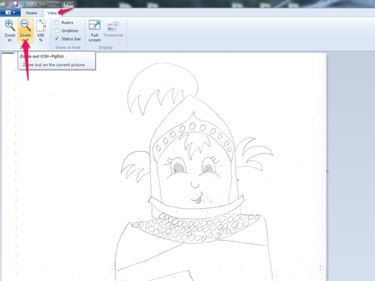
If the image appears too large, click the View tab and then Zoom out so that you can see the entire image.
Step 3
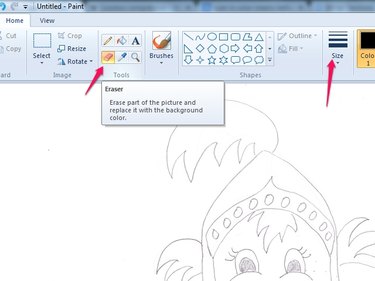
Clean up the image. Re-select the Home tab and then click on the Eraser in the Ribbon. Select an eraser Size from the ribbon.
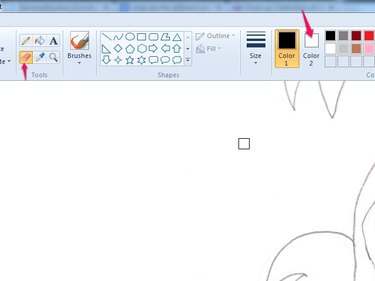
The eraser erases to the background color -- the Color 2 box in the ribbon -- so make sure it is set to White. Clean your image by erasing all the messy bits and extra lines.
Step 4
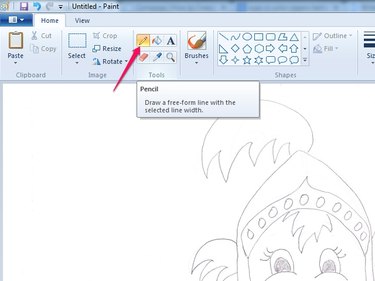
Fill in unintentional gaps in the artwork by selecting the Pencil tool, clicking on Size on the ribbon and choosing a size comparable to the line size in your sketch.

Click the Color Picker tool and then target an area of the pencil sketch to choose a pencil color. Fill in any missing lines or unwanted gaps.
Step 5
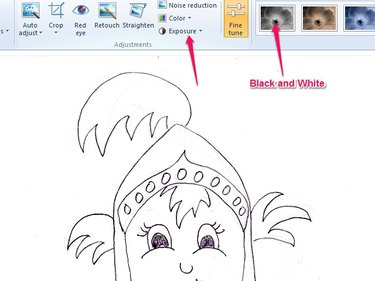
If you find you need better contrast, adjust it using the Exposure function in Photo Gallery which comes as part of Windows Essentials. You'll need to save the image as a JPEG before opening in Photo Gallery. Also, check for unwanted colors during this step and remove by clicking the Black and White image setting.
Step 6
Reopen the image in Paint or other photo-editing application to paint and complete the image to your liking.
Processing the Image With GIMP
Step 1
Open the scan in GIMP.
Step 2
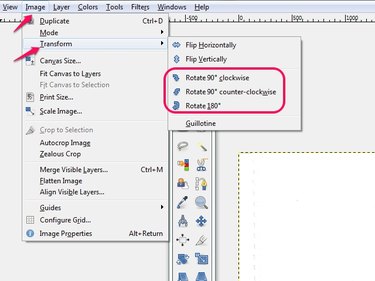
If your image is sideways, rotate it by selecting Image, and Transform. Then select the appropriate rotation angle to adjust the orientation. You can also use the Rotate Tool -- keyboard shortcut Shift-R -- to turn it. Select View and Zoom to adjust your view.
Step 3
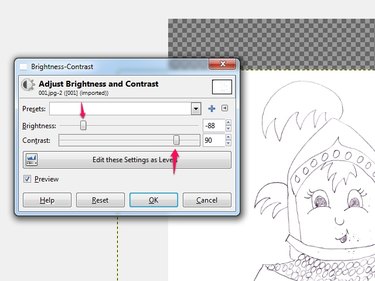
Adjust the contrast by selecting Colors and then Brightness/Contrast. Increase the contrast by sliding the Brightness slider towards the left and the contrast slider toward the right. When you are satisfied with the results, click OK.
Step 4
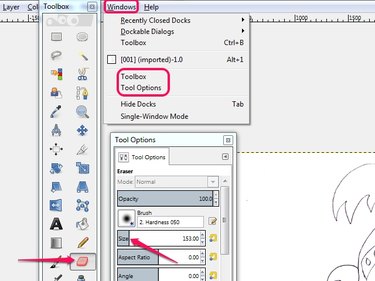
To begin cleaning up the image, select the Eraser from the Toolbox -- keyboard shortcut Shift-E. Input Size using the Tool Options and choose an appropriate brush.
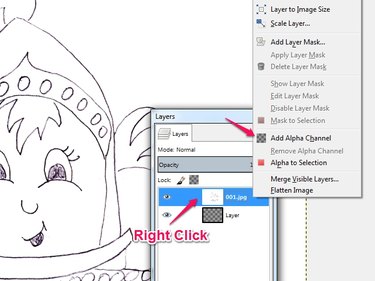
Like Paint, the eraser can erase to the background color but it can also erase to transparency. To erase to transparency, the layer needs to have an Alpha Channel. Right-click on your layer and choose Add Alpha Channel. If the layers panel is not visible, click Ctrl-L to open it. You should now be able to erase to transparency, if you so choose.
Step 5
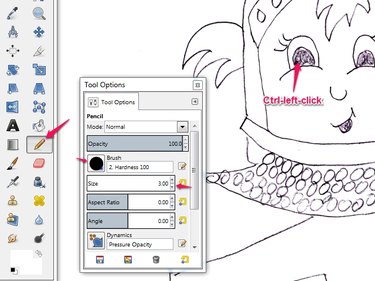
To fill in gaps, select the Pencil Tool -- keyboard shortcut N and select an appropriate brush and size from the Tool Options. This will likely be a small brush with hard edges. Hold Ctrl-left-click to select the pencil color from an area of your sketch. Use the pencil to fill in any unintentional gaps in the artwork.
Step 6
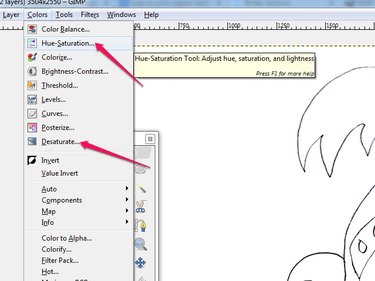
If you scanned using the Color option and have unwanted colors, use the tools under Colors to adjust. Hue-Saturation or Desaturate are good for this purpose.
Step 7
Paint or process your image using your favorite application.
Processing the Image With Photoshop
Step 1
Open the image in Photoshop CC. Adjust the orientation by selecting Image and then Image Rotation. Use the Zoom Tool -- keyboard shortcut Z -- to adjust the view.
Step 2
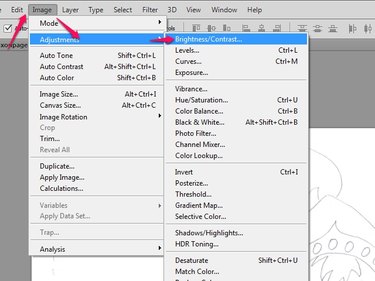
Access the Brightness/Contrast controls by selecting Image from the Main Menu, clicking on Adjustments from the drop-down menu and selecting Brightness/Contrast.
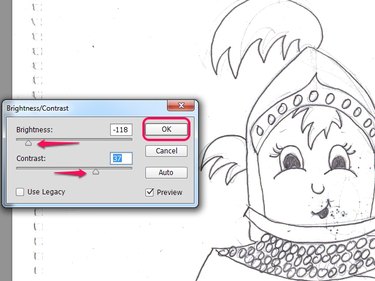
Increase the contrast by sliding the Brightness slider toward the left and the contrast slider toward the right. When you are satisfied with the results, click OK.
Step 3
As with Paint and GIMP you can clean the image using several tools. Explore the Brush Tool, the Clone Stamp Tool, and the Eraser Tool which are all viable options. Try this method as well:
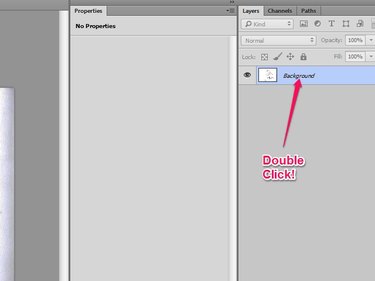
Double-click on the Background layer in the Layers panel to turn it into a regular layer.
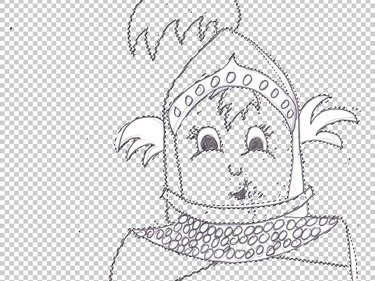
Select the background sections of your image by using the Magic Wand, Color Range or similar selection tool and press Delete on your keyboard to delete larger areas at once.
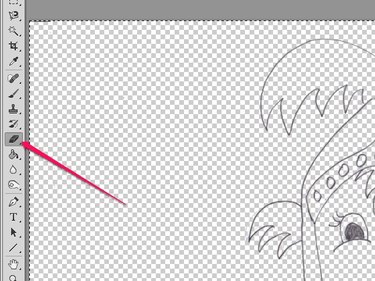
Use the Eraser Tool to clean up any imperfections.
Step 4
If you scanned using the Color setting and have unwanted colors, select Image, Adjustments and Hue/Saturation or Desaturate to remove them.
Step 5
Color or paint your image using your favorite photo-editing application.