
Making an electroscope for a science project is not only exciting, but easy. An electroscope is a scientific measuring instrument that detects the presence of an electrical charge. When an electroscope detects a charge, the flaps on the end will move away from each other.
- Aluminum foil
- Tall glass jar with plastic lid
- Hole punch or drill.

Cut two pieces of aluminum foil, one 10 inches by 10 inches, and one 4 inches by 10 inches. Crumple the larger piece of foil into a ball, the same way you would roll a piece of clay into a ball. Roll the smaller piece of foil between your palms to form a long, thin rod shape, like a pencil. Now connect the foil ball to the end of the rod with a thin strip of foil. Your two pieces together should resemble an all-day sucker, or lollipop.

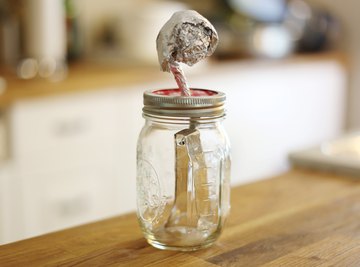
Make a hole in the middle of the jar lid with a hole punch or drill. Be sure that the hole is large enough for the foil rod to fit through. Slide the rod through the hole in the lid, so the ball sits above the lid, outside the jar, when the top is screwed on.

Bend the bottom of the rod so it makes a 90-degree angle. The angle should resemble an uppercase L.

Make a narrow strip of foil that is at least 10 inches long and fold it in the middle. Fold up about 1/8 of an inch on each end of the strip to make small flaps. Hang the folded strip of foil on the end of the rod where you formed the L shape.The strip should hang evenly on both sides.

Screw the lid tightly on the jar, with the foil rod and flaps inside. See that the two small flaps at the ends of the folded strip almost touch the bottom of the jar.

Test your simple electroscope by putting an electrically charged body near (or even in contact with) the foil ball on top. Try a plastic comb that you've combed your hair with or a balloon you've rubbed against a wool coat. When the electroscope detects a charge, the small flaps at the bottom of the jar will spread apart.
Things You'll Need
References
About the Author
Brandi Berry is a wife and mother from Kansas City. She believes she is not only in this world to learn all she can, but to teach all she learns. Berry loves to write and finds the Internet an ideal outlet to provide readers with advice and information through her stories.
Photo Credits
Pamela Follett/Demand Media