When a bathroom sink drain gets old, it tends to get rusty and smelly, and because there's little chance of things improving on their own, it's a good reason to replace the drain. Don't be intimidated by the task and call a plumber because as far as DIY jobs go, it's one of the least challenging. In fact, it's easier to do the job right the first time than it is to make a mistake, and you definitely can't say that for every plumbing job.
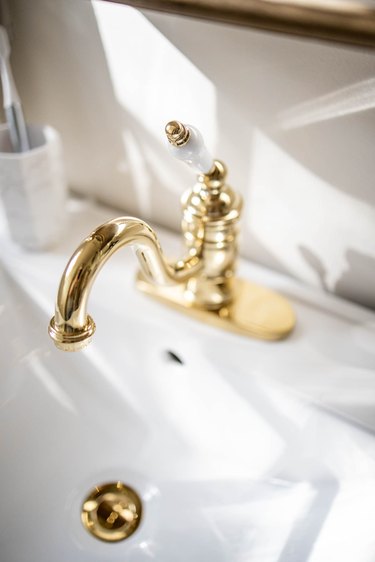
Purchasing a new faucet gives you another opportunity to replace the bathroom sink drain. Bathroom faucets often come with matching drain assemblies, and if the kit includes a pop-up stopper, you have to use the drain assembly included in the kit if you want the stopper to work. Another reason to remove and replace the sink drain is to stop a leak from around the drain opening.
Video of the Day
Video of the Day
Get to Know the Parts of a Bathroom Sink Drain
When assembled, a bathroom sink drain is a continuous length of pipe, but it has several individual parts that plumbers identify with technical terminology. It's important to know this terminology when you have to purchase new parts, and it helps to understand the sequence of assembly of the drain. Beginning at the drain opening, these parts are:
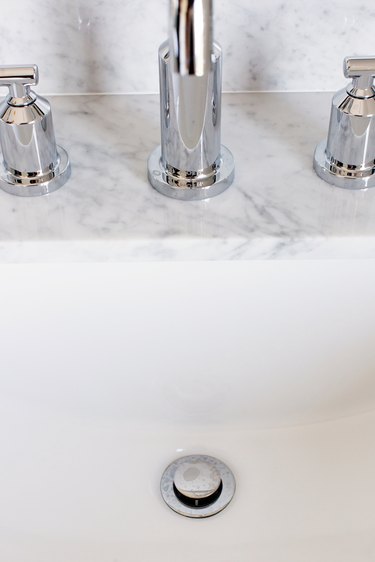
- The strainer is the metal drain covering itself. It may or may not have mesh or a crossbar to prevent small items from falling in the drain, but it always has a flange that prevents it from falling through the hole. A rubber gasket and locknut secure the strainer to the drain hole from underneath the sink.
- The tailpiece is the length of vertical pipe that extends down from the drain. If the drain comes with a pop-up assembly, the tailpiece has a threaded opening for the stopper's pivot rod. The tailpiece can corrode, as illustrated on Pretty Handy Girl, and sometimes, you can stop a leak by replacing it instead of the entire drain assembly.
- The P-trap is the curved pipe into which the tailpiece empties. The inverted "P" of the trap holds a pool of water that keeps sewer gases in the pipes. The plumbing code requires a trap on all plumbing fixture drains.
- The trap arm is the length of horizontal pipe that connects the P-trap to the drain, which is usually in the wall. The drainpipe is usually fitted with a trap adapter to reduce the size of the opening and allow a secure connection with a compression fitting.
The individual parts of the P-trap assembly are connected with compression nuts, or slip nuts, which are designed to be tightened by hand, although you often need tongue-and-groove pliers to do the job properly. Inside each connection is a tapered compression gasket that wedges into the slip joint to make a watertight seal when you tighten the nut. The reason for a leaking joint is often that this gasket is worn out and needs to be replaced.
Things You'll Need
Soap and water
Screwdriver
Tongue-and-groove pliers
Rag
Flashlight
Warning
Turn off the water supply shutoff valves under the sink to prevent someone from turning on the faucet while you have the drain disassembled.
How to Replace a Bathroom Sink Drain
Step 1: Clear Out the Sink Cabinet
Give yourself plenty of room to work by clearing everything out of the sink cabinet. If the cabinet is small and the drain has a pop-up drain stopper, consider removing the cabinet doors by unscrewing the hinges with a screwdriver to allow easier access to the stopper mechanism.
Step 2: Unscrew the P-Trap Nuts and Remove the Trap
Loosen the compression nut holding the mouth of the P-trap to the tailpiece and then unscrew the one holding the trap arm to the trap adapter. You should be able to do this by hand but if not, use tongue-and-groove pliers. Lower the mouth of the trap until it clears the bottom of the tailpiece, gently pull the trap arm away from the trap adapter and invert the trap over a bucket to empty it. It's probably full of gunk, so it's a good idea to take it outside and clean it to prevent a clog from developing if you plan to reuse it.
Step 3: Disassemble the Pop-Up Stopper Assembly
Locate the stopper pivot rod on the back of the tailpiece and squeeze the spring clip holding the clevis (the vertical strip of metal with holes in it) to loosen it. Slide the clip and clevis back to disconnect the clevis from the pivot rod. Unscrew the nut holding the pivot rod to the tailpiece with your fingers or pliers and remove the pivot rod.
If you're replacing the faucet or the drain assembly, you'll also want to remove the faucet lift rod (the vertical rod at the back of the faucet that you raise or lower to control the stopper). To do this, loosen the nut holding the clevis to the lift rod, slide the clevis off the rod and pull out the lift rod from the top of the faucet.
Step 4: Unscrew the Tailpiece
Grip the tailpiece with pliers and turn it counterclockwise to loosen it. Unscrew and remove it from the strainer by hand.
Step 5: Remove the Strainer
Unscrew and remove the strainer locknut using pliers and pull off the rubber gasket behind it. Tap upward on the strainer with the pliers to loosen it from the sink and then pull it out from the top of the sink. Scrape old plumbers' putty from the sink drain opening using a putty knife and clean the bottom of the sink thoroughly with soap and water.
Step 6: Install the Strainer for the New Drain Assembly
Pack the underside of the strainer flange with fresh plumbers' putty or apply a continuous roll of putty around the sink drain opening. Drop the strainer into the drain opening and then slip on the rubber gasket from underneath the sink and screw on the locknut. Tighten the nut as much as you can by hand and then finish the job with pliers. Clean up all the putty that oozes from underneath the flange using a putty knife and a rag.
Step 7: Screw on the Tailpiece
Screw the tailpiece onto the strainer and tighten it hand-tight. If the tailpiece has an opening for a pop-up drain stopper, make sure this opening is facing the back wall when the tailpiece is tight.
Step 8: Connect the Pop-Up Assembly
Drop the lift rod into the hole in the back of the faucet, connect the clevis and tighten the connection screw by hand. Drop the stopper into the strainer and insert the pivot rod into the hole in the tailpiece and through the slot in the bottom of the stopper flange. Make sure the stopper goes up and down when you operate the pivot rod and then tighten the nut holding the pivot rod to the tailpiece finger-tight.
Insert the other end of the pivot rod through a hole in the clevis (select the hole that allows for best operation of the stopper) and slip on the spring clip to hold it. Tighten the nut holding the clevis to the lift rod with pliers to prevent it from moving.
Step 9: Reconnect the P-Trap
Replace the compression gaskets on the tailpiece and trap arm with new ones, ensuring that the tapered side faces toward the connection. Slip the trap arm onto the trap adapter and the trap inlet onto the tailpiece and tighten the compression nuts by hand.
The trap arm must have a slight downward slope to the drain, so if the new tailpiece is longer than the old one and you can't slide the trap inlet high enough to produce this slope, cut the tailpiece with a hacksaw before installing the trap.
Step 10: Check for Leaks
Close the sink stopper, fill the sink and check the strainer for leaks from underneath the cabinet using a flashlight. If you see any water, tighten the strainer locknut until the water stops. Open the stopper and let the water drain while you look for leaks in the drain assembly. Tighten any compression nuts that leak using tongue-and-groove pliers.