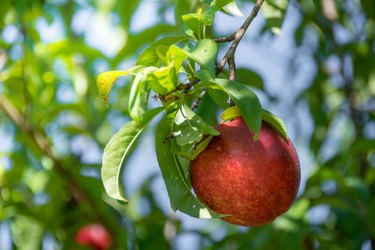
Watching your garden flourish from your hard work is an amazing feeling. It's even more satisfying when you grow plants directly from their seeds and they turn into amazing and sustainable plants. Growing fruits from their seeds is easier than you might think, and this applies to growing a nectarine tree (Prunus persica var. nucipersica) from a pit as well. While there are certain conditions that need to be met for it to be a successful project, it is an endeavor that will bring you abundant rewards.
Growing a Nectarine Tree
Video of the Day
You may have thought it impossible to grow a nectarine tree directly from the pit; however, it is actually quite simple. Before jumping into the growing process, it is important to know that it will be quite a while before you are able to eat a fruit directly from your tree. It will take anywhere between two and four years before you see any signs of fruit on your tree. This is considering that all optimal growing conditions are met and that the plant is well cared for. Even if you provide optimal care, it's also important to note that the fruits from your new tree may not match the size and quality of the fruit from which you took the seed.
Video of the Day
Another aspect that must be verified before beginning this growing project is to check your hardiness zone. Most nectarine varieties grow best in USDA plant hardiness zones 4 through 8. They need a dormancy period, making areas with winters where temperatures drop below 45 degrees Fahrenheit ideal. Along with a dormancy period, they will grow their best in locations with hot summers.
Prepping the Seeds
Start by acquiring a few seeds from the fruits of a local nectarine tree. It is recommended to do so with fruit straight from the tree, as it should be free of any genetic modifications or pesticides. You should prep more than one seed; this way, you will likely have at least one seed that will germinate, allowing you to continue the growing process.
Let the seeds dry out in your kitchen in an area where they won't be touched or disturbed. This may take anywhere from a few days to a few weeks depending on the warmth and dryness of the surrounding air.
Letting the pit dry out will allow the seed inside to shrink, making it easier to withdraw from its shell. Once the pit has dried, find a hammer and crack open the pit. You might also be able to accomplish this with your average nut cracker. The inner seed should resemble something similar to an almond, and this is the actual seed you will be planting.
Beginning the Growth Process
Fill a jar or plastic bag with potting soil and add the seeds you have harvested into the soil. Add a small amount of water to make the soil moist, not soggy, and proceed to toss around the seeds to make sure everything gets mixed together. Place the lid on the jar or seal the plastic bag and place it in your fridge. Pitted fruit seeds need cold temperatures to allow them to sprout, so leaving it in your fridge is probably the most optimal growing condition.
Leave the jar or bag in your fridge, checking on the seeds every couple of weeks to look for signs of germination. It may take several months before you have roots long enough to plant your seed successfully in soil.
Once the seeds are ready for sowing, place each seed in a separate growing container with proper drainage and a soil pH between 6.0 and 7.0. When the sprout has developed into a small plant that will sustain the elements, you can transfer the seedling outdoors in spring after the last frost either in a pot or directly in your garden.