Locking a worksheet in Excel 2013 gives you the freedom to share the file with someone, without worrying about that person making unwanted changes to the data or its formatting. Because you can customize the protection for any worksheet, it's important to review what the user can and cannot do once its locked. The options you leave unlocked for the user range from the ability to edit PivotCharts to the ability to click and select a cell.
If the Excel file contains more than one worksheet, you may want to consider locking the entire Excel workbook.
Video of the Day
Video of the Day
Step 1
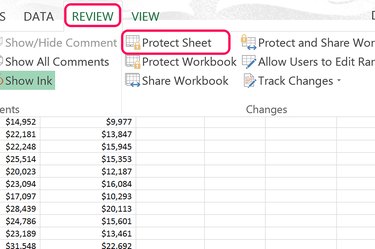
Select the Excel worksheet you want to lock. Select the "Review" tab and click the "Protect Sheet" icon in the Ribbon's Changes section.
Step 2

Scroll through the list of options and choose those that you don't want locked. Any item without a check mark beside it will be locked. Options with check marks are unlocked.
The first two items are checked by default, allowing anyone opening the worksheet to select both locked and locked cells. Clear either of these check boxes if you don't want anyone be able to select these cells.
Step 3
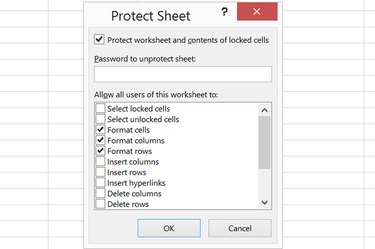
Click the "Format Cells," "Format Columns" and "Format Rows" check boxes if you want users to be able to change the formatting, like the font or background colors. Note that if you applied conditional formatting to the worksheet, the formatting will still change if someone changes a value in a cell, even if the formatting options are locked.
Step 4
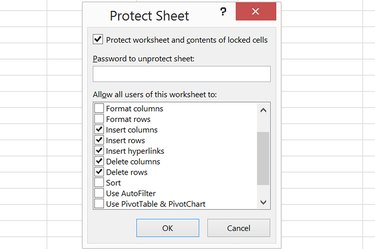
Specify if you want the user to be able to insert and delete rows or columns in the worksheet. There is also an option to allow the user to insert hyperlinks into the worksheet, like creating a link to another worksheet or a Web page within one of the cells.
Step 5
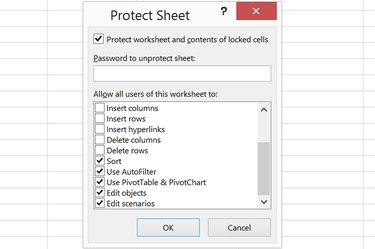
Click the "Sort" check box if you want users to be able to sort data using the Sort & Filter group options under the Data tab. This won't allow them to sort ranges on any locked cells on a protected worksheet.
Select "AutoFilter" if you want users to be able to change filter ranges on AutoFilters you have already applied to the worksheet. Note that users can't add or remove AutoFilters on any protected worksheet, regardless of the options that have been unlocked.
Select the "Use PivotTable & PivotChart" option to allow users to create or change PivotTables and PivotCharts.
Unlock the "Edit Objects" option to allow users to change graphics like charts, maps, shapes and text boxes. This option also needs to be unlocked for users to interact with PivotCharts.
Click the "Edit Scenarios" option to allow users to look at hidden scenarios, or to edit and delete scenarios. Values in changing cells can only be edited if the cells aren't protected.
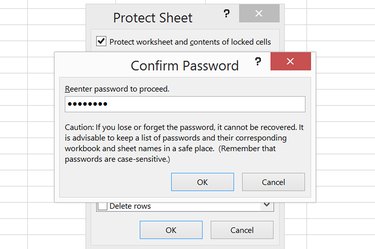
Step 6
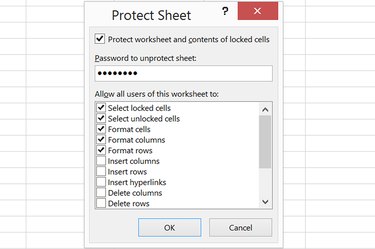
Type a password in the "Password" field and click "OK." Enter the password again in the confirmation window that opens. You will need to enter this password in order to unlock the worksheet.
Step 7
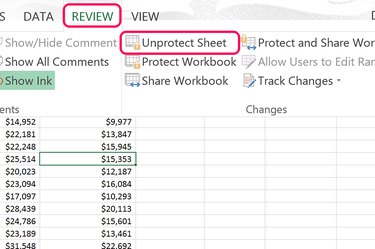
Click the "Review" tab above the worksheet at any time and click "UnProtect Sheet." This prompts you to enter the password you selected. Once the worksheet is unprotected, you can edit the worksheet as usual.