
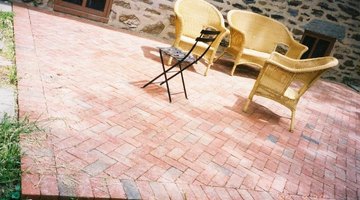
Do it Yourself Brick Paver Patio

Building a brick patio is one of the most common home improvement projects undertaken by home owners who want to add both form and function to their yards. This is due in part because it requires no specialized skills, just a willingness to do the labor and an attention to detail.
Plan the Job
Spend time planning your patio thoroughly and it will pay off in a job that progresses efficiently and without extra and avoidable cost over runs. Select the plot of land for your patio and mark its perimeters with landscaping paint or stakes and string. Calculate the area of your patio in square feet as you will need this number to determine all you material needs. Select a brick for your patio that fits your color preference and is also readily available and will suit your needs as far as delivery or pickup. If you are incorporating a special pattern into the patio by using different color bricks, plan and lay out the pattern so that you can order the appropriate number of each color of brick. Check on the schedules of those people who will be helping you and set the dates for the job.
Materials
Compile your list of materials and the quantities needed of each so that you can order materials for the job ahead of time. You want to have everything ready to go when you have helpers available. You will need a 4-inch layer of finely crushed gravel over the entire patio area, then a 1-inch layer of masonry sand over that, edge restraints for the perimeter, a 6-foot piece of 2x4 lumber, shovels, picks, rakes, a couple of heavy duty brooms and of course the brick.
Prepare the Base
Excavate the patio area down to a depth of 5 inches, plus the depth of the bricks you have chosen for the project. Compact the soil firmly with a hand tamper or heavy duty plate compactor. Add the 4-inch layer of gravel and level it with the rakes.
Lay the Patio
Begin in one corner and add the 1-inch layer of masonry sand to an approximately 4-foot-by-4-foot square area. Screed the sand with the 2x4 lumber to smooth it and make it as close to perfectly level as possible. Place the first brick tightly up against the edge restraints and lower it on to the sand. Add successive bricks in the same manner using previous bricks like you did the edge restraints. Once that sand area is complete, add another section of screeded sand and continue laying brick this way until you have laid the entire patio. Add another 1/4 inch layer of sand on top of the laid brick and sweep it back and forth, working it into the cracks between the bricks to set them securely in place. Sweep off the excess sand and you are finished.
The Drip Cap
- Building a brick patio is one of the most common home improvement projects undertaken by home owners who want to add both form and function to their yards.
- If you are incorporating a special pattern into the patio by using different color bricks, plan and lay out the pattern so that you can order the appropriate number of each color of brick.
- Compact the soil firmly with a hand tamper or heavy duty plate compactor.
- Begin in one corner and add the 1-inch layer of masonry sand to an approximately 4-foot-by-4-foot square area.
- Add another 1/4 inch layer of sand on top of the laid brick and sweep it back and forth, working it into the cracks between the bricks to set them securely in place.
References
Writer Bio
Anthony Smith began writing for Demand Studios in May of 2009 and has since written over 1400 articles for them. He also writes for "The College Baseball Newsletter." He attended the University of New Mexico, and has more than 25 years of experience in the business world.
More Articles