
If you would love to put up a Christmas tree but don't have room for one in your small space, here's the perfect solution for you. This space-saving DIY wire Christmas tree simply hangs flat on the wall.
An artificial Christmas tree doesn't need to be a pre-lit pine tree and several feet tall. With this wire xmas tree, you can add to your holiday decor without taking up much space and rearranging the furniture. You can also use this metal wire design as an outdoor Christmas tree.
Video of the Day
Video of the Day
You can decorate it with ornaments, and even use it as a holiday card display. But this tree isn't made with just any wire. It's created with wire hangers, so it's a great way to upcycle extra hangers you may have in the closet, making it beautiful for your home—and the environment.
Things You'll Need
8 wire hangers
24-gauge wire
Wire cutter
Spray paint
Wall hook
Garland
Ornaments

How to make a wire Christmas tree
1. Pair up the wire frame hangers
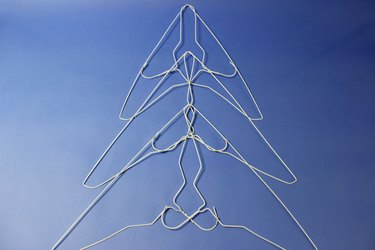
To create the tree shape, divide the eight hangers into four pairs. Each pair of hangers will be arranged in a triangular shape, with the narrowest triangle at the top of the tree, and the widest at the bottom. Follow the formations shown in these photos.
This is the first pair of hangers, which has the narrowest shape. Connect the two hangers by cutting some 24-gauge wire with wire cutters and wrapping the wire at contact points, where the hanging hook of one touches the long edge of the other.

The second pair of hangers is arranged a little wider. Again, connect the hangers with wire at the contact points.

The third pair of hangers is even wider. Connect these hangers with wire.

And the fourth pair is the widest. Connect them with wire as well.

2. Connect the top two triangles
Overlap the top two triangles, laying the tip of the wider triangle on top of the bottom of the narrow triangle. Notice how the curves of the wire hangers create a delicate art deco design. Connect these two triangles with wire at a minimum of three contact points to keep it stable.

3. Connect the third triangle
Overlap the third triangle on top of the second, laying the tip of the wider triangle on top of the bottom of the narrower one. Connect them with wire at contact points. It's already looking like a tree!
4. Connect the fourth triangle
Complete the tree shape by positioning the widest triangle at the bottom, with the tip laying on top of the bottom of the triangle above. Again, connect them with wire at contact points. You now have a wire tree.

Tip
If you would like to create a taller tree, add additional pairs of wire hangers to the bottom, configured into the widest triangle formation.
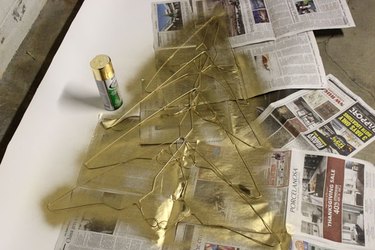
5. Spray paint the tree
In a well-ventilated area, spray paint the wire hanger tree on both sides in the color of your choice. Be sure to wear eye, nose and mouth protection.
Tip
Alternatively, you can skip this step and use copper wire or white or gold-painted hangers.
6. Hang the tree
Hang the tree from a hook on the wall. If you do not want to damage your wall, select wall hooks with removable adhesive strips. For a seamless look, spray paint the hook along with your wire hangers so they are the same color.

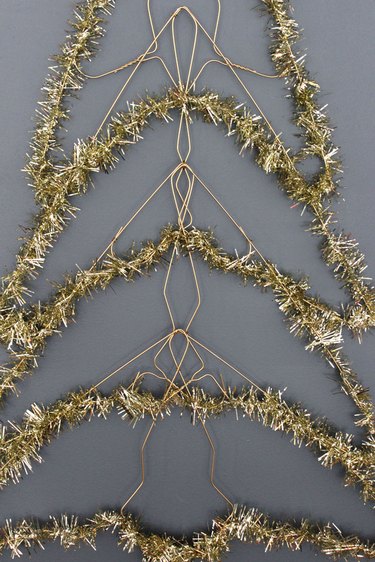
7. Add Christmas tree decorations
Wrap garland around the perimeter of the tree. Work in sections of about 24 inches of garland at a time so it does not get tangled.

Then, work the garland across the tree to accentuate the four sections.
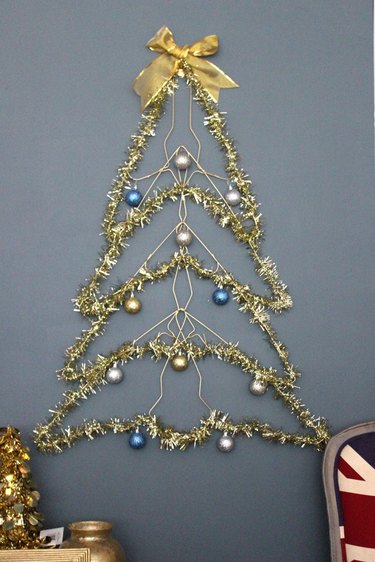
8. Add the Christmas tree ornaments
Hang ornaments from the tree with 24-gauge wire. If you intend to use your wire Christmas tree for ornaments, choose a selection of ornaments that are relatively small or flat so they do not protrude too much from the wall. Consider small multicolored balls or options like glue snowmen or paper snowflakes.
Consider adding other decorations such as a red berry or pine cones. Add a bow as a tree topper for the tree and to hide the hook.
Tip
Brighten it up even more by adding a small light string of warm white or multicolor lights on the tree, or hang the LED lights on the wall to frame your wire tree. If you are hanging the tree on an outside wall, make sure you use outdoor Christmas lights.
Bonus: How to turn the tree into a card display tree
With the ornaments, the wire hanger Christmas tree already makes a beautiful Christmas decoration for your home. To add more functionality to it, turn the tree into a holiday card display by clipping cards to the tree with clothespins. This wire tree card holder is such a festive piece of wall art, you may want to make one even if you have an actual Christmas tree in the house.

Whether you hang the tree on its own or use it to display your holiday cards, the DIY wire Christmas tree brings Christmas spirit to your home decor. Simply connect the wire coat hangers to create a tree shape. Then paint and decorate the wire tree to complete the look.