The Oatey drain company produces shower drains designed for installation in tiled shower floors to allow for stability and safety during installation. You can install these drains in either plywood or concrete subfloors, which are two of the most common materials used to create subfloors in shower installations.
The Oatey drain system features an adjustable drain barrel that allows the installer to change the height of the drain to match the height of the tile floor. Proper installation and sealing of the shower drain is the only way to prevent leaking and ensure a safe and clean shower environment.
Video of the Day
Video of the Day
Cut Through the Substrate
Cut a 4 1/2-inch diameter hole in the substrate with a jigsaw; use a diamond blade saw to cut through concrete. Cut the hole so that its center sits above the drainpipe under the shower floor. If you are unsure of the location of the pipe, contact the shower installer or a plumber.
Disassemble and Install Oatey Drain
Disassemble the drain. It comes apart in four pieces: the drain base, the clamping ring, the drain barrel and the strainer. The base and ring are held together with bolts; use a wrench to disassemble the drain completely.
Set the drain base in the hole you cut so that the wider top part sits on the subfloor and the bottom touches the drainpipe. Adhere the pipe to the base with solvent cement provided by Oatey with your installation kit. The solvent cement seals the base to the pipe to prevent leaking when the drain is in use.
Cement Around Drain
Mix Portland cement and water together until it forms a thick paste similar to peanut butter. Cover the opening over the drain base with masking tape so that you completely seal it.
Spread a thin, even layer of the cement mixture over the subfloor surface with a flat-bladed trowel. The cement should slope downward toward the drain 1/4 inch per foot of floor space on each side so that the water slides towards the drain. Spread the cement right up to the edge of the drain base but not over the hole. Allow the cement to dry for 24 hours before continuing.
Install Shower Pan Liner
Measure and cut the shower pan liner to fit around your drain and in your shower. Lay the liner in the shower and trace out the lines along which you need to cut to make it fit in the shower. The liner should run 2 inches up the wall on all sides. Do not cut away the section over the drain itself. Cut the liner to fit following the liner's instructions; different pan liner manufacturers have different requirements.
Remove the tape from over the drain base. Spread a bead of silicone caulk along the top of the drain base, 1 inch from the edge. Install the bolts so that two to three of the threads are hidden beneath the drain base. This will leave a significant amount of space between the base piece and bolts, which is the goal.
Lay the pan liner over the entire shower floor. Use a sharp utility knife to cut small "X" shapes over the locations of the bolts, so that when you push down, the bolts poke through the pan liner. Apply pressure outwards from the drain to the walls, ensuring that the liner bonds to the caulk around the drain and lays completely flat against the floor.
Secure Pan Liner
Nail or staple the pan liner in place against the floor or the wall studs following the manufacturer's instructions. The nails or staples should sit about 1/2 inch below the top of the liner for a firm hold.
Cut out the section of the pan liner that sits directly over the drain hole. Set the clamping ring on top of the area so that the holes in the ring pass over the bolts. Tighten the clamping ring down as tight against the pan liner as you can make it and then tighten the bolts down as far as they will go to hold everything together.
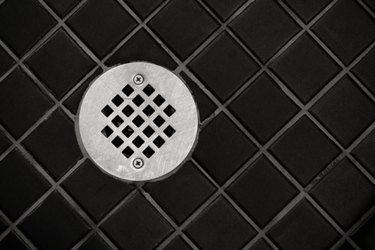
Complete Oatey Drain Installation
Fill the weep holes around the bolts with a small amount of pea gravel to allow for some drainage to continue through that area. Mix up cement mortar as before and spread a 1 1/2-inch thick layer over the pan liner to create a reinforcing layer. Make sure you create the appropriate slope toward the drain of 1/4 inch for every foot. Allow the cement to dry before continuing.
Thread the drain barrel into the clamping ring and twist it counterclockwise until it is firm against the shower floor base. If you intend to install tile, leave enough space between the barrel and the floor to allow for the width of the tile, as well as a 1/4-inch layer of tile adhesive. Set the strainer in place over the barrel to complete drain installation.