Gates can be heavy, and frequent opening and closing will cause wear and tear on both the gate's hinges and any portions of the gate that come into contact with the ground. Adding wheels to a gate can go a long way toward extending its life, as well as make its use far simpler. The process of wheel installation varies slightly depending on the material that gate is made of.
Basic Wheel Installation Tips
You can purchase wheels for your gate separately or in a kit. Wheel kits are often sold in hardware and home improvement stores. If you are purchasing wheels without a kit, you will need to be sure they can support the weight of your gate. Check their weight rating before purchasing. In addition, some wheels merely spin in place, while others rotate and spin. The kind you choose depends on the motion you prefer your gate to have.
Video of the Day
Video of the Day
Regardless of whether your wheels are in a kit or sold on their own, you will need to be sure they are the correct size. Unless you plan to rehang the gate, wheels you install must have a diameter appropriate to the gate's distance from the ground. Before proceeding with your gate refurbishment, be sure to measure this distance.
Before attaching wheels to your gate, you also need to verify that the gate is even. Use a carpenter's level or check the doors. They should be the same height off the ground as one another on both their near and far ends. If this is not the case, you may need to make adjustments before installing wheels.
Wheel Installation for Various Gate Materials
If your gate is wooden, wheel installation is a fairly simple process. Wheels for wooden gates typically come on a long bracket. The bracket itself is screwed into the back of the gate, and the wheel sits just beneath the bottom of the gate. This requires only basic tools and hardware.
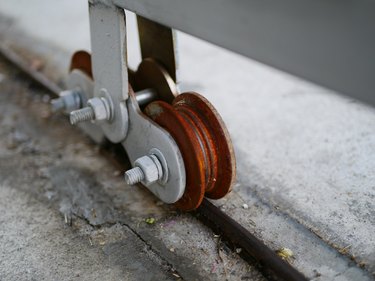
Wheels for metal, vinyl or chain link fences are often called helper wheels. These also sit on a bracket. In this case, the bracket is U-shaped and has a bolt at either end. Installation requires only the removal of the bolts, hooking of the bracket to the fence and replacement of the bolts.
Installing Wheels on a Gate
After carefully reading any instructions that came with your wheel kit or wheels, place the wheel beneath the gate where you intend to attach it. Holding the wheel and gate firmly, as if they were already attached, swing both outwards. Be sure the wheel can spin completely in every allowable direction and isn't impeded by anything in the yard or driveway.
Next, while still holding the wheel in place, use a pencil (for wood and vinyl) or piece of tape (for chain link or metal fences) to indicate where the wheel should attach to the gate. Once you've finished marking this place and where any bolts or connectors will go, remove the wheel.
If you are working with wood or a material that permits drilling a hole, do so in the place you have marked. Then, for all gate types, attach the wheel in the place you indicated with your pencil or tape.
Once you have finished installing the wheel, test the gate and be sure it opens the way you hoped it would. If it does not swing freely or open completely, adjust the wheels until you are satisfied.