
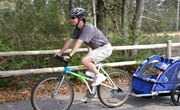


Biking is a great family activity. Young children who cannot ride yet could feel left out, but the next-best thing is to pull them behind the bike in a trailer. Bike trailers easily attach to the rear axle or seat post of a bike. Learn to securely attach the trailer to a bike so they won't become separated during a ride.
Items you will need
Wrench set
Bike
Bike trailer
Step 1
Determine what type of bike trailer hitch system you have. There are quick-release skewers and fixed-nut attachments. The quick-release skewer is just a squeeze clamp and strap that attaches around the bike seat post. The fixed-nut attachment is a horizontal hole through the trailer hitch that will bolt to the rear bike wheel.
Step 2
Unscrew the nut holding on the rear tire. This is necessary for the fixed-nut attachment bike trailer hitches.
Step 3
Slide the fixed-nut attachment trailer hitch over the rear wheel bolt protruding through the bike frame. Screw the nut back on tightly.
Step 4
Wrap the strap around the bike seat post under the bike seat. This is necessary for the quick-release skewer bike trailer hitches.
Step 5
Squeeze the clamp on the quick-release skewer. Feed the strap back through the quick-release skewer on the bike trailer. Release the clamp on the quick-release skewer. Pull the strap tight.
References
Writer Bio
Mark O'Brien started his professional writing career in 2000 at the "Newman Grove Reporter" newspaper. He was an English tutor while in school and earned an Associate of Arts in English from Northeast Community College. O'Brien indulges his mechanical side by fixing mowers part-time.