Things You'll Need
Screwdriver
Wrench
Pliers
Needlenose pliers
Wire brush
Plumber's tape
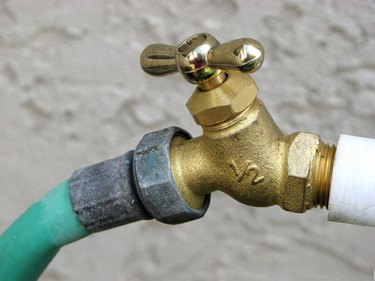
The hose bib or spigot is the part of your outside hose connection that allows you to turn the water on or off for outdoor connected hoses such as a sprayer hose or soaker. Because these hose bibs are located outside, they are exposed to the elements and can be damaged by severe weather such as a hard freeze. If you find out that your hose bib is leaking, you should repair it as soon as possible. A leaking hose bib can not only waste water, but cost you money as well.
Step 1
Turn off the water supply for the bib you will be repairing. Unless you have a separate shut off valve for this faucet (rare), you will have to shut off the water supply for the whole house. This is usually located somewhere near where your property joins the street.
Video of the Day
Step 2
Open the faucet and allow any water inside to run out.
Step 3
Use the screwdriver to remove the screw holding the valve knob in place. Remove the valve knob.
Step 4
Use the adjustable wrench to remove the packing nut located just beneath the valve handle.
Step 5
Use a pair of needlenose pliers to remove any of the packing material inside of the valve. This is usually present on older bibs. Newer ones will utilize a rubber o-ring.
Step 6
Pull out the valve stem with the pliers.
Step 7
Remove the old washer at the end of the valve stem by first unscrewing the screw holding it in place. Replace with a washer of the same size. Tighten in place with the screwdriver.
Step 8
Use a stiff wire brush to clean off the stem and remove any debris or foreign objects. Squeeze a few drops of silicon grease or lubricant on the valve stem.
Step 9
Replace the valve stem in the faucet. Replace the packing material or o-ring.
Step 10
Wrap the threads on the faucet with plumber's tape. Replace the packing nut and tighten with the wrench.
Step 11
Reattach the handle. Tighten with the screwdriver.
Step 12
Restore the water supply. Open the faucet and check for leaks. Tighten the packing nut if necessary.
Tip
If you're worried about scratching up the hose bib when removing the packing nut, you can cover your pliers or wrench with duct tape.
An alternative to teflon tape is thread compound.
Video of the Day