The Mayans were a powerful tribe of people that thrived in Mesoamerica from 2000 BC until 900 AD. This incredible group of people had a calendar, method of writing and built large cities with the most modern infrastructure of the time. The Mayans are well-known for their towering pyramids and temples, and you can easily create a model of a Mayan pyramid as a project for school when your class is studying this time period.
- Plywood board
- Sandpaper
- Paint
- Sugar cubes
- Glue
- Toothpicks
You can add realistic detail to the base of your project by using paint that has a special sand effect. If you do not have the faux finishing paint, you can just mix a small amount of sand into regular paint, and apply it as evenly as possible.
Add fake foliage or small models of people to give your model more details.
Be careful when transporting your project since it will be heavy and fragile. If you can, have an adult help you carry it to school in the bed of a pickup or the cargo space of an SUV.
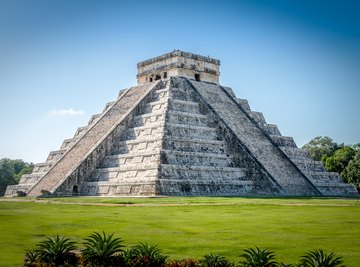
Look at pictures of Mayan pyramids to decide which structure you want to showcase. Chichen Itza is a famous Mayan pyramid, and it is a more simple design than some of the other structures.
Cut a piece of plywood to fit your model, making sure that it is small enough to fit through standard doorways without tilting it. Children should ask an adult to cut the board for them. Sand the edges to prevent any splinters, and paint the surface to make it look like the ground.
Use sugar cubes to build the pyramid. Make a large square by gluing the cubes to the board, and then fill it it with three or four rows of sugar cubes behind the outer perimeter of the square. Begin to build layers, moving each subsequent square outline in by the width of half of a sugar cube to slowly create the pyramid shape. Repeat the layers until your pyramid is complete.
Add additional cubes to build details and other features on the structure. Attach toothpicks with glue to highlight stairways or other linear details.
Allow the entire structure to dry, and then you can add color by lightly painting the cubes with paint. Do not saturate the cubes with paint, or they can melt.
Things You'll Need
Tips
References
Tips
- You can add realistic detail to the base of your project by using paint that has a special sand effect. If you do not have the faux finishing paint, you can just mix a small amount of sand into regular paint, and apply it as evenly as possible. Add fake foliage or small models of people to give your model more details. Be careful when transporting your project since it will be heavy and fragile. If you can, have an adult help you carry it to school in the bed of a pickup or the cargo space of an SUV.