When you're in the midst of redecorating a room, you may find that you need something to pull it all together – and in rooms with large, otherwise blank walls, using an accent wall to set the tone of the space is an excellent idea. Stone and brick accent walls can create arresting settings, but the cost of the masonry work required to install them is hefty – unless you build the wall yourself, of course. By using joint compound, it's simple to create a faux stone or brick wall, with enough texture and definition to make your interior or exterior walls pop.
Video of the Day
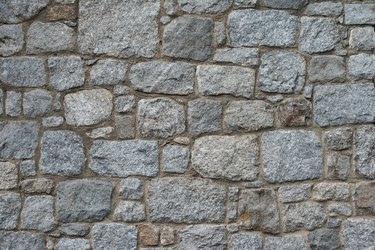
A DIY Faux Brick Wall?
Joint compound, also known as "drywall mud," is a form of gypsum-based plaster. Primarily used by builders to seal cracks in drywall and make interior painting easier, in the DIY space it's become a beloved tool for adding texture and definition to a wall, mantle or any other space that could benefit from a facade of fake but convincing stone or brick. Joint compound can be purchased in either a powdered or pre-mixed form, and when stirred or otherwise prepared, spreads similarly to cake frosting. It's inexpensive and when applied with care, a faux stone wall with joint compound can be stunning.
Video of the Day
Planning and Plaster Stencils
The first step to making a faux stone wall is to establish a plan: while it's possible to complete the project in the heat of the moment, the best-looking results will come from mindful application of the joint compound. If your project requires a plaster stencil, you should obtain it in advance to ensure you purchase enough joint compound, and you should figure out what colors you'll need for your project if you wish to paint the wall as part of it. Whether you're looking for a sheetrock look or a faux, exposed, brick wall finish, you'll use the same materials – it's just a question of how much time it'll take to make everything work.
Preparing the Wall
Once you've gotten everything together, you'll need to prepare your wall and your joint compound. Clean the wall and make sure it's dry and clear of dust, and if you're applying the plaster only to a specific area, make sure you've sectioned it off with painter's tape. Mix or stir your joint compound in accordance with your package's instructions, and then you're ready to apply it.
Plaster and Finishing Touches
If you have a plaster stone stencil, follow the instructions for using it now – but whether you're using a mold or just making a simple wall texture, you'll use a trowel to apply five to seven layers of joint compound to the wall, working in sections to prevent it from drying unevenly. There's no need to worry about neatness: imperfections significantly help the rough-hewn stone or rough brick look. When you're done applying the joint compound, give it 24 hours to dry fully. Once the compound on your wall is dry, you're free to finish it as you please: you can sand it down for a more standardized brick look, paint it to your preference, or leave it as-is.