How to Change the Timing Belt on Dodge Cars
by Contributing WriterUpdated June 12, 2017The process to change the timing belt is the same on either engine type. Both engines are freewheeling engines, which means that should the belt stretch more than the tensioner can handle, the valves most likely will not slam into the pistons, causing extensive engine damage.
Under The Hood:
- How to Change the Timing Belt on a 1998 Dodge Stratus
- How to Change a Timing Belt on a Dodge Neon
- How to Change the Timing Belt on a 2003 Dodge Stratus
- How to Replace the Timing Belt on a 1994 Dodge Dakota
How to Change the Timing Belt on a 1998 Dodge Stratus
Replace Timing Belt in 1998 Dodge Startus with 2.0 Liter SOHC Engine
Remove the negative battery cable by first loosening the terminal clamp with a wrench, turning the bolt counterclockwise. Once the clamp is loosened, twist and pull to remove it.
Remove the accessory drive belts. There is a tensioner bolt on the alternator to adjust the belt tension. Loosen the adjuster bolt at the top of the alternator and the pivot bolt on the bottom by turning them counterclockwise with a socket and the ratchet. You may need to hold the nut on the back of the pivot bolt with a wrench to keep it from turning. Remove this belt and mark it "alt" and set it aside.
Loosen the pivot bolt and adjuster bolt on the power steering pump by turning them counterclockwise with a socket and ratchet. Once loose, pull up on the belt to loosen it and remove it. Mark it "PS" and set it aside.
Place the block of wood on the jack pad and roll the jack under the front portion of the engine. This is the side on the passenger side of the car. Raise the jack until the block of wood just makes contact with the forward edge of the oil pan.
Remove the passenger side motor mount and bracket by rotating the bolts counterclockwise with the ratchet and proper socket. You will most likely need to use a wrench on the motor mount nut to keep it from turning. Set the motor mount and bracket aside.
Remove the three bolts that hold the timing belt cover onto the front of the engine by turning them counterclockwise with the socket and ratchet.
Remove the crankshaft dampener/pulley by turning the bolt in the center counter clockwise. Grasp the dampener/pulley and wiggle it back and forth to remove it. Set it aside. Reinsert the bolt in the end of the crankshaft and tighten it to 80 to 100 foot-pounds. Remove the timing belt cover.
Locate the timing marks on the crankshaft and camshaft sprocket and line them up with the corresponding arrows. The arrow on the crankshaft sprocket will line up with the arrow on the oil pump housing. The arrow on the camshaft sprocket will line up with the arrow at the top of the rear cover.
Loosen the tensioner bolt by turning it counterclockwise with the socket and ratchet. Don't remove it. Insert the long end of the smaller Allen wrench in the small pin hole on the tensioner and the short end of the 8 mm Allen wrench into the larger hole. Turn the Allen wrench counterclockwise and push in on the small Allen wrench until it slides into the hole behind the tensioner. Remove the belt. Rotate the crankshaft to ½ notch before TDC (the timing mark)
Install the new timing belt, remembering the routing. Rotate the crankshaft back to TDC in order to take up the slack in the belt. Turn the large Allen wrench counterclockwise and pull the small Allen wrench out of the hole. Remove the 8 mm Allen wrench and tighten the tensioner bolt by turning it clockwise to between 40 and 50 foot-pounds with the ratchet and socket. Rotate the engine two full turns and recheck the timing marks.
Replace the timing belt cover and tighten the bolts by turning them clockwise. Tighten these bolts to approximately 20 foot-pounds using the ratchet and socket.
Replace the right side motor mount and bracket. Tighten these bolts to between 40 and 50 foot-pounds.
Remove the crankshaft dampener/pulley bolt by rotating it counterclockwise. Replace the pulley/dampener, lining up the keyway properly. Reinstall the bolt, turning it clockwise. Tighten this bolt with the ratchet and socket to approximately 100 foot-pounds.
Replace the accessory drive belts, paying attention to routing and tension the belts until there is no more than one inch of deflection when you push the belt halfway between the two pulleys farthest apart. Adjust the power steering belt tension by inserting the ½ inch drive adapter in the square opening on the bracket and pushing down. Tighten all of the pivot and tensioner bolts to 40 foot-pounds by turning them clockwise with the ratchet and the socket.
Lower the jack and pull it out from under the car.
Reconnect the negative cable to the negative battery terminal and tighten the cable by turning the bolt clockwise with the wrench.
Items you will need
Jack
Block of wood
Wrench set
Socket set
Ratchet
Straight screwdriver
1/8 inch and 3 mm Allen wrenches
Half inch socket adapter
How to Change a Timing Belt on a Dodge Neon
Disconnect the negative battery cable.
Raise the vehicle with the floor jack and support it with the jack stands.
Remove the right-inner splash guard, the accessory belts and the crankshaft pulley. Remove the bolt in the pulley with the puller and the puller insert.
Support the engine with the floor jack, then remove the right engine mount and the torque strut.
Remove the power-steering pump from the block, but leave the hoses attached to the pump. Set the power-steering pump out of the way.
Remove the right engine-mount bracket and the lower torque strut. Remove the timing belt cover.
Turn the crankshaft clockwise until the timing marks on the camshaft and the crankshaft are lined up. You may have to turn the crankshaft two complete turns to get both marks to line up. The timing marks are located on the camshaft pulley and the harmonic balancer. They look like a small line and will line up with similar marks on the block. The timing marks on the block are at the 12 o’clock position.
Push the 3mm Allen wrench into the tensioner pulley, then turn the tensioner clockwise with the 8mm Allen wrench. Turn the tensioner until you hear it click in the locked position. Remove the 8mm Allen wrench. Remove the timing belt.
Check the timing marks to make sure they are lined up. Move the crankshaft sprocket one-half tooth before (to the left) of the timing mark.
Put the timing belt on at the crankshaft pulley and work your way counterclockwise, over the water-pump pulley, then the camshaft pulley and behind the tensioner. Turn the crankshaft until the timing marks are realigned to take up any slack in the timing belt.
Remove the 3mm Allen wrench from the tensioner, allowing the tensioner to operate. Turn the crankshaft clockwise until the timing marks are lined up again (two times around).
Replace the rest of the parts in the opposite order they came off. Torque the crankshaft pulley bolt to 105 foot pounds of torque.
Items you will need
Set of 1/4-inch sockets
1/4-inch ratchet
1/4-inch air gun
Set of 3/8-inch sockets
3/8-inch socket
1/4-inch air gun
Set of 1/2-inch sockets
1/2-inch ratchet
1/2-inch air gun
3mm Allen wrench
8mm Allen wrench
Adjustable wrench
Pliers
Phillips screwdriver
Common screwdriver
Crankshaft pulley puller, #1026 (special tool)
Puller insert, #6827-A (special tool)
Floor jack
Jack stands
How to Change the Timing Belt on a 2003 Dodge Stratus
Disconnect negative battery cable. Raise vehicle on hoist. Remove right front wheel. Remove belt splash shield. Remove accessory drive belts. Remove crankshaft damper. Remove AC/Generator belt tensioner. Disconnect generator connections. Remove generator and bracket. Remove upper and lower timing belt covers (Fig. 100). Remove coolant recovery container. Remove right engine mount. Remove engine support bracket. CAUTION: When aligning crankshaft and camshaft timing marks always rotate engine from crankshaft. Camshaft should not be rotated after timing belt is removed. Damage to valve components may occur. Always align timing marks before removing timing belt.
Before the removal of the timing belt, rotate crankshaft until the TDC mark on oil pump housing aligns with the TDC mark on crankshaft sprocket (trailing edge of sprocket tooth). NOTE: The crankshaft sprocket TDC mark is located on the trailing edge of the sprocket tooth. Failure to align trailing edge of sprocket tooth to TDC mark on oil pump housing will cause the camshaft timing marks to be misaligned.
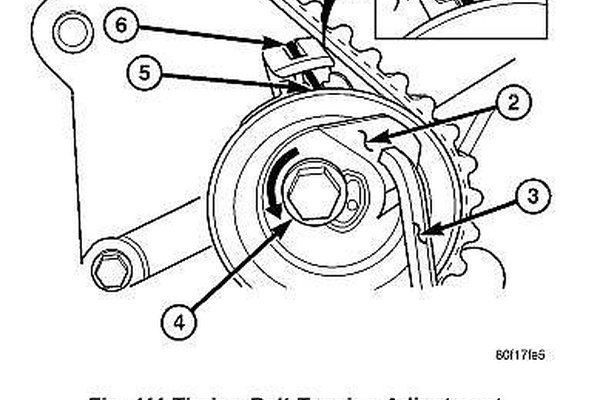
Loosen timing belt tensioner lock bolt (Fig. 105). Insert a 6 mm Allen wrench into the hexagon opening located on the top plate of the belt tensioner pulley. Rotate the top plate CLOCKWISE until there is enough slack in timing belt to allow for removal. Remove timing belt. CAUTION: If timing belt was damaged due to incorrect tracking (alignment), the belt tensioner pulley and bracket must be replaced as an assembly.
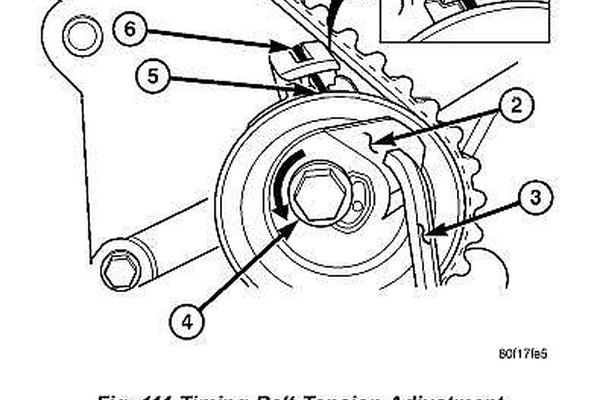
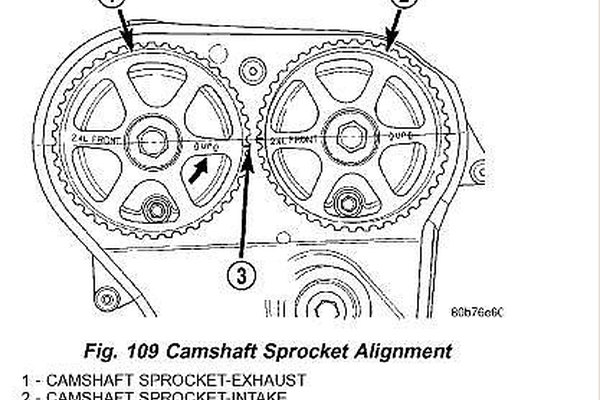
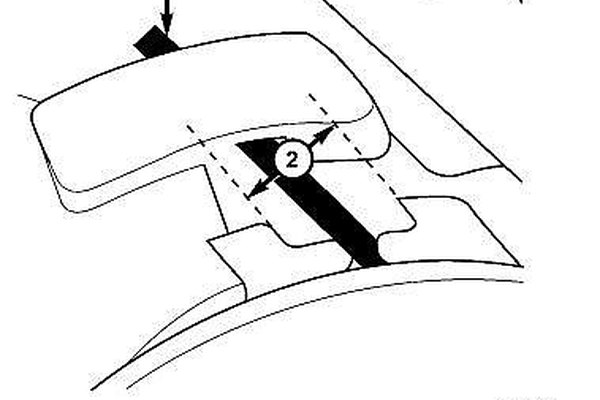
Set crankshaft sprocket to TDC by aligning the sprocket with the arrow on the oil pump housing.Set camshafts timing marks so that the exhaust camshaft sprocket is a 1/2 notch below the intake camshaft sprocket. CAUTION: Ensure that the arrows on both camshaft sprockets are facing up.
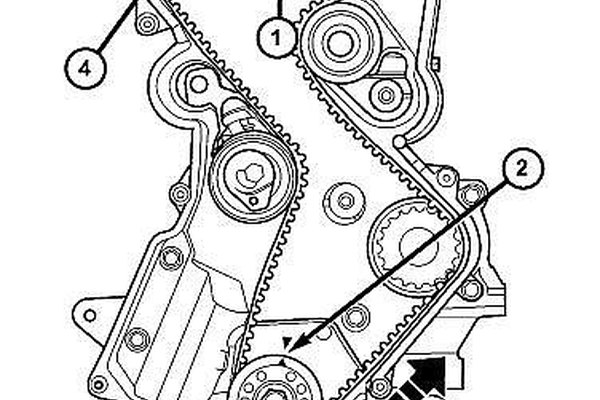
Install timing belt. Starting at the crankshaft, go around the water pump sprocket, idler pulley, camshaft sprockets and then around the tensioner. Move the exhaust camshaft sprocket counterclockwise to align marks and take up belt slack.
Insert a 6 mm Allen wrench into the hexagon opening located on the top plate of the belt tensioner pulley. Rotate the top plate COUNTERCLOCKWISE. The tensioner pulley will move against the belt and the tensioner setting notch will eventually start to move clockwise. Watching the movement of the setting notch, continue rotating the top plate counterclockwise until the setting notch is aligned with the spring tang. Using the alien wrench to prevent the top plate from moving, torque the tensioner lock bolt to 25 Nm (220 in. lbs.) . Setting notch and spring tang should remain aligned after lock nut is torqued. Remove alien wrench and torque wrench. NOTE: Repositioning the crankshaft to the TDC position must be done only during the CLOCKWISE rotation movement. If TDC is missed, rotate a further two revolutions until TDC is achieved. DO NOT rotate crankshaft counterclockwise as this will make verification of proper tensioner setting impossible.
Rotate the crankshaft CLOCKWISE two complete revolutions manually for seating of the belt, until the crankshaft is repositioned at the TDC position. Verify that the camshaft and crankshaft timing marks are in proper position

Check if the spring tang is within the tolerance window. If the spring tang is within the tolerance window, the installation process is complete and nothing further is required. If the spring tang is not within the tolerance window, repeat Steps 5 through 7. Install engine mount support bracket. Install upper timing belt cover. Torque fasteners to 6 Nm (50 in. lbs.) (Fig. 100). Install the lower timing belt cover. Torque fasteners to 6 Nm (50 in. lbs.). Install generator and bracket. Connect generator connections. Install AC/Generator belt tensioner. Install crankshaft damper. Install right engine mount. Install coolant recovery container. Install accessory drive belts. Install belt splash shield. Install right front wheel. Connect negative battery cable.
Items you will need
Hand tools
Puller for crankshaft balancer
How to Replace the Timing Belt on a 1994 Dodge Dakota
Disconnect the battery’s negative cable and lay it aside, but do not allow it to touch any metal. Raise the front of the vehicle and support it with jack stands. Place a block of wood on the floor jack then push it under the engine. Jack the truck up enough so that it touches and supports the bottom of the engine. Remove the right engine mount then jack the engine up slightly.
Remove the right wheel using the lug wrench. Remove the right inner splash guard with the appropriate socket. Remove the accessory belts by loosening the bolts on the slider brackets and loosening the tension on the belt, or by moving the tensioner away from the belt, if equipped with one long serpentine belt, and releasing the tension on the belt.
Unbolt and remove the air compressor but do not remove the lines. Lay the air compressor out of the way. Remove the air compressor idler pulley and the water pump pulley using the appropriate sockets. Remove the crankshaft bolt and crankshaft pulley.
Number the spark plug wires so you know how to put them back on. The firing order for the 2.2 or the 2.5 Dodge Dakota is 1-3-4-2. Remove the wires and the plugs. Stick a screwdriver into the number 1 cylinder spark plug hole. Turn the engine over via the crankshaft until you feel the piston reach the top of the piston hole. Check the timing marks by looking for the small hole in the camshaft sprocket (look through the hole in the upper timing belt cover). If you see the hole, the number 1 cylinder is on top dead center. If you do not see it, turn the engine over via the crankshaft one more time until you feel the screwdriver come up again. You should now be able to see the hole in the camshaft sprocket.
Remove the upper and lower timing belt covers using the appropriate sockets. Check the timing marks on the crankshaft sprocket (2 o’clock position) and the intermediate sprocket (7 o’clock position). The two marks should line up with each other. Check the large holes on the camshaft sprocket--they should be aligned with the joint of the camshaft bearing cap and the face of the cylinder head.
Loosen the timing belt tensioner bolt. Push the tensioner away from the timing belt. Tighten the tensioner bolt enough to hold the tensioner in place. Remove the timing belt. Ensure the timing marks are still lined up.
Install the timing belt, starting on the crankshaft sprocket and working your way to the intermediate shaft sprocket, then up and over the top of the camshaft sprocket and down behind the tensioner pulley, keeping tension on the non-tensioned side.
Install the special tool C-4703 on the large hexagon of the tensioner pulley. Position the tool within 15 degrees of horizontal then loosen the tensioner bolt. Turn the crankshaft counterclockwise two turns until all three timing marks are realigned. Hold the special tool while tightening the tensioner bolt to 45 foot-pounds of torque.
Remove the special tool. Install the rest of the parts in reverse order of removal. Torque the crankshaft pulley bolts to 22 foot-pounds.
Items you will need
Set of wrenches
Floor jack
Jack stands
6-inch, 2-by-4-inch block of wood
Set of sockets
Lug wrench
Long screwdriver
Special tool tensioner wrench #C-4703


