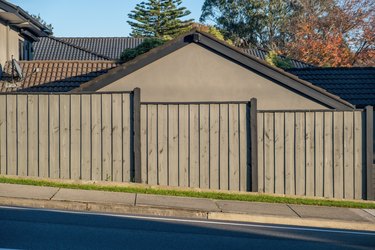
You have two choices when it comes to putting up a fence on sloped ground — actually, you have three because it's possible to combine the first two options into another one. Two of the options are to follow the slope of the ground with the fence line — which is called raking — or to keep the fence line horizontal and follow the ground in steps. The third hybrid approach to building a fence is to follow the ground with the rails while keeping the fencing slats or pickets vertical. Raking keeps the fencing close to the ground and works well on shallow slopes, while the stepped approach works best on steep slopes.
Considering Fencing Material
Video of the Day
When erecting a wood fence with slats and rails, you can choose either to rake or step the sections between posts, but the use of fencing panels constrains you to the stepped approach. Typical spacing for wood and metal fences is 8 feet, but if you're using the step method on a steep slope, you'll probably have to reduce the spacing to avoid the need for an excessively long post on the downslope side.
Video of the Day
When installing a chain-link or metal fence, the angles of the rails are usually adjustable to some degree. If the slope exceeds 12 inches across a 6-foot length, you must usually use the stepped method. Moreover, even when the slope is gentle, raking creates a fair amount of extra work when installing a chain-link fence because you have to cut the ends of the metal mesh at an angle.
Using the Step Method
Step 1: Start on the Highest Ground
Set the first post. After leveling and securing it, mark a point 4 inches from the ground and draw a string to the location of the next post. Level the string, measure the distance from the ground, and subtract 4 inches.
Step 2: Cut the Next Post
Cut the post for that location that much longer than the first post, remembering to add an extra third of that distance to the bottom of the post so you can set the post deeper. Set that post level, and use it to determine the length of the third post, and so on.
Step 3: Set Rails, Panels or Sections of Metal Fencing
Use the 4-inch marker on the first post as the reference for the bottom corner of the first wood panel or section of metal fencing. If you're constructing a picket or slat-and-rail wood fence, attach one end of the bottom rail at that mark and extend the rail to the next post, using a level to make it horizontal. The top rail is automatically horizontal if it's the same distance from the bottom rail on both posts.
Step 4: Attach Slats
Make each slat vertical using a level before attaching it to the rails with screws, if you're constructing a slat-and-rail or picket fence. The level is also a handy tool for making sure the top of each slat is at the same level as the others before you attach it.
Step 5: Fill in the Gap
Prevent animals from passing under the fence by filling in the section underneath the panel or bottom rail. One way to do this is to attach horizontal boards to the bottom rail and one of the posts. Another is to staple wire mesh to the bottom railing. You can even construct raised planters that sit along the bottom edge and block the gap.
Using the Rake Method
Step 1: Lay Out and Set the Posts
The posts can all be the same length or you can cut them different lengths to make the top of the fence level. If you choose the second option. which works best on gently sloping ground, start on the highest ground; cut that post to the height of the fence, set it, measure its height and stretch a line level to the next post. Measure the height of the line above the ground and add the extra distance plus one third to the length of the next post.
Tip
Although it wastes wood, you can also make all the posts longer than necessary and cut them level after setting them all.
Step 2: Angle the Ends of the Rails
Adjust the holders on the ends of metal rails to the proper angles before connecting them to the posts with appropriate fasteners. If you're installing a wood fence, bevel the ends of the rails with a circular saw before attaching them to the posts with screws.
Step 3: Install the Fencing
When installing metal mesh for a chain-link fence, cut the ends of the mesh at an angle so that the mesh follows the rails while the ends are straight with respect to the posts. Install wood slats or pickets a uniform distance from the ground. You can either set them vertical or perpendicular to the rails. If you choose the first option, you may have to cut the bottoms to conform to the slope of the ground.