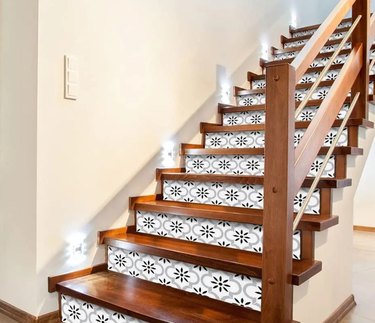
Peel-and-stick tiles are a quick do-it-yourself method of changing the look of your home without breaking the budget. You can even use them to dress up a stairway by covering just the risers or installing them over the risers and treads. Though peel-and-stick tiles are fairly easy to install, be sure to take time to prep the underlying surface to ensure a long-lasting installation.
Measure Before Purchasing the Tiles
Video of the Day
Measure the stairs carefully before purchasing the tiles. The 2018 International Residential Code for stairs requires that the riser height be no more than 7 3/4 inches tall. The depth of treads should be at least 11 inches, or 10 inches with added nosing that measures between 3/4 and 1 1/4 inches. The code also requires a minimum 36-inch-wide stairway.
Video of the Day
Your stairs may be significantly steeper with taller risers and shorter treads and narrower than 36 inches depending on the age of your home. Measure each step carefully, as they may be inconsistent, particularly in older homes. The peel-and-stick tiles may have to be individually cut to fit each step.
When selecting the peel-and-stick product, whether square or rectangular tiles or planks, consider the pattern and size of the tiles. A patterned, stone, or wood-look vinyl floor tile may be 3 to 12 inches wide and 24 to 36 inches wide, while square tiles range from 7 1/2 to 12 inches square. If you have to cut the tiles to fit the risers and treads, a symmetrical pattern may become less attractive once installed on the stairway. It may also be visually confusing and cause missteps and falls.
Prep the Underlying Surfaces
Before you begin, put the boxes of tiles in the room for 48 hours to allow then to acclimate. The surface needs to be level, as peel-and-stick tiles are relatively thin and will show lumps and bumps. Put on safety goggles, a mask or respirator, and other safety gear. Then:
- Pull up the carpet.
- Remove any adhesive with Goo Gone Pro Power or a similar adhesive remover according to the manufacturer's directions if the carpet was glued down. Allow it to dry completely.
- Fill nail or staple holes with wood filler. Allow it to dry and sand it smooth.
- Sweep and vacuum the stairs to remove all dust and debris before installing the peel-and-stick tiles.
If the stairs are covered with preexisting vinyl, ceramic tile, or other materials, you might use a leveling compound to fill in the grout lines. Alternatively, glue and screw down 1/4-inch plywood to cover uneven surfaces. No matter how you treat the underlying surface, it must be smooth, clean, and dry.
Install Tiles on the Risers
Dress up a stairway by adding the peel-and-stick tiles to the risers only. Choose a pattern that works with your décor, making sure that it fits neatly between the tread and the nose. If the treads need painting, staining, or sealing, do that first. Then:
- Cut the tiles to size if necessary using a metal ruler and utility knife.
- Measure and mark the center of the stairway.
- Center the first tile on the riser that is at eye level, as your eyes will fall on that tile first. Use painter's tape to hold it in place and double-check the position.
- Peel the backing off the bottom corner of the tile, align it on the riser, and press it in place.
- Pull the rest of the backing off the tile at a diagonal while pressing it down.
- Align the center tiles on the rest of the risers and install them. You may choose to offset the pattern on the risers or keep the tiles aligned.
- Work your way across each riser, butting the tiles against the already-installed pieces, keeping the tops and bottoms even.
- Trim the side tiles as needed to fit neatly against the walls.
Cover the Treads
The treads may be covered with the same tiles or in a solid color. You aren't limited; you can use patterned tiles on the risers and then a 3-foot-long matching or contrasting wood or solid-color plank on the treads.
- Clean and wipe the treads to ensure they're perfectly clean before you begin installing the tiles. Any bit of debris will result in a visible bump when you stick the tiles onto the surface.
- Repeat the installation process on the treads, cutting and fitting as needed against the walls or around the balusters.
- Use a J-roller over all the tiles. Press firmly to remove bubbles and air pockets.
After installing the press-and-stick tiles, avoid walking on the stairway for 72 hours. This gives the adhesive time to completely cure.
Finish the Edge
The edges of the steps, whether square or bullnose, need finishing. You can stain or paint to match or contrast with the tile patterns and/or colors or install a bullnose or self-adhesive edging. Depending on your stairway, especially if it is steep and narrow, a rubber edge protector designed to help prevent slips and falls may be the best option.
Install self-adhesive edgings according to the manufacturer's directions. Cut it to size and then pull one corner of the backing off. Align it, stick down one corner, and then smoothly pull off the backing while pressing the strip into place. Alternatively, apply a compatible construction glue to the back side of the edging and press it in place.
