Most contemporary homes sit on foundations of poured concrete or concrete cinder blocks. Although these materials are sturdier than their brick predecessors, they're not impervious to damage. Layers of mortar hold the cinder blocks in place, just as it would in brick walls, and seal off gaps between blocks to prevent water from getting into the wall.
But mortar can crumble with age, and cracks that allow moisture in could eventually cause structural damage. That's why it's important to periodically assess and repair mortar joints or the spaces between the cinder blocks. This process of adding new mortar to the joints is also called repointing. If the damage to the wall's mortar is minor enough, it can often be fixed with mortar repair compound or masonry caulk. But in other cases, the joints should be repointed.
Video of the Day
Video of the Day
Step 1: Remove Old Mortar
You will need the following tools to start: Safety goggles, cold chisel, hammer, masonry caulk, wire brush, mortar mix, water, plastic bucket or mixing tray, pointed trowel or grout bag, brick jointer and acrylic or silicone masonry sealer.
Carefully dislodge any loose or crumbling mortar from the joints using a narrow cold chisel and a hammer. Wear safety goggles and work slowly and deliberately to prevent accidentally chipping away at the cinder blocks. You want to remove old mortar to a depth of about 1/2 inch but no deeper than 1 inch. You can also repair any minor cracks in the mortar using masonry caulk during this step if you'd like. Brush away dust and debris when you're done.
Step 2: Mix Up New Mortar
Home improvement stores carry contractor-grade mortar mix. Follow the instructions on the bag, but generally you should add only enough water to make a paste the consistency of peanut butter. It's better to err on the dry side here: Mortar that's too wet will be hard to apply and won't stay in the joint. Let the mixture set for five minutes while you work on Step 3.
Step 3: Clean the Joints With Water
Use a brush to apply clean water to the mortar that's already in the joints. This will get rid of dust and prevent the existing mortar from sucking moisture out of the new layer. Skipping this step could cause the mortar to crack.
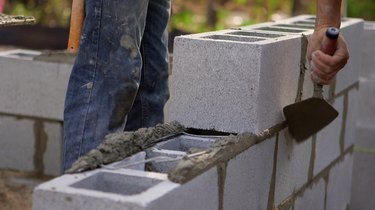
Step 4: Apply Mortar to Vertical Joints
You can fill a grout bag with mortar and dispense it that way (it works similarly to a cake icing bag) or use a pointed trowel. Some experts say it's easier to contain mortar and maintain a neat appearance with a grout bag. Fill the vertical joints with mortar first. Then use a brick jointer to smooth out the new mortar so that it's level with existing mortar. You may need to turn the jointer sideways to scrape off any excess mortar. Repeat the process for any gaps in the mortar. Once you've finished all of the vertical joints, add mortar to the horizontal joints using the same process.
Step 5: Add a Coat of Masonry Sealer
Allow one or two weeks for the mortar to dry and set, then apply a layer of acrylic or silicone masonry sealer. Cover the entire wall, cinder blocks and mortar joints. This will add an extra layer of protection and repel any water that might otherwise seep into the surface.