Removing vocals from recorded songs depends on two bits of nifty science -- the properties of stereo sound and phase cancellation of contrary sound waves. Don't worry, there's no need for an engineering degree on your part since open-source sound editor Audacity takes care of the details.
However, the conditions required to completely remove vocals are exact, and any deviation may leave some of the vocal behind. Audacity's Vocal Reduction and Isolation and legacy Vocal Remover effects provide a good set of tools to accomplish the tasks.
Video of the Day
Video of the Day
There is no universal, reliable way of removing vocals without access to the original multi-track recordings.
Different tracks require different techniques to achieve maximum possible attenuation or isolation. This depends on where the vocals are positioned in the stereo field, and on their frequency content compared to the rest of the audio. -- the Audacity manual, "Tutorial - Vocal Removal and Isolation."
How Vocal Removers Work
Stereo Sound
As you listen to a stereo recording, particularly through a set of headphones, you hear sounds that stretch from ear-to-ear, not simply on the left or right, where the speakers actually are. Your brain processes sound arriving at each ear using both volume and time differences. If a sound is louder in your right ear, and arrives before the signal reaches your left ear, you perceive that sound as being on the right. When a sound arrives at both ears at the same time and same volume, you perceive it as in front of you. This is the principle of binaural hearing.
Phase Cancellation
Sound travels in waves, alternating between peaks and troughs. When two waves arrive at the same point, what happens depends on both the similarities and differences between the waves. That sound that arrived at both your ears at the same time and volume is reinforced if the waves are in the same phase. That is, when the sound was created, it produced a vibration that first produced positive pressure, then reversed and made a negative pressure. Picture a sine wave going up and then down, and you have the idea. That center signal from two headphone speakers are in phase.
Because polarity of an electrical signal feeding audio to headphones, in our example, can be changed, so can the phase relationship of the sound. For instance, reversing wires on the left side of the headphones makes the speaker pull back, then push forward, while the right side pushes forward and then pulls back. Everything else is the same. The volume remains constant, and the sounds arrive at the same time. The energy of those two waves, however, cancel each other.
Stereo Mixing and Voice Cancellation
By convention, vocals for contemporary recordings are often mixed in the center of a stereo image, the perceived field of sound between left and right channels. Also called center-panned, it means the vocal has an identical signal on both the left and right sides of a mix. Other instruments are spread across the stereo image from one side to the other. When the phase of one audio channel is inverted, all common sounds of equal volume occurring at the same instant will cancel. That center-panned vocal disappears.
Using the Vocal Reduction and Isolation Effect
Step 1: Import the Song File
Click File on the menu bar then select Import from the drop-down menu. Click Audio, select the appropriate file and then click Open. Select Make a copy of the files before editing (safer) from the warning screen, if you are using an uncompressed audio file. A supported compressed format, such as an MP3, will load upon selection.
Step 2: Open the Vocal Reduction and Isolation Effect
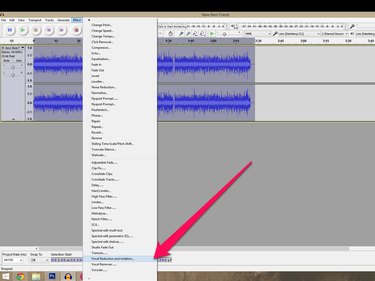
Click Effect on the menu bar and scroll down to click Vocal Reduction and Isolation. The effect window opens.
Step 3: Choose the Action
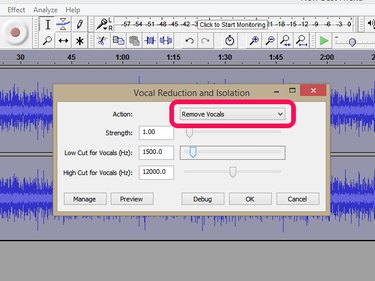
Select Remove Vocals from the Action drop-down, if it is not already selected.
Step 4: Adjust the Effect Parameters
Three settings can be adjusted to improve your results.
Strength -- The default value is 1.00, providing a good starting point. Values below 1.00 reduce the intensity of the effect while values above increase the amount of center reduction.
Low Cut for Vocals (Hz) -- This specifies the lowest removed
frequency. Instruments such as bass drum and electric bass are often panned to the center. This value preserves instruments below the target frequency, where there is little to no vocal content.
High Cut for Vocals (Hz) -- This setting does the same as the low cut, but instead preserves instruments above the target frequency.
Step 5: Apply the Effect
Click OK to start processing the song. When the effect is done, play back the song and evaluate the result. If the vocal is not removed or if the sound of the remaining tracks is affected too much, click Edit on the menu bar and select Undo Vocal Reduction and Isolation. Adjust the effect parameters to correct the problems.
- Remove more vocals by raising the Strength value, lowering the Low Cut value, raising the High Cut value, or a combination of any of the three.
- Reduce the effect on the remaining tracks by lowering the Strength value, raising the Low Cut value, lowering the High Cut value or a combination of any of the three.
Repeat the process until you are happy with the result.
Step 6: Save the Song
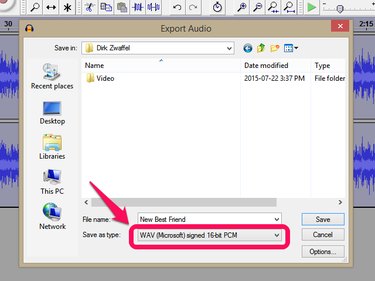
Click File from the menu bar and click Export Audio. Choose a folder, file name and format. Songs saved in Audacity format can play only within Audacity.