Things You'll Need
Hand saw
Sharp knife
Metal pot or large deep pan
Leather gloves
Table salt
Plastic pan
Wood rasp
Wood glue
3/8 inch plywood
Taxidermist modeling clay
Four, 4-inch wood screws
Power drill
Tacks, 3/8 inch
Hammer
Screwdriver, straight edge
Leather piece
Picture hanger
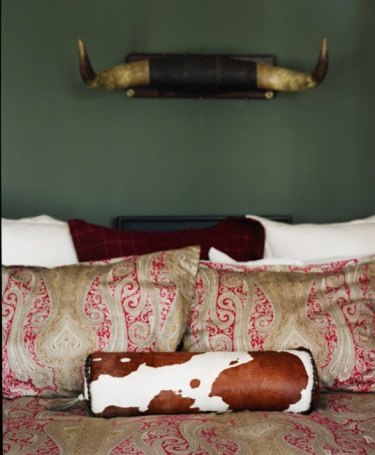
A set of bull horns can make an interesting wall display for a den or recreation room. Mounting bull horns differs from mounting antlers such as deer or elk in that the horns actually grow off of a bone core. The horns need to be removed from the core, cleaned, and dried to prevent decay. The horns are then reattached to the core and the mounting completed. Supplies for mounting and preserving bull horns can be purchased from a taxidermy supply shop.
Step 1
Cut the horns from the head by sawing through the skull from side to side. Make the cut 1 inch below the bottom of the horns. Skin the hide off the skull plate and clean all tissue off of the bottom side of the skull plate.
Video of the Day
Step 2
Place the horns in a metal pot or deep pan of clean boiling water. Put on leather gloves and take the horns out of the pot at five-minute intervals and pull on the horns until they slip off the bone core. Total time will vary as to when the horns become loose enough to pull off, but won't exceed 30 minutes.
Step 3
Remove the skull plate and horns from the pot once the horns pull off the core. Scrape and completely clean the layer of tissue from the horn cores and inside the horns.
Step 4
Set the skull plate with the protruding horn cores in a plastic pan, and thoroughly cover the skull and cores with salt. Coat the inside of the horns with salt. Leave the skull and horns covered in salt until the bone and salt completely dries which can take up to one week depending on the temperature they are kept at.
Step 5
Remove the dry skull plate and horns from the salt and clean all the salt off them. Apply a thin layer of glue over the whole of both cores and push the horns back onto the cores until they are tight against the skull. Leave this to dry for 24 hours.
Step 6
Trim the skull plate so that the diameter of the bone is the same as the diameter of the horn bases. Use a wood rasp to shave the bone and level the bottom side so the horns lay flat and will not rock.
Step 7
Set the horns on a piece of 3/8-inch plywood and trace onto the wood around the skull plate the same length and width as the skull plate. Cut the piece of plywood out on the drawn line, and drill two evenly spaced holes through the wood and the skull plate in the same locations. Screw 4-inch screws through the holes in the wood and into the bone securing the piece of wood to the back of the skull plate.
Step 8
Pinch off pieces of the modeling clay and fill in the gaps between the skull and wood backing all the way around. Cover the skull plate with clay and mold the clay around the skull plate and wood backing forming them into one smooth unit with the top and sides rounded, leaving the back side of the wood bare and flat. Leave for 48 hours to let the clay completely harden.
Step 9
Lay the piece of leather on the clay molded portion, trim the leather to overlap the horn bases by 1/2 inch. Wrap the top of the leather to the back side and drive tacks every 1 inch through the leather and into the wood backing. Pull the leather tightly around the bottom and tack it to the backing and then trim the leather so the top and bottom edges are flush against each other.
Step 10
Attach a picture hanger to the back side of the horns or they can be mounted on a plaque. Decorative trim can be glued around the horn bases or left with just the leather edge.
Tip
Use only taxidermist modeling clay as it is designed for this type of work. Do not use oil-based clay as it will not dry and the oil will soak through the leather cover. Potter’s clay will crumble and break apart.
If the horns are too big to fit in a pot, boil one side at a time or use a deep, rectangular metal pan.
If the screw tips protrude out of the top of the skull plate, cut the tips off with a hacksaw.
Use thin flexible leather for the skull plate cover. Measure the dimensions for the area to be covered and purchase a piece of leather to fit.
Warning
Failure to remove the horns from the core and dry them will cause the mount to decay. Wear leather gloves when testing the horns in the boiling water to prevent burns.
Video of the Day