Whether you're interested in building your own electronics as a hobby or just doing some DIY repairs and troubleshooting around the house and car, a digital multimeter is one of the handiest tools in your arsenal. With it, you can test for short circuits, see whether voltages are at their correct levels, or test the amount of current – measured in amperes – flowing through a circuit. Testing amperage requires some caution and an understanding of what you're doing.
Be Safe When Testing Amperage
Video of the Day
If you live in a flood-prone area, you probably know that a surprisingly few inches of fast-flowing water are enough to sweep you off your feet, potentially injuring you or dragging you to your death. It's a good analogy for amperage, which is the flow rate of electricity through the circuit.
Video of the Day
A surprisingly low level of amperage can be dangerous. Fatal electrocution is the most obvious hazard, but as little as 50 milliamps – a very low amperage – can cause heart arrhythmias and other long-lasting health problems. Familiarize yourself with any cautions spelled out in your multimeter's manual or in the books and internet sources you're using for guidance.
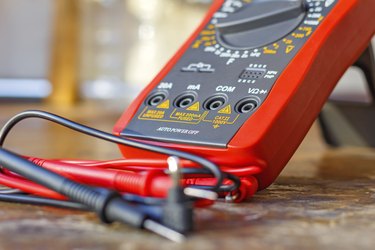
Familiarize Yourself With the Multimeter
Most digital multimeters are similar in appearance. There's one black jack for the negative or common lead and three red jacks: one for measuring voltage and resistance, one for measuring amps, and one for measuring milliamps and microamps. The amp symbol on your multimeter is an uppercase A. Milliamps and microamps are indicated by the abbreviations mA and µA, respectively.
Your meter likely has a dial that selects different functions from testing AC and DC voltage to continuity and resistance. Your meter may have several settings on its dial for measuring amps or just one setting and push buttons to select specific ranges.
Setting the Multimeter's Range
The range refers to the level of amperage you expect to be testing. Since you might be certain – that's why you're testing, right? – it's good practice to start at the highest setting. This means plugging your multimeter's red probe into the 10A jack. If the dial has a single setting for amperage, set it there. Most modern digital multimeters are auto-ranging, meaning they select the correct range when you start your test. The black test lead goes to the black jack, labeled COM or Common.
If you have a multimeter that isn't auto-ranging, it has high- and low-amperage settings. Put the dial on the 10A setting.
Measure Current With the Multimeter
To test the current in a circuit, you need to run the circuit through the meter itself. To do that, cut off power to the circuit. Break the circuit at a convenient point, usually by disconnecting a wire or unplugging a power connector. Now connect or hold the red lead of your multimeter to the "upstream" part of the circuit, closest to the power source. Connect or hold the black lead to the "downstream" portion of the circuit.
Now, restore power to the circuit. The display should show a number. If it starts with a whole number, from 1 to 10, you're measuring amps. If it starts with a zero and a decimal point, you're measuring milliamps. If that number is below 0.400, you'll get a more accurate reading by changing your red lead to the mA jack and – if necessary – changing the meter to the milliamps range. Meters often give readings to three decimal points, so a reading of 0.236 when you're on the 10A range might translate to a more precise 235.695 mA. That won't always be significant, but sometimes it is.
Measuring Amps With Optional Accessories
Holding the red and black leads in place while you switch the power on and off can be tricky. There are alligator clips designed to attach to the leads, keeping your fingers safely out of the way. You can also buy leads with built-in alligator clips.
A more robust accessory is an amperage-testing clamp. It resembles a C-clamp built into a small multimeter and measures amperage at a single wire or terminal. It's the best and safest way to test when breaking the circuit isn't practical. Some clamps are built specifically for AC or DC, while others do both. Some return a voltage to your meter and plug into its COM and voltage jacks. Others return an amperage and plug into the COM and mA jacks.
To test, open the clamp's jaws and clamp it onto the wire. Set the multimeter's dial to the Amps setting, and view the reading. Clamps work best when they're isolated from other wires in the circuit or sources of magnetic interference by at least several inches.