Things You'll Need
Wheel chocks
Floor jack
Jack stands
Tire iron
Brake cleaner
Drip pan
Needle-nose pliers
Brake shoes
Return springs
High-temperature grease
C-clip
The rear brakes on a Toyota Corolla are drum brakes with shoes that are connected to the parking brake. As is the case with most cars, changing the rear brakes means working with multiple springs and levers along with the shoes. You need to replace the springs with the brakes, as they can stretch and wear out over time. This process can vary depending on the exact year of the Corolla.
Accessing the Brakes
Step 1
Block the car's front wheels with blocks or chocks, and release the parking brake.
Step 2
Raise the rear end of the Corolla using the floor jack, and support it on jack stands. Remove both rear wheels with the tire iron.
Step 3
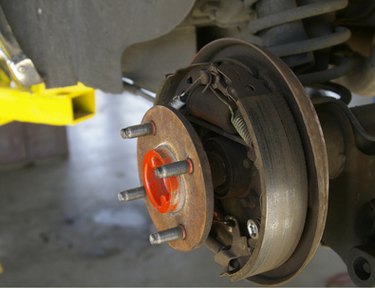
Pull the brake drum off the assembly and axle.
Step 4
Wash off the entire brake assembly with brake cleaner spray; never use air. Catch the dripping cleaner and residue with a drip pan.
Removal
Step 1
Unhook the upper return spring from the adjuster lever, and then disconnect the lever from the shoe that it is connected to via stud. You need needle-nose pliers for these tasks.
Step 2
Remove the lower return spring from both shoes using the pliers.
Step 3
Press the hold-down spring on the shoe you didn't disconnect the adjuster lever from, turn it 90 degrees, and release it using the pliers. Remove this shoe, then disconnect the upper spring's other end and remove it.
Step 4
Remove the other shoe along with the adjuster mechanism by disconnecting its hold-down spring, then disconnect the parking brake lever from the shoe by removing its clip with the pliers.
Installation
Step 1
Connect the parking brake lever to its accompanying replacement brake shoe, and crimp a new C-clip in place on it with the pliers.
Step 2
Dab high-temperature grease on the spots on the brake assembly's backing plate that touch the brake shoes.
Step 3
Position the rear replacement shoe into position on the backing plate, guide the shoe's hold-down pin in place, and attach the pin's hold-down cup and spring with the pliers.
Step 4
Lubricate the adjuster screw's moving parts lightly with high-temperature grease, and connect the adjuster assembly on the rear shoe, fitting the adjuster's end into the slot on the shoe. Hook a new upper return spring onto the shoe.
Step 5
Connect the upper spring to the new front shoe with the pliers, and line up the shoe with the adjuster. Seat the shoe against the backing plate, and screw its hold-down spring in place with the pliers.
Step 6
Reconnect the adjuster lever, and connect the upper spring to the lever, then connect a new lower spring to both shoes.
Step 7
Reconnect the brake drum to the brake assembly and axle.
Step 8
Connect the wheels, and lower the car after changing both sets of brakes.