Things You'll Need
Socket wrench
Socket set
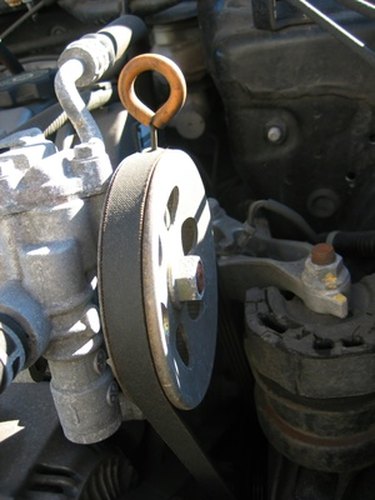
The Chevrolet Cavalier is equipped with a serpentine belt that runs off the crankshaft and uses the power of the engine to operate major components. The belt is routed through a series of pulleys to enable a smooth transition around the engine. The tensioner pulley makes the belt tight so it can run more efficiently. A bad tensioner pulley can cause the belt to not run around the pulleys correctly and will need to be replaced. This task is straightforward as the pulley is simple to access.
Step 1
Park the car on a flat, paved surface and set the parking brake.
Step 2
Open the hood to access the engine compartment. Locate the tensioner pulley between the alternator and the power steering pump. Place a bare socket wrench onto the hex-shaped hole at the end of the tensioner. Pull the socket wrench back to loosen the belt. Pull the belt off the pulley.
Step 3
Unscrew the bolt holding the tensioner pulley in place with a socket wrench. Pull the tensioner away from the engine.
Step 4
Replace the tensioner pulley with a new one. Push the bolt in and tighten it with the socket wrench.
Step 5
Push the tensioner pulley down so the belt can slide over the pulley. Slowly release the socket wrench to tighten the belt.
Step 6
Start the car and allow it to idle. Observe the belt to make sure it is not sagging along the belt path. If the belt is sagging, then the new tensioner pulley may not be any good.
Step 7
Turn the car off and close the hood.
Tip
The tensioner pulley can be purchased at any Chevrolet dealer.
Warning
Use caution when working in the engine compartment. Ensure the car is turned off and the key is out of the ignition.