
How to Build Window Sashes

Window sashes are the movable parts of windows that contain the panes of glass. The most common types are hung windows, such as double-hung and single-hung. Older windows of this type often had four or more small panes of glass called "lites," installed separately in each sash.
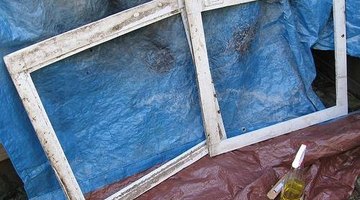
Modern windows usually use a single pane in each sash with a grid added to give the appearance of the older style of window. Building replacement sashes with single pane glass is a moderately challenging project for an experienced home woodworker.
Things You Will Need
- Window sash to be replaced for measurements
- Wood for new sash frame
- 3/4-inch birch plywood working surface and template
- Glass cut to fit new sash
- Table saw with finishing blade and dado blade
- Router and router table
- 220-grit sandpaper
- Rabbeting router bit
- 1/4-inch straight router bit
- 1/4-inch chisel
- Brad nailer and brads
- Glazing compound
- Glazing points
- Square
- Pencil
- Painters tape
- Wood glue and brush
- Putty knife
- Tack hammer
- Wood sealer and brush
- Wood putty
- Safety glasses
- Hearing protection
- Dust mask
Tip
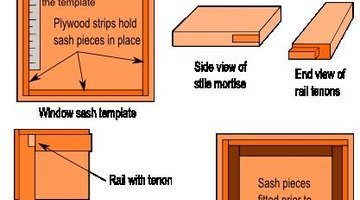
The template is one key to success in this project. Make the template square and the proper size and the finished product will be a square, usable window sash. Careful measurements and precision cutting are the second key to a well-made sash. A dado blade cuts a wider opening than a regular blade. Set your dado blade height and width to match the requirements of the tenon. You can buy a sheet of glass and cut it yourself, but why bother? Most hardware stores will gladly cut it for you and then you do not have to worry about breaking, rather than cutting, the glass. Birch plywood is the wood of choice for templates and other shop uses. It is reliably flat, smooth and stable, which allows for good templates and jigs. Brush some wood sealer into the channel created by the rabbeting bit for the glass to sit in to make the new sash last a lifetime. Paint, or stain and sealer, are necessary to protect the sash from the elements and preserve the wood, as well as help seal the window from drafts.
Warning
Always wear appropriate protective gear, including ear plugs, safety glasses and a dust mask, when using power shop tools.
Wear gloves and eye protection when cutting glass.
-
Cut a piece of 3/4-inch birch plywood four inches larger than the old window sash. Measure the width and height of the old sash and add four inches to each dimension for cutting this piece.
-
Take precise measurements of the old sash and lay them out on the plywood. Note that the two horizontal pieces butt against the two vertical pieces. Use the square and measure carefully.
-
Cut four, two-inch wide strips of birch plywood on the table saw. Cut them to the same length as the frame pieces in the old sash.
-
Lay the plywood strips on the plywood template piece, in line with the marks made earlier. Use the square to ensure the template will be perfect.
-
Attach the plywood strips to the template with brad nails or, optionally, screws. Use glue if you plan to make many of the same size sash.
-
Cut the four pieces of the frame to the correct width of each piece measured in the previous section. The two side pieces (stiles) should be the same width. More than likely, the top piece (head rail) and bottom piece (bottom rail) are different sizes.
-
Add 3/4 inches to the width of the rail pieces to allow for the tenons that join them to the stiles and cut the pieces to length. Cut the side pieces to length as well.
-
Use the table saw with the dado blade to cut 3/8-inch long, 1/4-inch thick tenons on the ends of the top and bottom pieces. See illustration.
-
Lay the side pieces in the template and place them firmly against the template side blocks. It should be a snug fit. Lay the top and bottom pieces in the template. Mark the end locations of the mortises on the side pieces.
-
Set up the router table to cut a groove 7/16 inches deep with the 1/4-inch straight bit. Use stop blocks to prevent cutting too far into the side pieces. Cut a centered 1/4-inch groove into the edge of the side pieces, taking care to stop at the marked locations. This operation should be done in two or three passes, cutting 1/8 to 1/4 inch deep in each pass.
-
Use a 1/4-inch chisel to square the ends of the mortises. Test fit rail tenons into the stile mortises. With the pieces fit together, they should fit snugly into the template. Make any final adjustments to the pieces before glue-up.
-
Remove the pieces from the template. Place painter's tape in the template where the joints will lie, under the pieces and on the sides. Apply glue to the mortises and tenons, and the meeting faces of the stiles and rails.
-
Assemble the pieces and clean up any glue squeezed out. Place the pieces in the template to hold them together while the glue sets up. Clamp the pieces to the bottom of the template to prevent them from moving. Use eight clamps or more if necessary. Wipe up any more glue squeezed out that is visible. Allow one hour for the glue to cure.
-
Use the brad nailer to strengthen the four joints by adding brads through the side pieces and into the tenons. Fill the brad nail holes with wood putty that matches the wood type used.
-
Place the sash frame back in the template. Use the router with a rabbeting bit to cut a rabbet around the entire inside of the frame at a depth that is twice the thickness of the glass to be used. Keep in mind that you will probably be climb cutting for at least a portion of this cut, so a quality, new, sharp bit is required to prevent grain tear-out.
-
Square the corners of the rabbet with a 1/4-inch chisel and clean up any minor tear-out with sandpaper.
-
Roll a 1/8-inch bead of glazing compound into a rope and set it into the channel corner created by the rabbet, all the way around the sash frame. Lay the glass into and on top of the glazing compound. The backside and edges of the glass should both be embedded into the compound.
-
Add glazing points every six to eight inches to hold the glass in place. Use a stiff metal putty knife to press them into the wood. Hold the putty knife handle against the glass as you press the points in: Do not press at an angle or the glass will break.
-
Roll glazing compound into a rope and apply around the entire pane glass. Smooth the compound with a putty knife, making a 30- to 45-degree angle from the glass out to the front surface of the sash frame. Allow the compound to harden overnight and the new sash is ready to be painted or stained.
The Drip Cap
- Window sashes are the movable parts of windows that contain the panes of glass.
- Modern windows usually use a single pane in each sash with a grid added to give the appearance of the older style of window.
- Note that the two horizontal pieces butt against the two vertical pieces.
- Lay the plywood strips on the plywood template piece, in line with the marks made earlier.
- Use glue if you plan to make many of the same size sash.
- Use the table saw with the dado blade to cut 3/8-inch long, 1/4-inch thick tenons on the ends of the top and bottom pieces.
- Lay the side pieces in the template and place them firmly against the template side blocks.
- Remove the pieces from the template.
- Apply glue to the mortises and tenons, and the meeting faces of the stiles and rails.
- Roll a 1/8-inch bead of glazing compound into a rope and set it into the channel corner created by the rabbet, all the way around the sash frame.
- Use a stiff metal putty knife to press them into the wood.
- Smooth the compound with a putty knife, making a 30- to 45-degree angle from the glass out to the front surface of the sash frame.
References
Writer Bio
Michael Logan is a writer, editor and web page designer. His professional background includes electrical, computer and test engineering, real estate investment, network engineering and management, programming and remodeling company owner. Logan has been writing professionally since he was first published in "Test & Measurement World" in 1989.
Photo Credits
- Photo by Tami Hills, Illustration by MJ Logan
- Photo by Tami Hills, Illustration by MJ Logan
More Articles