Things You'll Need
Jack
Jack stand
Lug wrench
Wrench
Rubber tubing
Clear plastic bottle
DOT-3 brake fluid
Toyota markets the Camry as a compact economy vehicle. The Camry was introduced in 1983, and it replaced the rear-wheel-driven Corona. The Camry evolved from a simple drive line using front disc and rear drum brakes to the 2010 versions with options to use braking system involving front and rear vented disc brakes. Camry bleed screw locations differ slightly from year to year as a result of body changes. But bleeding the brakes on any model year Camry can be acheved in about an hour with the aid of an assistant.
Step 1
Raise the Camry's passenger rear tire off of the ground with a jack. Place a jack stand under the vehicle's jack point as outlined in the manual or directly beneath the axle. Remove the tire using the lug wrench to loosen and remove the lug bolts. Set the tire aside.
Step 2
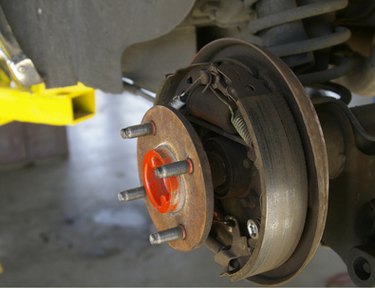
Locate the bleed screw. On drum brakes, the screw usually is on the back side of the drum just above the axle. On disc brakes, the screw is closer to the engine on the back side of the caliper. Loosen the screw with a wrench to make it easier to loosen and tighten rapidly, but don't leave it so loose that fluid drips out.
Step 3
Attach the rubber tubing to the bleed screw. Submerge the other end of the tubing into a clear plastic bottle partially filled with DOT-3 brake fluid.
Step 4
Open the hood of the vehicle. Locate the brake fluid reservoir, which usually is on the driver's side of the firewall toward the top of the firewall. Clean the reservoir top and remove it. Fill the reservoir to the fill line with brake fluid. Do not let the fluid level in the reservoir drop beneath half full while bleeding the brakes. Fill the reservoir as necessary. Top off the reservoir and replace the cap when you complete the bleeding process.
Step 5
Instruct an assistant to depress the brake pedal firmly and hold it in position. Loosen the bleed screw for a few seconds. Watch for air bubbles or fluid flowing in the plastic container. When the flow stops, tighten the bleed screw. Instruct the assistant to release the pedal. Repeat this process until no air bubbles come out of the tube. Repeat the process three more times. Tighten the bleed screw completely.
Step 6
Replace the tire and lug nuts. Raise the vehicle using a jack to remove the jack stands. Lower the vehicle to the ground with the jack. Tighten the lug nuts to factory specifications.
Step 7
Repeat steps one through six for the driver rear brake, the passenger front brake and the driver front brake. Check the reservoir and fill it as necessary with DOT-3 brake fluid. Replace the cap on the reservoir. Test your brakes when all four brakes have been bled. If you notice further problems, contact a professional for additional testing.
Warning
Loose drum brakes also may need adjusting, because drum brakes use hydraulic and spring pressure to activate them. If you notice loose drum brakes after bleeding the line, consult a professional to have the drum brakes adjusted or replaced.