Store-bought jewelry organizers don't always hold all the treasures they're supposed to. If the top of your dresser is covered with bowls of overflowing necklaces and you can never find the matching earring, turn a regular shadow box into a jewelry display. A custom jewelry organizer can accommodate all your favorite treasures, whether you have an abundance of necklaces, or an overflow of bracelets. The only skills needed for this easy DIY is knowing how to use a power drill, or a hammer and a nail.

Video of the Day
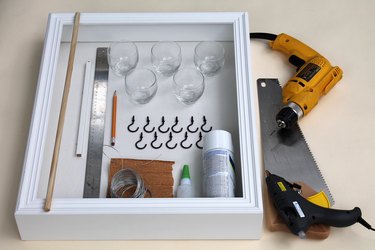
Things You'll Need
16-inch-by-20-inch shadow box frame
1 1/4-inch metal hooks, 10-20 count
Power drill
Votive holders
Hot glue gun
3/8-inch wooden dowel (length can vary)
Ruler
Hand saw
100-grit sandpaper
Drop cloth or paper
Spray paint
Quick-drying glue
Scrap of 1/4-inch-by-1/4-inch wood trim (optional)
Picture hanging hardware
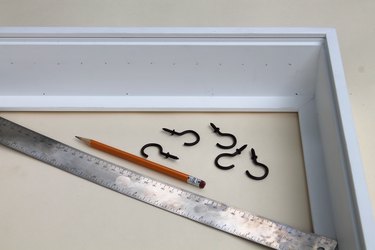
Step 1: Mark Hook Locations
Remove the glass from the front of the shadow box. Lay the shadow box flat on a table and arrange the jewelry inside so you can plan the location of the hooks, dowels and cups to fit your needs. Use a pencil and ruler to mark the location of each hook. Approximately 1 inch apart and 1 inch from the back of the frame is a useful spacing.
Video of the Day
Tip
To decorate the shadow box, cover the back panel of the box with fabric, or spray paint the frame to match your home's decor.
Step 2: Drill Holes
Drill a starter hole with a 3/32-inch drill bit. Drill the holes starter holes 1/4-inch deep at each marking. Be careful not to drill all the way through the frame. A way to make sure you don't drill too far is to put a piece of tape on the drill bit 1/4 inch from the end so that you know where to stop. If you don't have a power drill, hammer a small nail at the hook marking to give the screw an easy start. Make sure the width of the nail is smaller than the hook's screw.

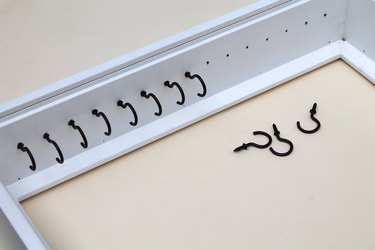
Step 3: Attach the Hooks
Screw the hooks into the frame at each drilled hole. Reserve two hooks to hold a dowel.
Step 4: Attach the Cups
Turn the shadow box upright and arrange the votive holders at the bottom of the frame. Use a hot glue gun to put a circle of glue around the bottom of each cup. Place the cup down onto the frame and hold firmly until the glue secures the cup.

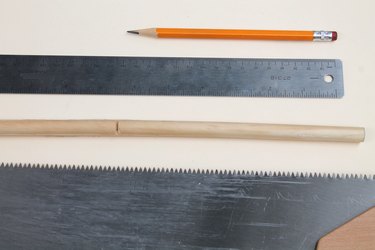
Step 5: Prepare the Dowel
Mark the of your dowel with a pencil and ruler. Saw the dowel at the pencil mark. The length of the dowel can vary depending on what you want it to hold. Cut the dowel approximately 10 inches long, or add two 6-inch long dowels to hold more bracelets and hoop earrings. Or, use only one 7-inch dowel if you have many long necklaces to make space for.
Mark the desired length of your dowel with a pencil and ruler. Saw the dowel at the pencil mark. The length of the dowel can vary depending on what you want it to hold. Cut the dowel approximately 10 inches long, or add two 6-inch long dowels to hold more bracelets and hoop earrings. Or, use only one 7-inch dowel if you have many long necklaces to make space for.
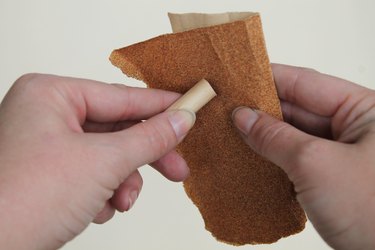
Sand the edge of the dowel to smooth out rough edges.
Step 6: Paint the Dowel
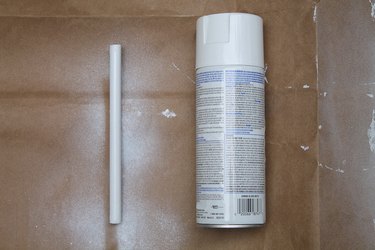
Lay out a drop cloth or large piece of paper to protect the area from spray paint. Place the dowel flat on the paper. Hold the can of spray paint approximately 8 inches from the dowel and slowly spray a light and even coat of spray paint on the dowel. Allow the dowel to dry before you turn it to the other side for another coat of paint. Continue to add layers of spray paint until the dowel is covered.
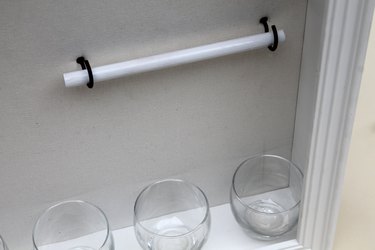
Step 7: Attach the Dowel
Place the dowel inside the shadow box to mark the location of the two hooks that will hold the dowel. The hooks should be spaced apart 1 to 2 inches shorter than the length of the dowel so that there is some overlap for the dowel to sit on the hooks.
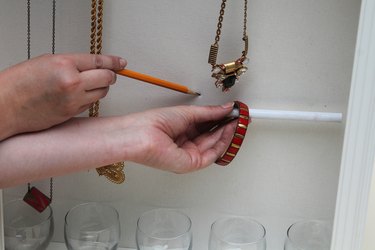
Use a ruler to measure the distance from the mark to the bottom of the frame to ensure the markings are even and the dowel will be level.

Drill a starter hole at the marking for each hook.

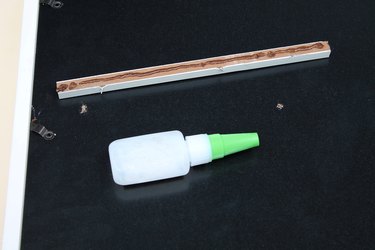
Check to see if the length of the screw on your hook is longer than the width of the back panel of the shadow box. To avoid the sharp end of the hook scratching the wall, add a piece of trim to add thickness for the screws. Drill the starter hole all the way through the panel. Turn the box over, and place a 1/4 inch piece of wood trim on top of the drilled holes. Place a line of quick-drying glue on the back of the trim, place it onto the panel, covering the drilled holes, and hold it firmly until the trim is secured. Turn the box right-side up and re-drill each hole into the trim.
Screw the hooks into the holes and place the dowel inside of the two hooks.
Step 8: Finish the Jewelry Holder
Turn the shadow box over and attach picture hanging hardware if the shadow box does not already have it. Screw a D-ring into each side of the frame, no more than 1/3 of the way down the total length of the frame. Cut a piece of wire 1 1/2 to 2 times as long as the width of the frame. Loop each end of the wire through the D-ring and wrap the extra wire around itself several times. Pull the wire up at the center to make sure it does not extend past the top of the frame.

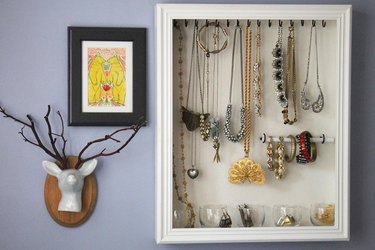
Your shadow box is now ready to display your jewelry collection.
Tip
To decorate the shadow box, cover the back panel of the box with fabric, or spray paint the frame to match your home's decor.
Warning
Use caution when using the power drill, hand saw and glue gun. Each tool can cause injury.