Carpet tape with decorative cord trim along one edge is readily available premade, but the limited availability of colors and styles doesn't always work with the endless array of patterns and colors present in carpet. Make your own with decorative upholstery cord and use it to finish frayed area rugs or transform carpet remnants into professional-looking floor coverings. Choose upholstery trim the same height as the carpet; a higher-pile rug requires more substantial trim.
Prepping the Carpet
Video of the Day
Step 1
Place the rug face down over a scrap piece of plywood and clear the area around it, allowing for a 3-foot perimeter to work in. If desired, set the plywood over sawhorses.
Video of the Day
Step 2
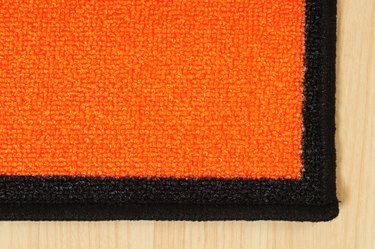
Trim all four edges of the rug. Using a metal straightedge as a guide, cut through the backing with a utility knife outfitted with a new razor blade. Flip the rug over and snip away any loose threads with sharp shears.
Step 3
Measure the total perimeter of the rug and add 6 inches. Cut a wide piece of carpet tape and flat-back upholstery cord this length.
Creating the Tape
Step 1
Lay the tape horizontally on a flat surface. Carefully peel up the backing along the side closest to you, folding it over to expose one long edge of adhesive about the same width as the upholstery trim. Crease the fold to keep it in place; if this doesn't work, secure the fold with two small pieces of low-tack painter's tape or weigh it down with a book or tool.
Step 2
Roll up the upholstery trim so that the back is on the outside and the good edge is rolled inward. Line up the left end of the roll of trim with the left end of the exposed adhesive. Working your way to the right, press the cord onto the carpet tape along the edge, unrolling the trim and pressing it into the flat tape slowly as you move toward the opposite, right side of the tape. Take care to line up the edges of the two products and fix any mistakes as they occur before the adhesive on the carpet tape sets.
Step 3
Trim the new decorative carpet tape, about 1/4 inch on both ends, to create clean, flush edges.
Decorating the Rug
Step 1
Position one end of the carpet tape under the middle of one side edge of the carpet. Peel off a portion of the tape's backing. Press the tape onto the back of the carpet, lining up the cord with the edge of the carpet. Peel off the backing in small sections as you work to prevent the tape from sticking to itself or the work surface as you attach it.
Step 2
Work your way around the carpet. When you come to a corner, snip the tape just up to the cord and then bend the carpet tape around the corner. Stop when you reach your initial starting point.
Step 3
Trim the end of the carpet tape to create a snug seam between the two ends. Seal the seam with a bead of hot glue applied to the cut ends of the trim.
Step 4
Run a thin bead of glue around the perimeter of the rug between the cord and the rug fibers. Press the cord against the rug as you work; for long sections, a scrap piece of lumber pushed against the cording streamlines the process. Let the glue dry completely before placing the rug back on the floor.