Things You'll Need
Measuring tape
Calculator
Shingles
Plywood, 3 feet wide
2-inch by 6-inch lumber
Yardstick
Circular saw
Sawhorses (2)
Roofing nails, galvanized
Hammer or pneumatic nailing gun with compressor
Pencil
Chalk line
Metal cap or cone
Construction adhesive
Caulking gun
Roof caulking
Finial (optional)
Crayon
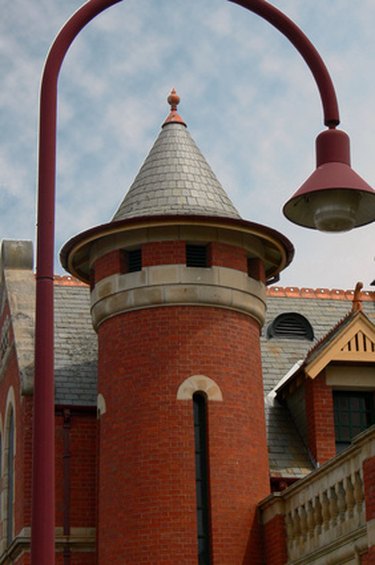
A traditional roof containing a conical or turret tower can be a challenge for the roofer accustomed to working with straight angles and sides. A simple pitched roof has at least two sides and a hip roof has four. The round or turret style roof is basically a hip roof with an infinite number of sides.To cover a turret, you must determine its rafter length, the diameter of the cone and the dimension of the widest piece of roofing material you will be using. Whether your shingles are asphalt, cedar shake or TPO rubber, the calculation, cutting and laying remains the same.
Calculations
Step 1
Measure the rafter length, cone diameter and the widest piece of roofing tile you plan to use.
Video of the Day
Step 2
Multiply the diameter of the cone by 3.14 to determine the distance around the perimeter of the cone at its base. If the diameter is 20 feet, the perimeter will be 62.8 feet. If the width of your shingle or tile is 1 foot, you would need 63 pieces in each row to go around the cone. The pieces will change in shape and become narrower as you move from the bottom row to the final row at the top.
Step 3
Place several pieces of 3-foot-wide plywood abutting each another to form a column on the floor. Measure and find the center point of the column at the base. Mark the point with your pencil. If your rafters are 15 feet long, measure 15 feet up from the midpoint of the base and mark the spot with a pencil.
Step 4
Measure 6 inches to the right of the center point at the bottom and 6 inches to the left. Mark each point with your pencil. This represents the length of your roofing shingle: 12 inches or 1 foot.
Step 5
Place the start of your chalkline 15 feet up the board at the place you marked earlier. Run your chalkline down to the 6-inch mark to the left of center at the base. Snap the line to mark the angle. Repeat on the right side of center. You will now have a triangular template to use to cut your shingles.
Preparing and Installing the Shingles
Step 1
Cut the template from the plywood using a circular saw. Mount the pieces to a piece of 2-inch by 6-inch lumber and place the template between two sawhorses. The bottom of the template is the bottom of the shingles, including the overhang. Place one shingle at the base. Mark the top point of the shingle where the next row of shingles would be placed.
Continue marking to the pointed top of the triangle. Use your yardstick to draw a line from edge to edge of the template at the places you marked.
Step 2
Cut 63 shingles for each row using the template as a guide for shape. Move up the template to cut 63 shingles for the second row. Each row will have 63 shingles that become narrower as you move up the cone. Mark the reverse side of each row of shingles with a crayon, marking its position on the cone. For instance, number 1 represents the base row, number 2 the next row, and so on up the cone. Bundle the shapes cut according to number.
Step 3
Nail number 1 shapes at the base of the turret, allowing 3 inches of overhang. Circle the cone until all number 1 shingles are installed. Stagger the second row with the first and nail all of the number 2 shingles around the cone. Continue the pattern to the top of the turret until all of the shingle shapes have been used.
Step 4
Place a metal cap or cone at the top of the turret and cement it into place using construction adhesive. Seal the cap or cone with roof caulking. Add a finial to the cap or cone if desired.
Tip
Install scaffolding on the roof to make roofing the turret safer and easier.
Warning
Wear safety footwear, glasses and gloves when handling roofing materials or using a pneumatic nailing gun.
Hammer footholds into the roof to make inclines safer for working.
Video of the Day