Tung oil has long been one of the most popular wood finishes for furniture and other indoor woodworking projects. Derived from the tung tree, tung oil soaks into wood to do two things: create a protective, water-resistant finish and highlight the wood's unique grain pattern with a subtle stain. But tung oil alone won't save a wooden piece from damage due to water, scratches, and spills. Applying a layer of polyurethane over tung oil creates a durable protective coating so you can wipe wood clean when necessary.
Before Getting Started
Video of the Day
Applying tung oil and polyurethane should be the last steps in your wood refinishing project. Make sure you've completely stripped paint or stain from the wood and that it's well sanded. Wipe away any dust so it doesn't get trapped in the layers of tung oil you're about to apply.
Video of the Day
Also, be prepared for a multiweek project. You shouldn't varnish over oiled wood until the oil has completely dried. Each layer must dry individually, and then the oiled piece needs time to cure before the polyurethane is added.
Things You'll Need
Paint stir stick, dowel, or clean plastic hanger
How to Refinish With Tung Oil and Polyurethane
Step 1: Apply a First Layer of Tung Oil
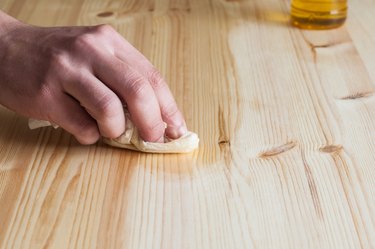
Pour a tablespoon or two of tung oil directly onto the wood. Use a lint-free cloth to gently rub the oil all over the surface of the wood. Wait at least 10 minutes to let as much of the oil soak into the wood as possible and then wipe away any excess with the cloth.
Wait for the surface to feel dry before adding the next layer. Tung oil dries slowly. Depending on the humidity and the brand of tung oil that you're using, you may need to wait 24 hours or more between coats.
Step 2: Apply More Layers of Tung Oil
Pour more oil onto the wood. This time, use a piece of fine-grit sandpaper to work the oil into the wood. This strategy should push oil into the wood and help you maintain a smooth surface at the same time. Again, let the oil soak into the wood for at least 10 minutes before wiping away any excess.
Step 3: Repeat Until You're Satisfied
Keep applying more layers of tung oil until you're happy with the color and sheen you've achieved. You could stop after two or three layers if you're pressed for time or do as many as five or six layers if you prefer a richer, darker stain.
Step 4: Let the Tung Oil Cure
Allow the oiled wood to dry until it doesn't feel tacky to the touch. This will take at least several days or a week or more. Wipe away any oil that pools on the surface during this time.
Step 5: Stir the Polyurethane
Open the polyurethane can and stir the contents gently with a paint stir stick, dowel, or clean plastic hanger. Make sure the stirrer touches the bottom of the can so all the contents are well combined. Don't shake the polyurethane, as this may introduce bubbles.
Tip
What type of polyurethane finish should you use for this project: satin, gloss, or semigloss? This choice really comes down to personal preference. Go with gloss if you like a shiny finish that reflects light, satin if you prefer a matte finish, or semigloss if you want to split the difference.
Step 6: Apply the Polyurethane
Apply a thin layer of polyurethane to the wood. Use a brush if you're working with a flat surface, like a wooden table, or a cloth to apply it to a curved surface, like chair legs. Cover the wood with polyurethane using long, even strokes. Let the wood dry for at least a few hours; check package directions for specific guidance about drying time.
Step 7: Sand the Surface
Once the first layer of polyurethane is completely dry, sand the wood with fine-grit sandpaper. Use a clean, lint-free cloth to remove any dust.
Step 8: Apply a Second Coat of Polyurethane
Wipe or brush on a second layer of polyurethane. Let the wood dry completely, following package directions. There's no need to sand after this final coat.