Things You'll Need
Ceramic clay
Water
Lead-free ceramic glaze
Paintbrush
Kiln
A charmingly rustic set of dinnerware can be created without a pottery wheel by using the coil-and-pinch pot method of pottery making. A set of these dishes and matching mugs can be created at home with no special supplies, but a kiln is necessary to fire the pottery, which will make it suitable for eating from. Look for area pottery studios or art schools, which will often let you fire your items for a small charge.
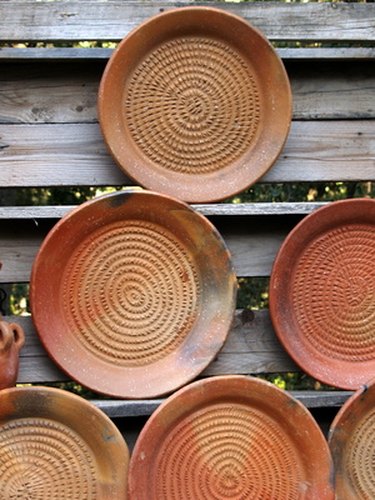
Pottery Plates
Step 1
Wet your hands with water. Knead the ceramic clay by pushing the clay with the heel of your hand for at least 20 minutes to remove all air bubbles. When the clay is smooth and pliable, cover it with a damp cloth and let the clay rest for half an hour.
Video of the Day
Step 2
Roll the clay into long snakes that are a little bit thicker than the size of a pencil, rolling your hands with an even pressure.
Step 3
Coil the snakes in a circle, beginning at the center of the plate.
Step 4
Continue coiling until you have the desired plate size.
Step 5
Wet your hands with water and smooth the inside of the plate, pressing and pushing the coils gently to merge them into a smooth surface. Be careful not to create or leave air bubbles. Create a slight indentation at the center of the plate with a gentle motion of the hands.
Step 6
Smooth the edges of the plate with wet hands.
Step 7
Let the plate dry thoroughly for several days. Paint with ceramic glaze and bake in the kiln according to the manufacturer's instructions.
Pottery Drinking Glasses
Step 1
Wet hands and knead the clay for 20 minutes. Cover the clay and let it rest for half an hour.
Step 2
Roll a ball of clay to the size of a tennis ball.
Step 3
Push your thumb into the center of the clay ball.
Step 4
Pinch with your thumb and fingers to enlarge the center of the clay ball, turning as you pinch to maintain an even thickness.
Step 5
Pat the finished glass on a table to create a flat bottom. Turn the glass over and press it on the table to keep the top edge even.
Step 6
Let the glass dry thoroughly. Paint it with ceramic glaze and bake it in the kiln.
Warning
Ensure the glaze does not contain lead.
Video of the Day